OCLMS Documentation
Welcome
Thanks for your purchasing OCLMS (Our Team Thanks for your purchasing Oclms Project) Template.Although this template is very easy to customize, We provide you a simple but useful documentation for your problems with customization.
All About OCLMS:
Oc (Open cart) lms (learning management system) It is an educational platform where instructors and students achieve or share their knowledge or skills in a course-based system, and the admin has to manage the plugin system.
OCLMS provides the best user experience
Training in oclms is as below:
- Store products
- Online classes.
- Training courses that include: lessons, exams and homework.
- Course exams.
Oclms is usefull for:
- Schools
- Colleges
- Universities
- Student who interested in online classes
- Instructors who are interested in online education
- Other educational institutions etc
Users of OCLMS:
- Students : those who are want to increase their knowledge, Also student can role az instructor and share their knolwlage.
- Instructors : those who want to share their knowledge with others and earn money
- Admin: Manages and implements all components of the site, users and instructors
A description of the performance and amount of access of each is below :
Admin: The admin must manage the entire system to run the program. Below are some examples
- configuration setting
- add, edit, enable or disable products
- add or edit offline and online courses
- add or edit Exam
- add lesson to courses
- mange students and instructors
- manage instructors dashboard, products,customers and orders
- access to instructor incomes
- access to instructor transactions
- create question bank for exam
- create exam for using in exam product and course lessons
- view and download student homeworks
- mange files and images
Instructor :
- view information from dashboard
- add or edit products
- add or edit offline and online courses
- add or edit Exam
- add lesson to courses
- view student Activities
- create question bank for exam
- create exam for using in exam product and course lessons
- view and download student homeworks
- manage Downloadable files
- mange files and images
- view transactions
- mange students
Students :
- purchase products
- Participate in offline and online courses
- participate in exams
- access to course lessons in their own account and do exam and homeworks
- see the result of exams
- become an instructor
How OCLMS works ?
Oclms generally works with three types of users. Admins, instructors, and students
Installation:
OCLMS purpose is to provide the best user experience. All you have to do is follow the steps below
The first thing you need to do is buy and download Oclms from https://themeforest.net Then follow the instruction , install Oclms on your CPanel.
Admin
configuration:
After installation you must configure the oclms module for your website. Then, to launch this program you must to adjust all the initial settings to suit your needs.
Create product, course or test:
After installation and setup, All Oclms facilities are available to you, Instructor can easily register and ready to construct a course or product to distribute.also Admin can easily add their specialized products and courses for sale.
Enroll and Sales:
an instructor is ready to give his lesson after creating the course The course can then be purchased and enrolled in by students and others . Students can also act as instructors and sell their products and courses.
How to install OCLMS:
Please follow the below steps to complete the installation process.
- Install opencart on your server from (downloading opencart).
- Unzip the Oclms Module file that you downloaded from here
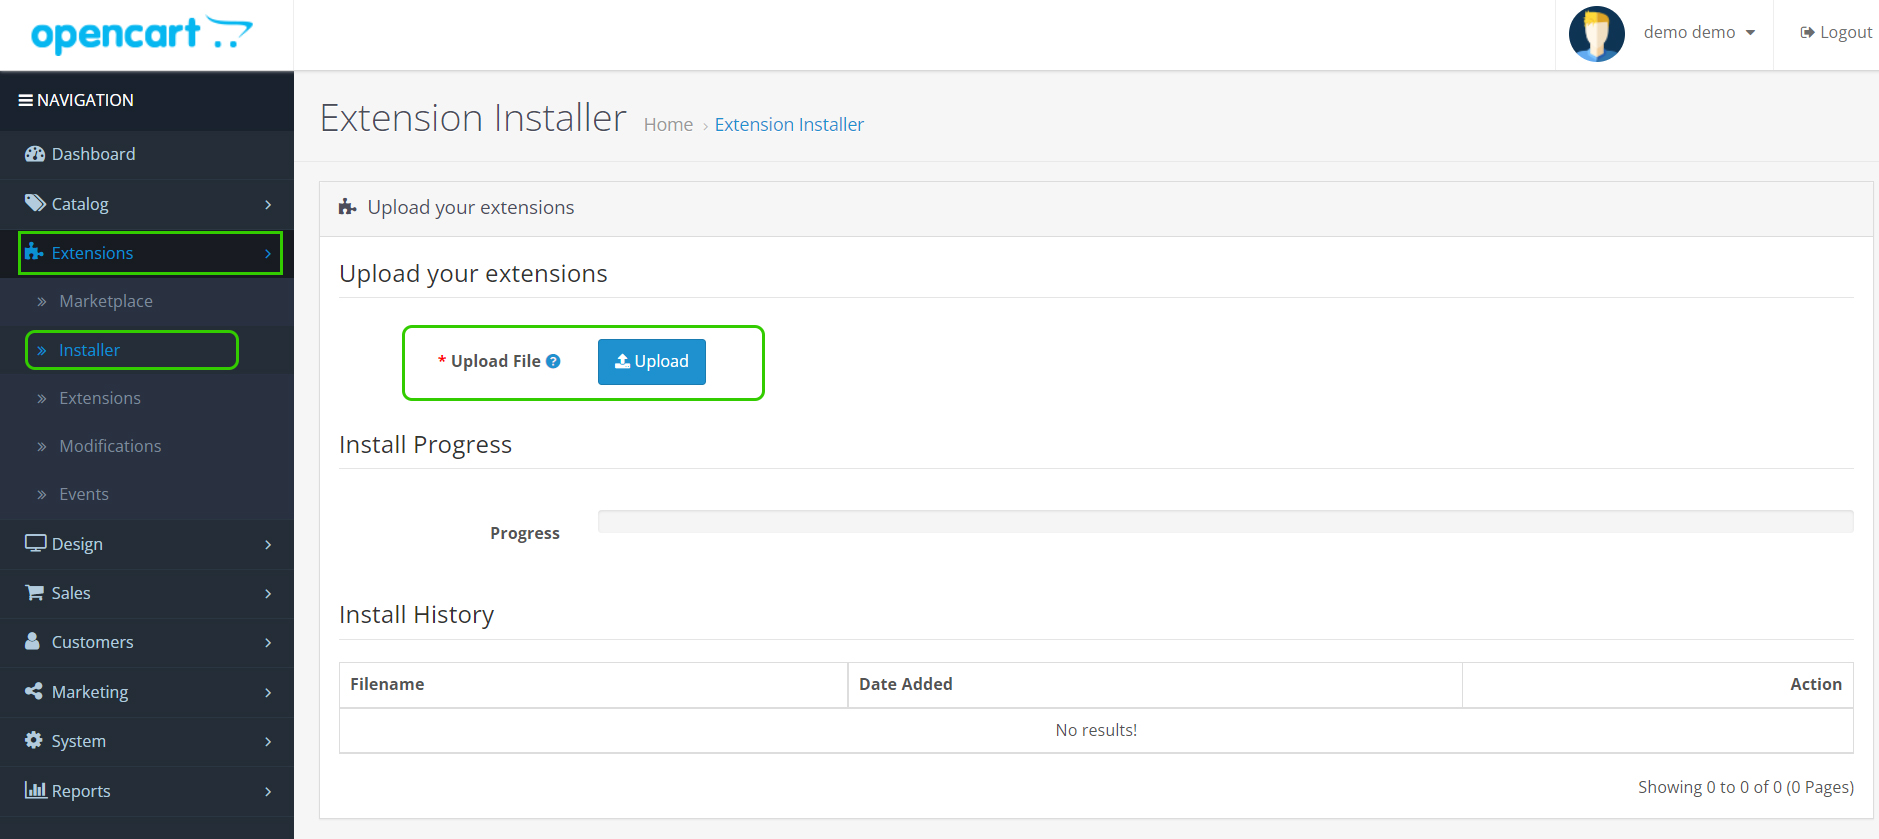
- Open the admin panel in your browser
- After entering the admin panel , from the left menu selecting the installer from the extensions tab subsets
- Click on the upload button.
- Go to the oclms folder and doubleclick on install.ocmod.zip file and waite for complete the progressbar.
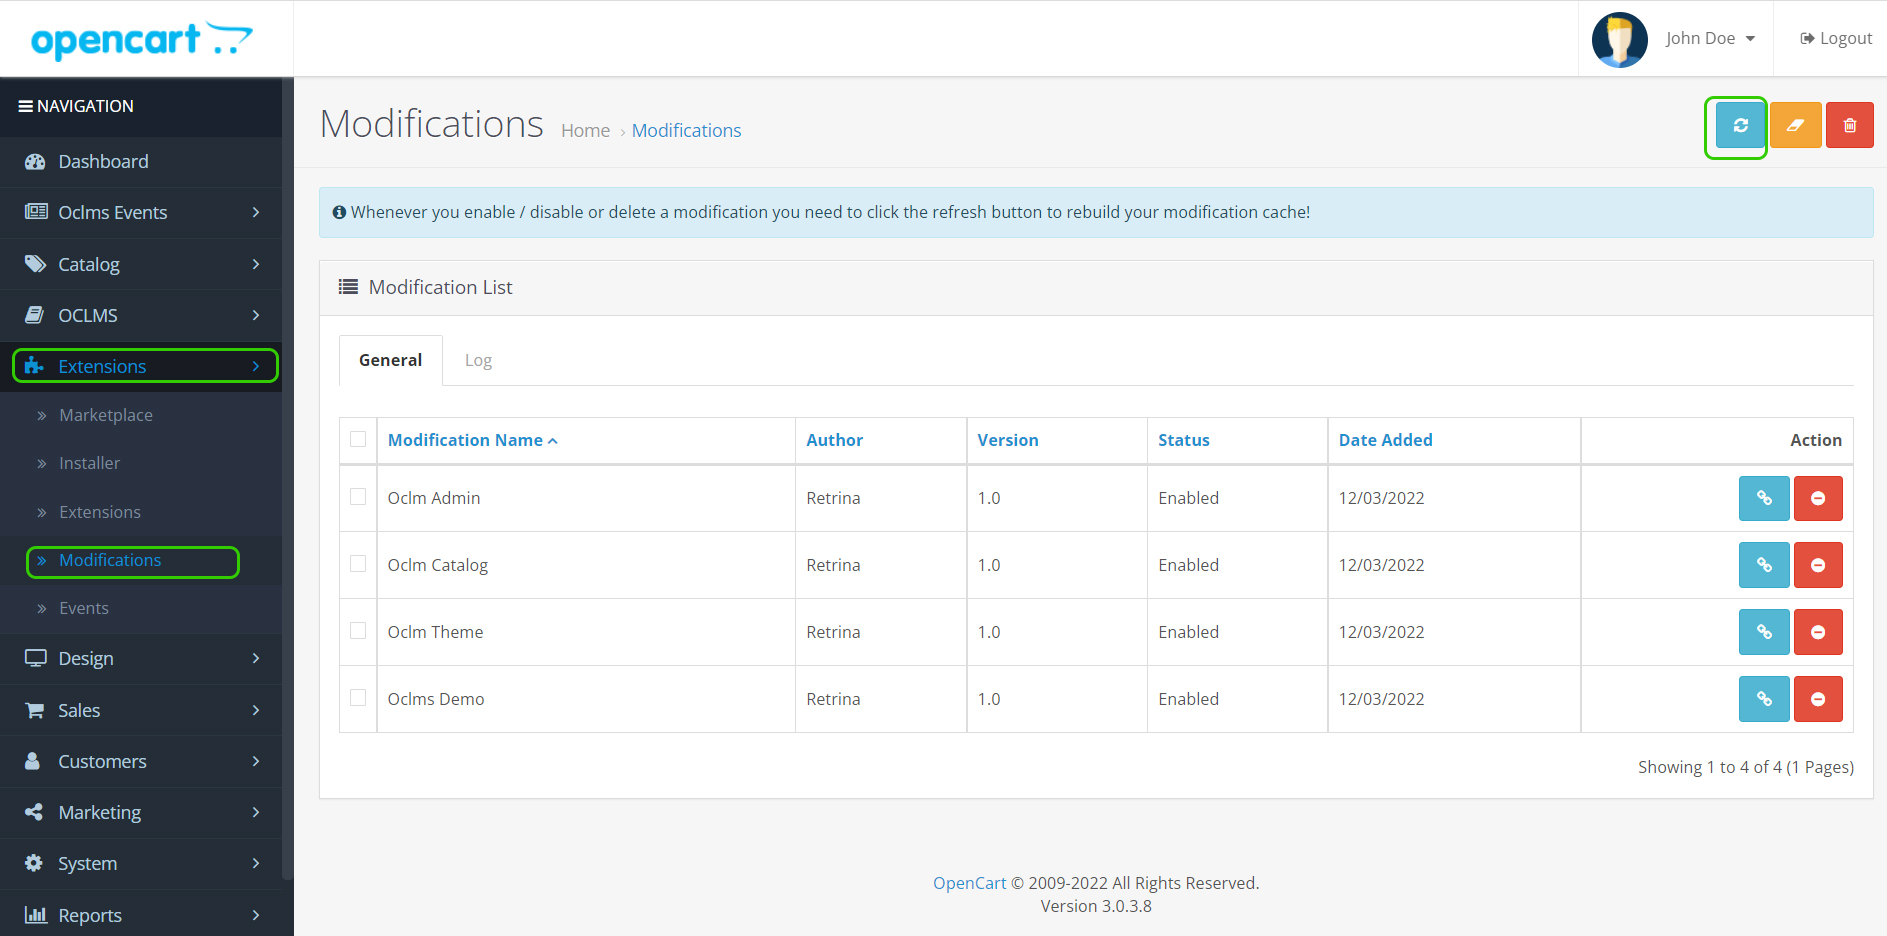
- from the left menu selecting the modification from the extensions tab subsets then select the refresh button in that page
From the left menu selecting the extensions from the extensions tab subsets
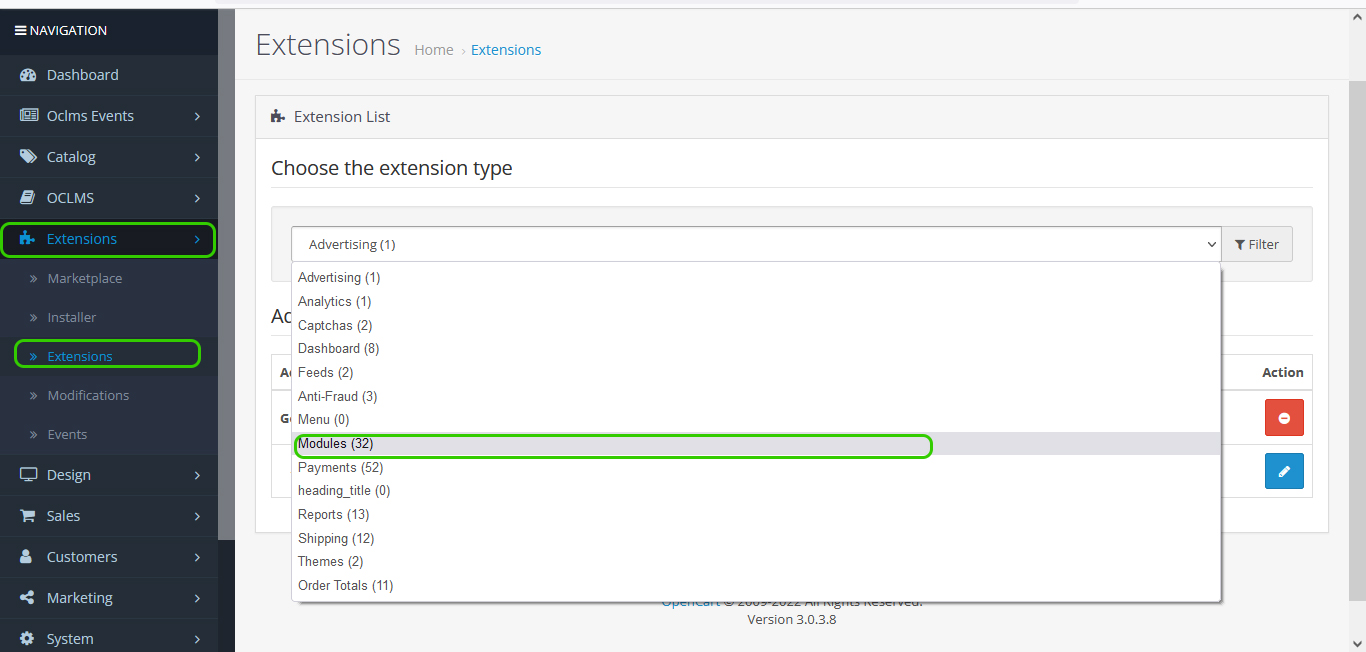
After selecting the modules option choose the install button (a green button with + sign) from action column to install module.After installing the module, color of the button changes from green to red and edit button will be actived.
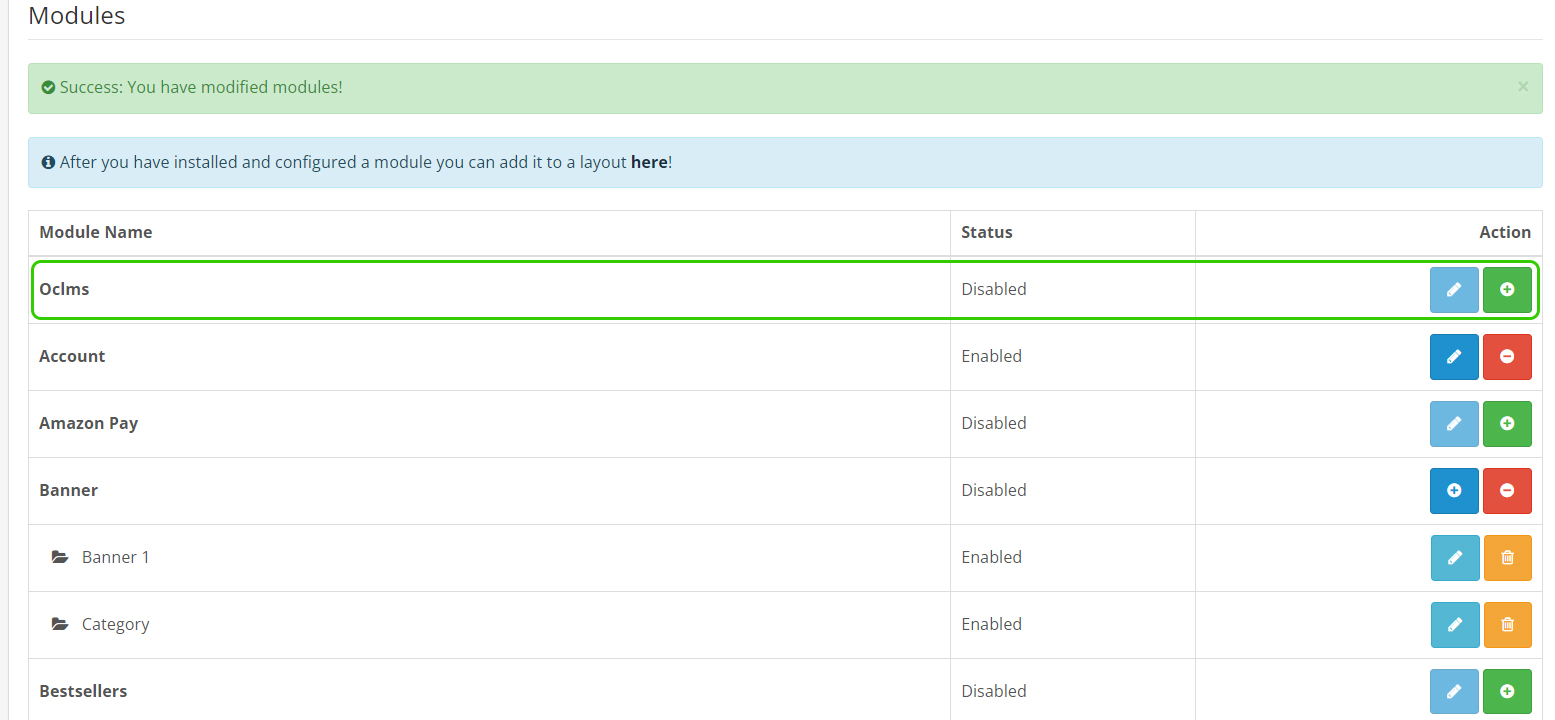
after Pressing the edit button dashboard page will opens.
In Admin Panel Go to System / Users / USerGroup and edit administrator and select all the Permissons and Save Changes.
If you rather to install our themes. After purchase themes from themeforest click on install theme tab in column left of sidemenu or click here.
OCLMS Dashboard :
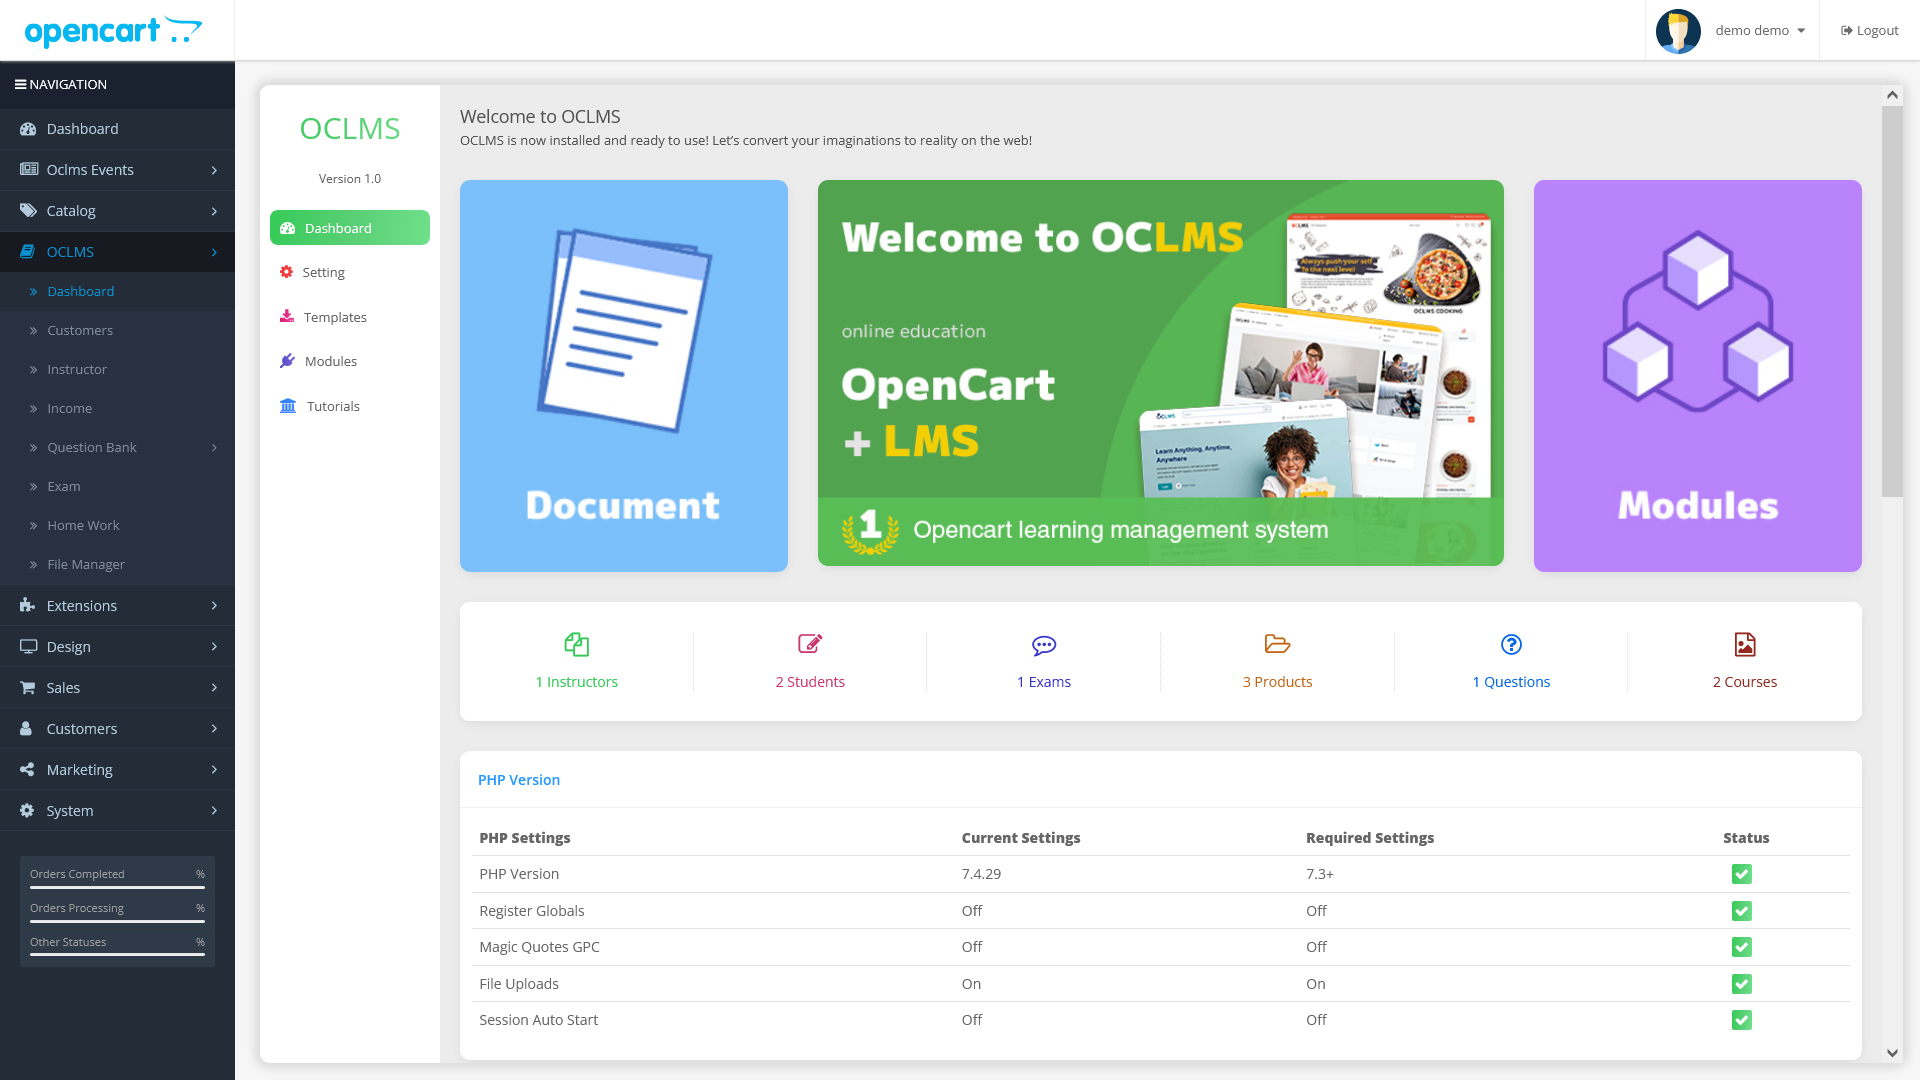
On the oclms dashboard you have access to all the information you need to know about oclms.
you can set your setting on setting tab on the dashboard left menu as bellow.
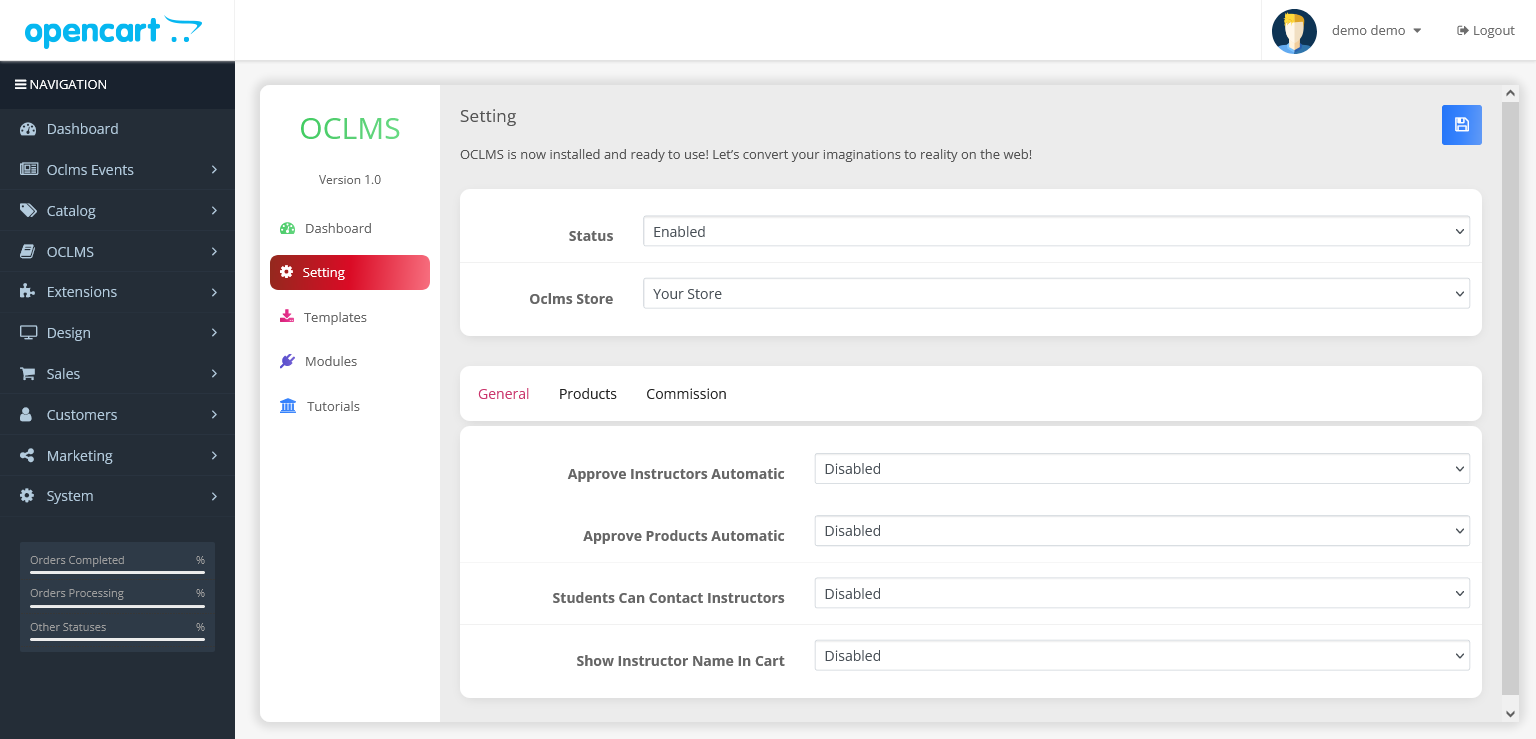
on this page you can enable or disable oclms, select your store for oclms, set your custom setting, change access to product form and set commission for instructors.
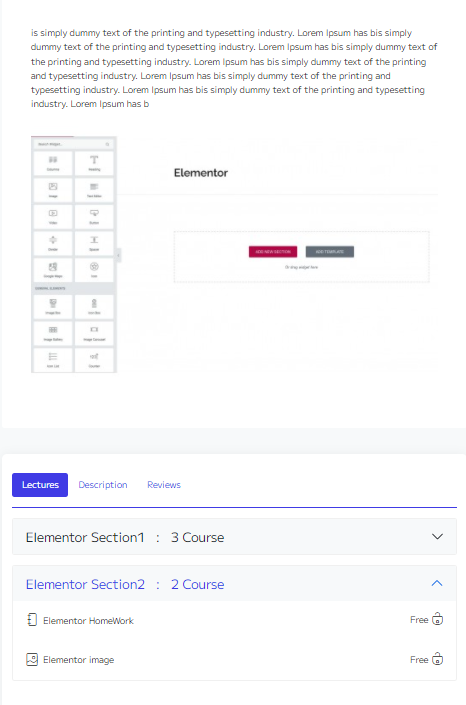
on the next tab that named templates you can see your installed themes and you can enable/disable and update your themes. and also you can buy new oclms themes from themforest.
you can see templates page below.

next tab shows oclms modules as below.
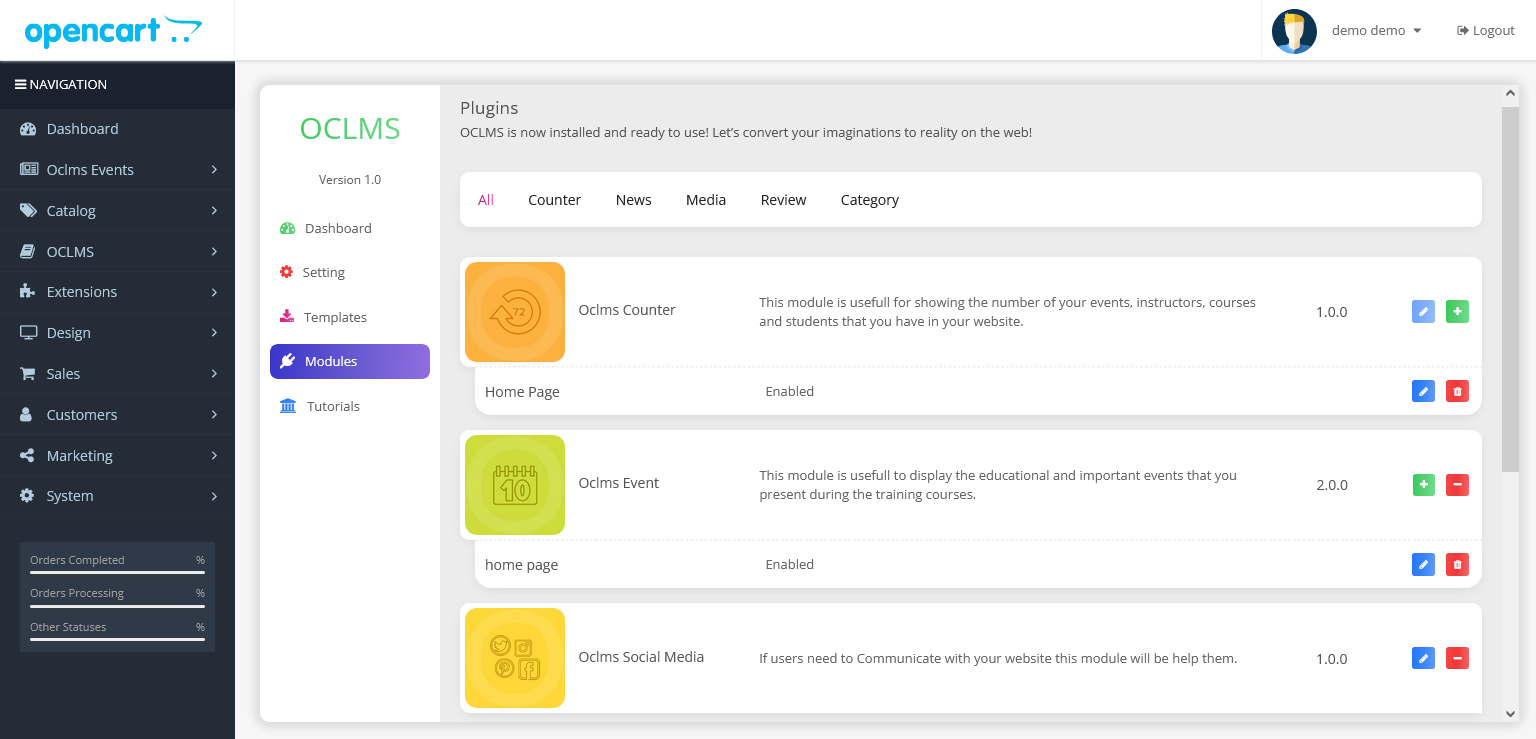
you can install,uninstall and edit oclms modules imported by you themes.
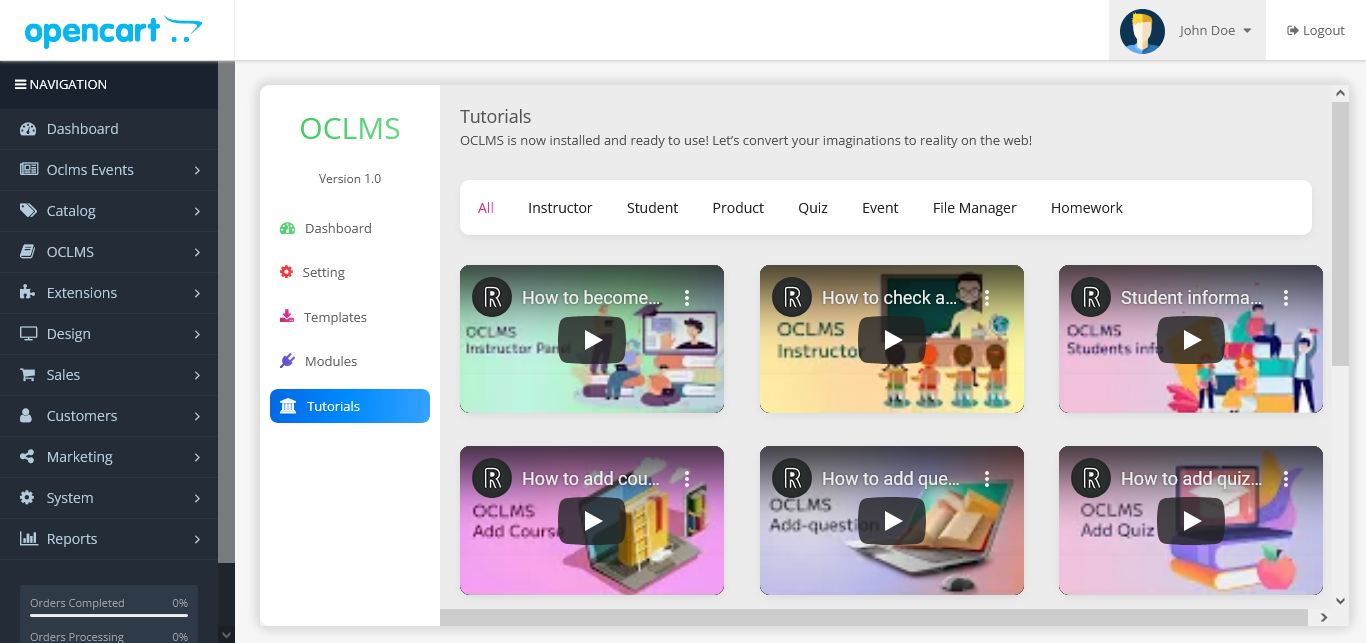
next tab shows oclms video tutorial for teaching you how to use oclms. you can see tutorials page below.
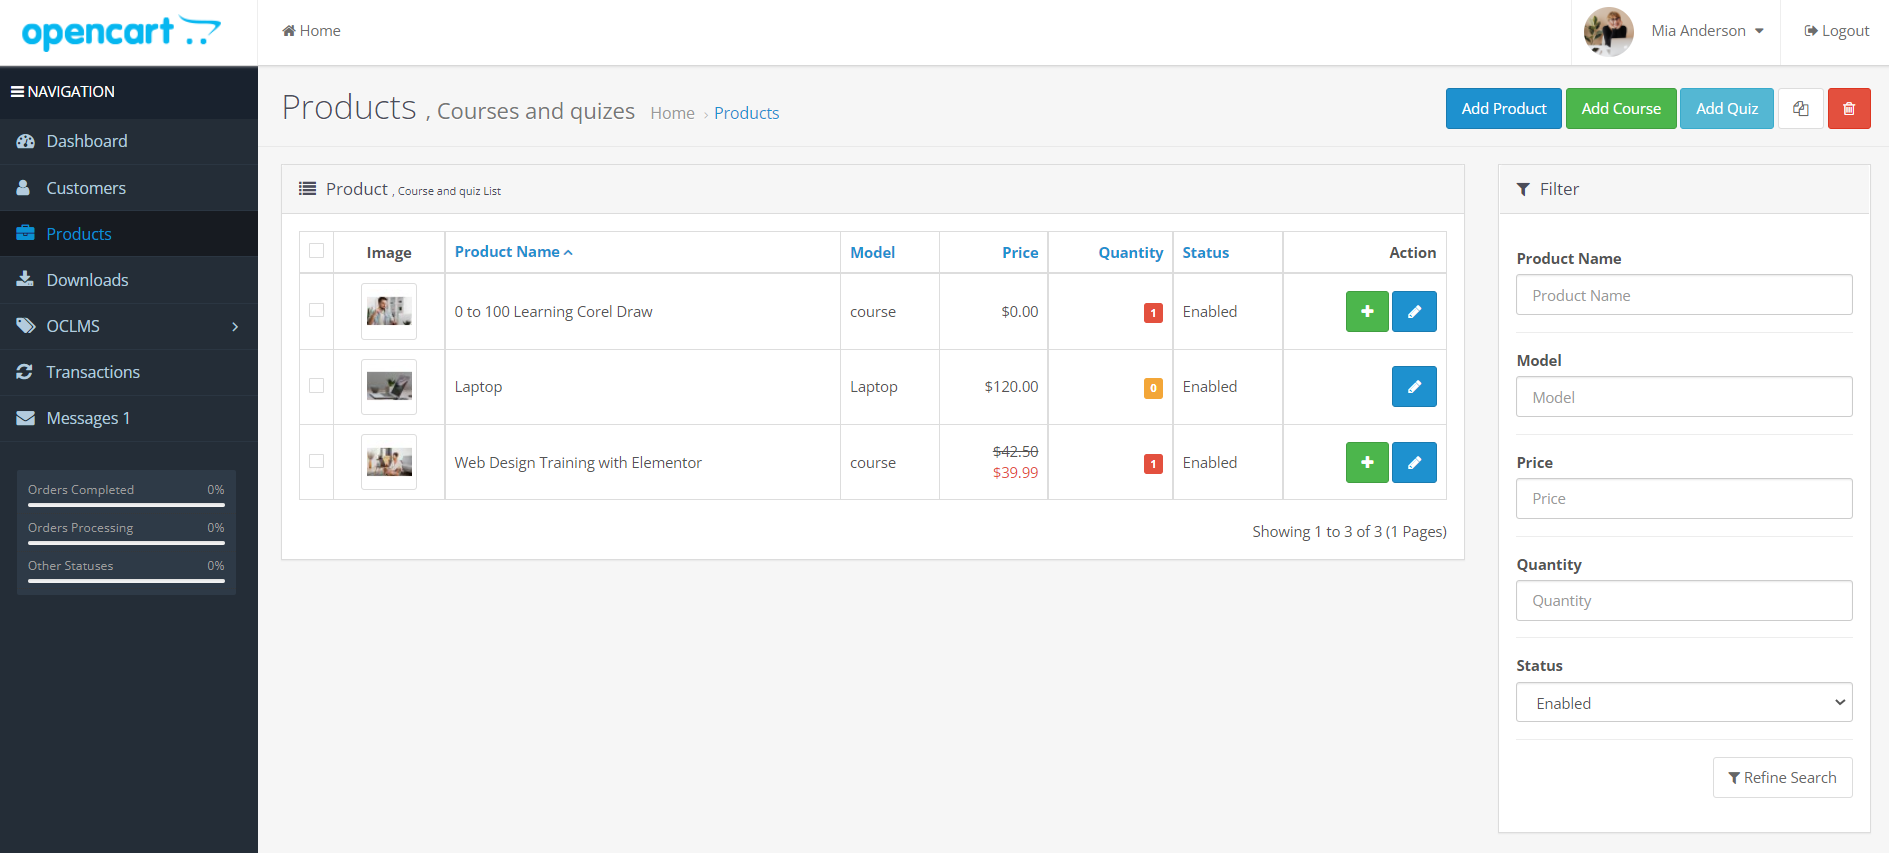
Product List:
three product models can be added within the site.(Products,Courses,Quizes)
- Product : There are products that can be sold and sent to the customer after registering the order.
- Courses : There are products that are offered as a training course and can be offered online or offline.
- Quizes : There are tests that include one or more exams and are sold on the site.
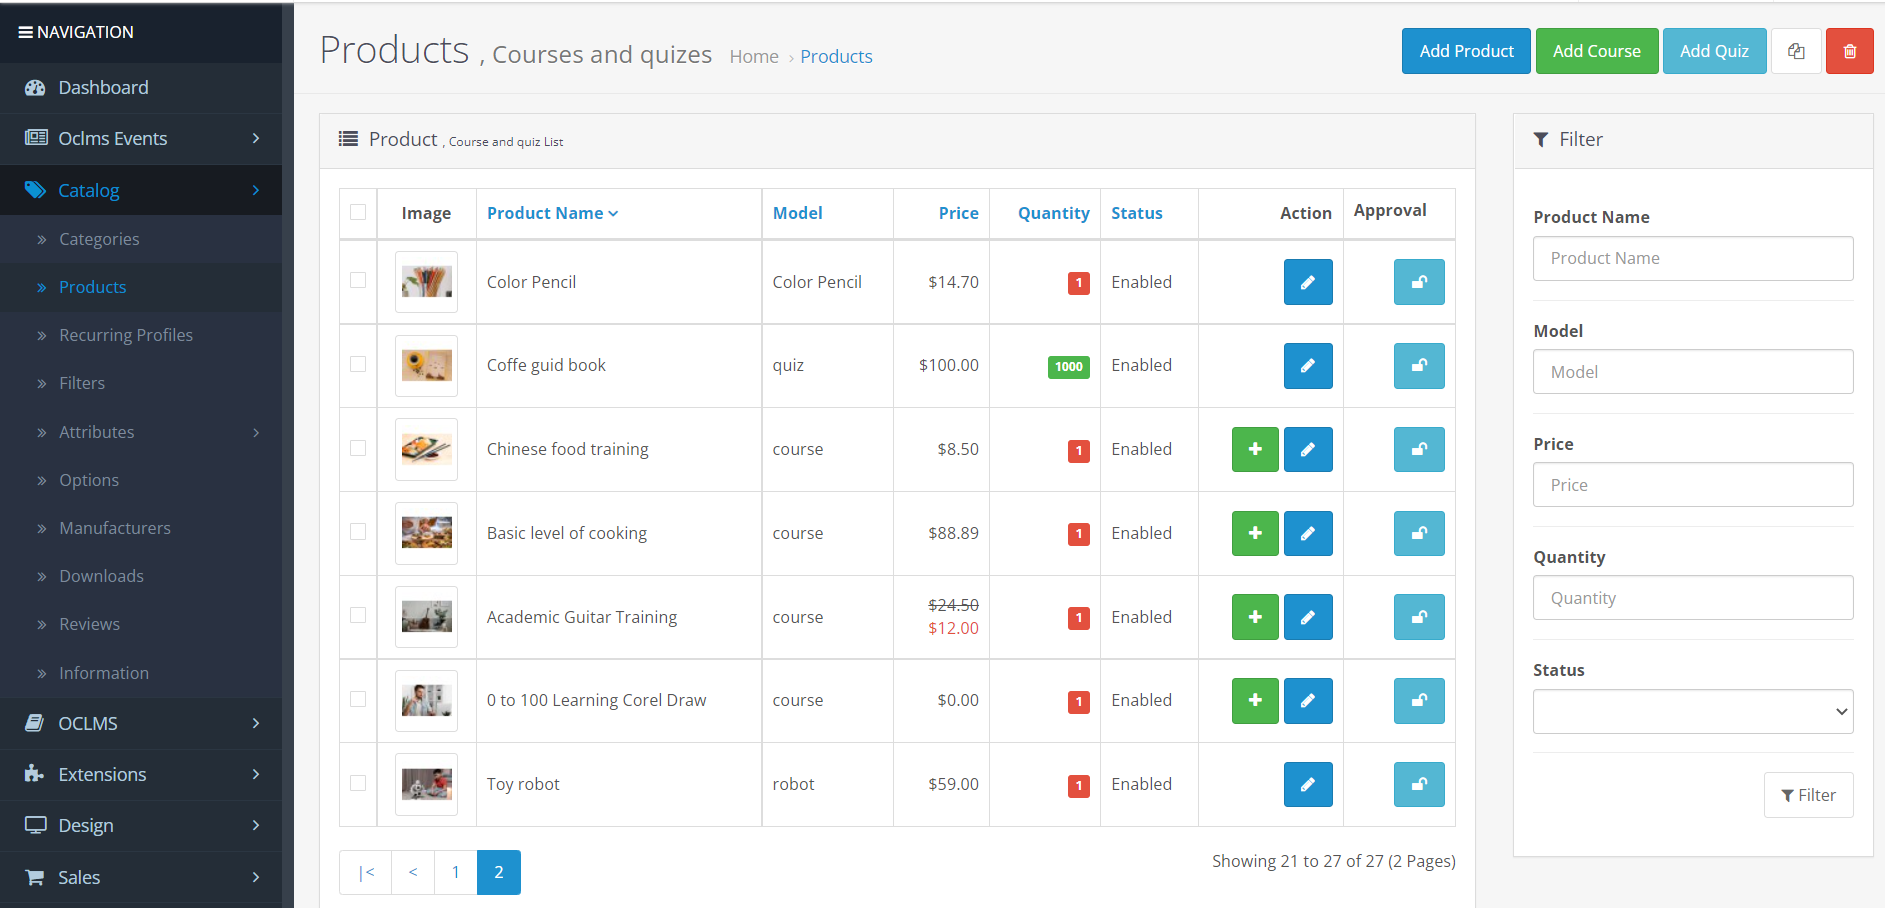
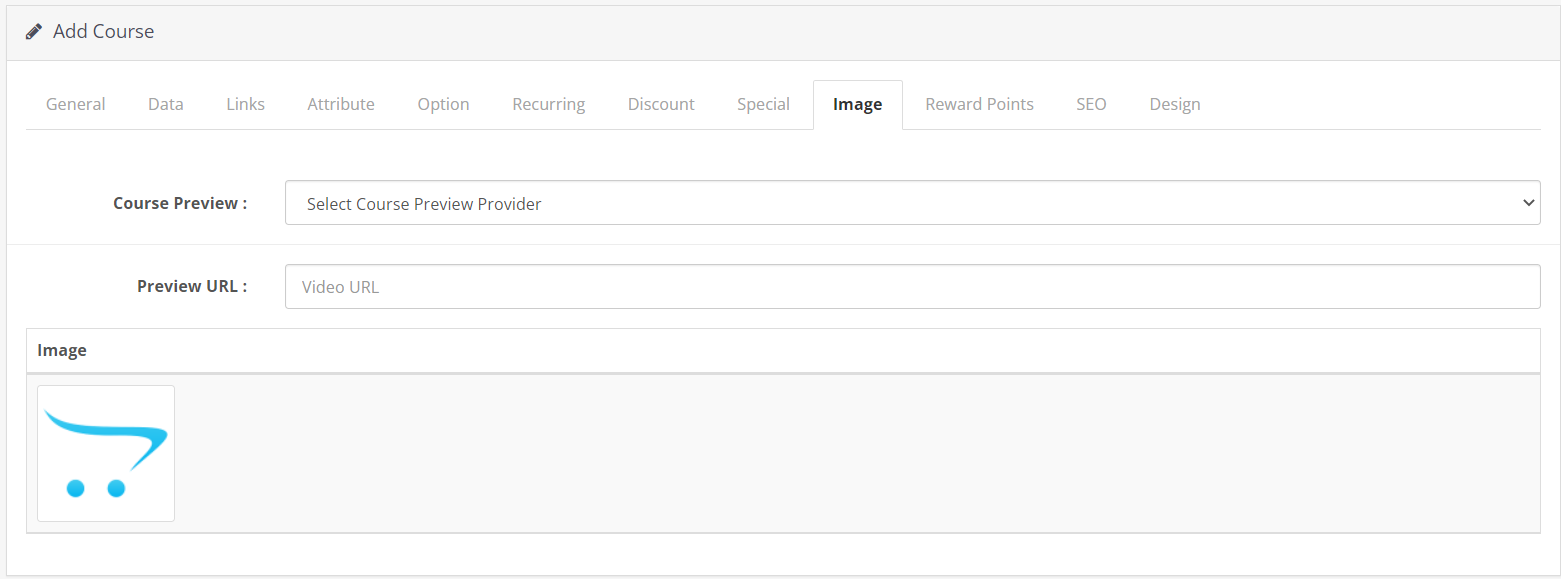
A number of features for educational(course product) and test products have been added to the product form
For example, when adding a course product, in the image tab, you can add a video preview to your course, which is as shown below.
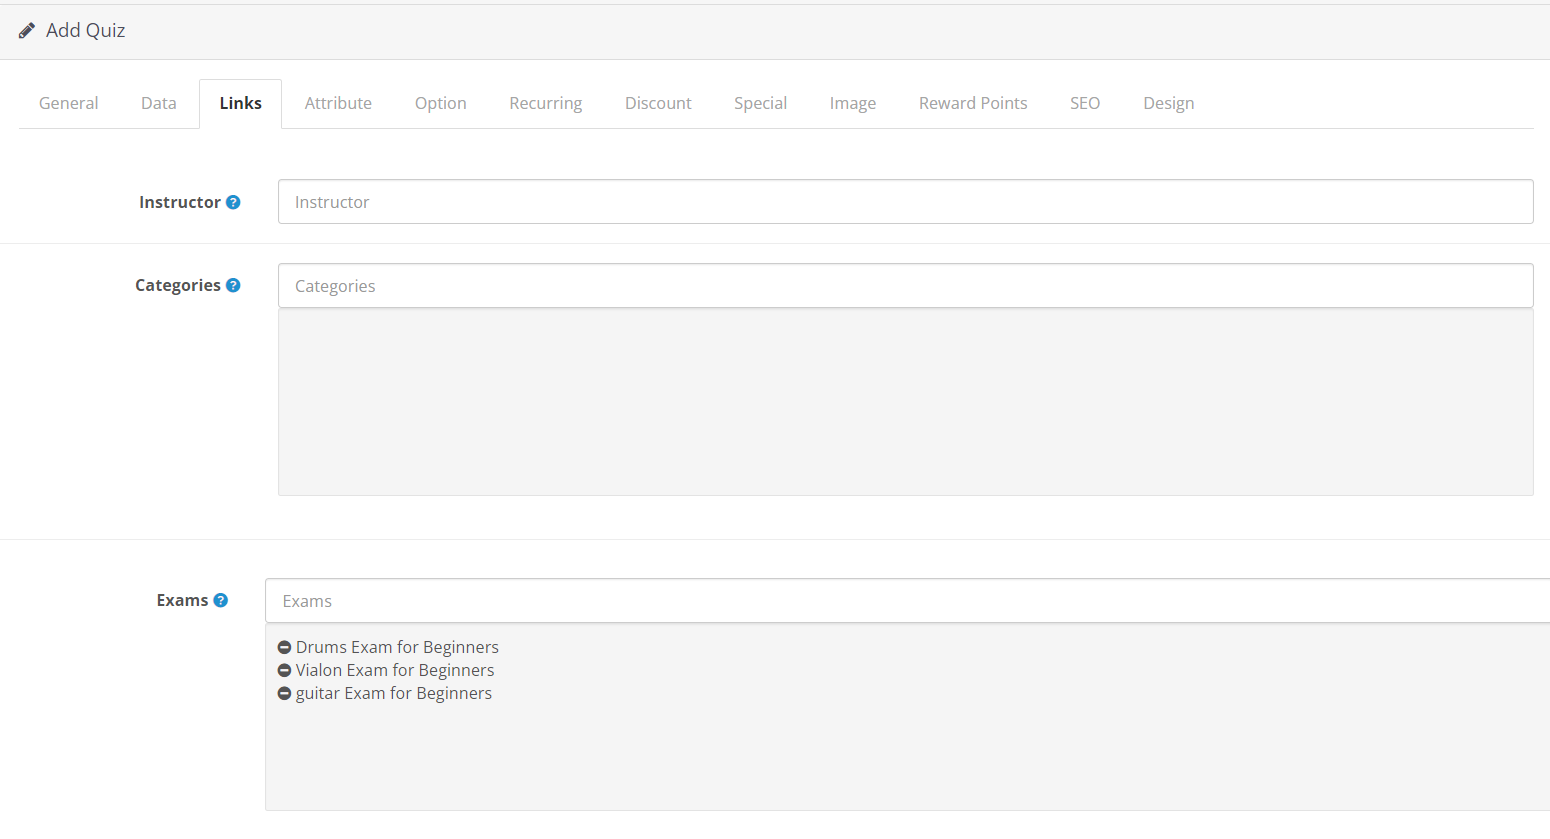
And when adding an exam product, in the links tab, an entry is placed like the image below, and you can select the Favorite exam from the exam list and sell it as a product.
After adding a course, the add lesson button is added to the course row (a green button with a + sign) .
After clicking on the addlesson button, you will enter the following page
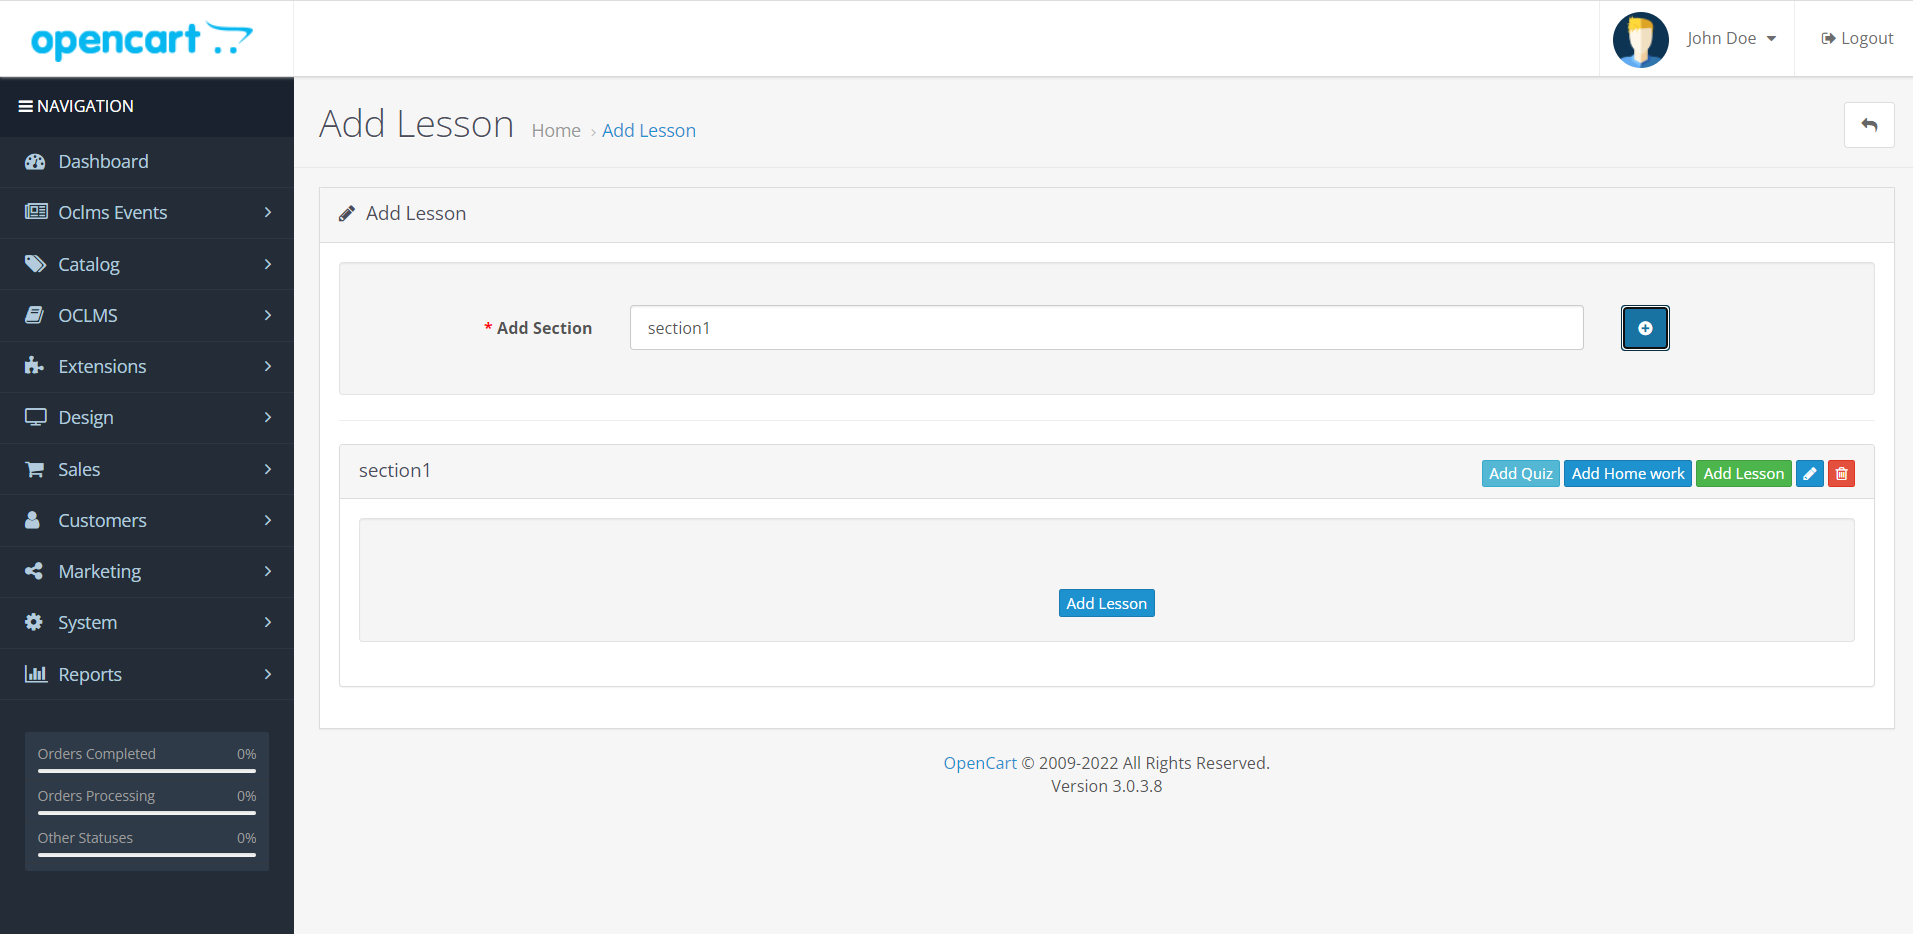
Each course can contain several sections and each section can include several lessons, exams and homework.
To add a section in the add section, write the name that you want and click the + button.
There are three buttons in the box for each section.
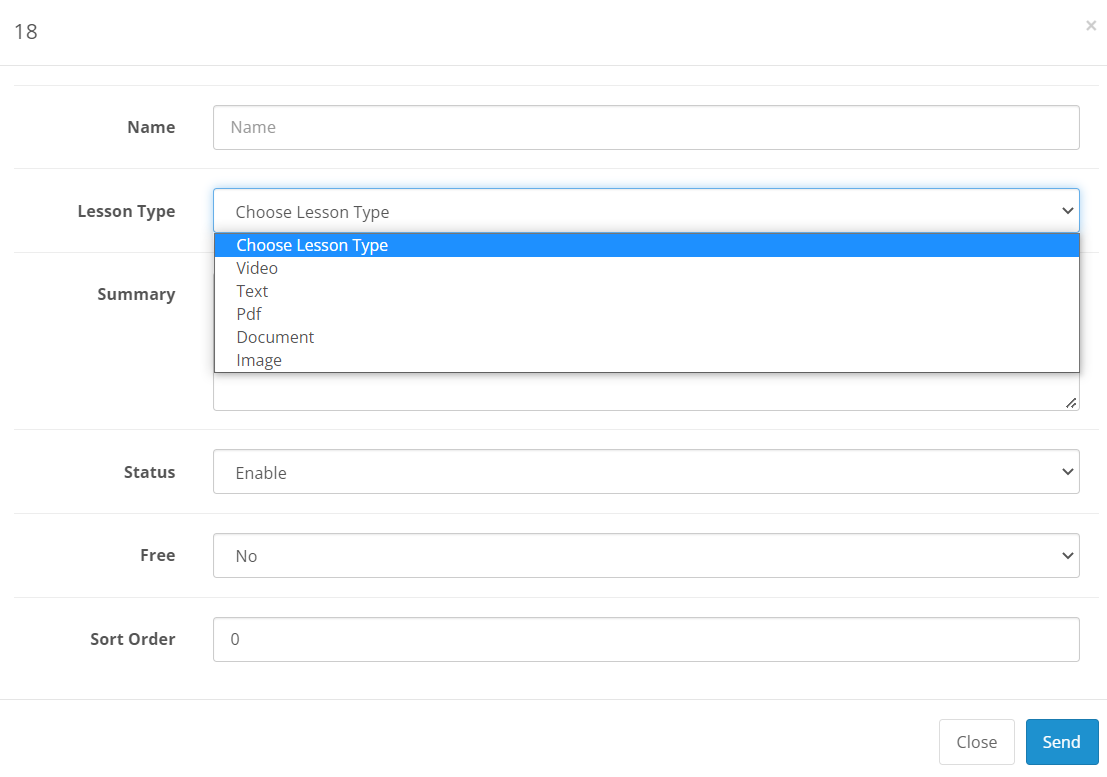
1.AddLesson : Lessons can contain several types of files
- Video : Which can be youtube, vimeo, html5 videos
- Pdf,document: Calls the files in the downloads section
- Image : Uploads photos to the project filemanager.
After clicking on the addlesson button, the following box will open:
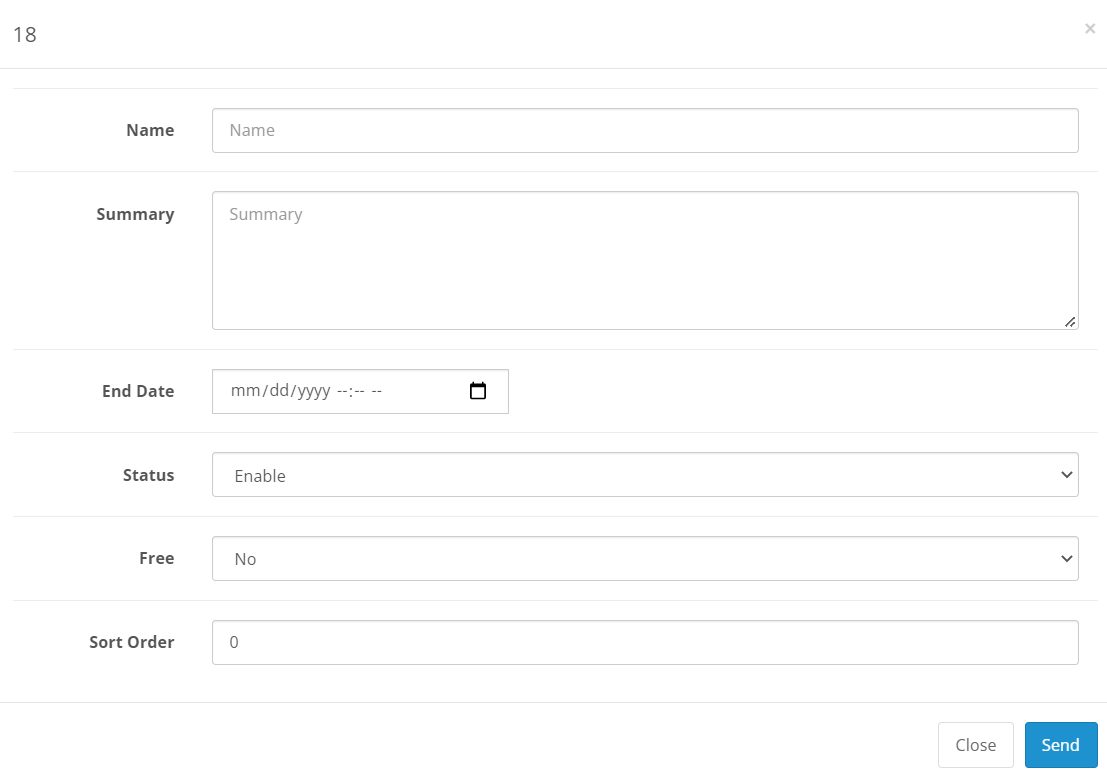
2.AddHomework : ou can define a set of homework for each course for students to do and register in their account as a description or pdf file and you can watch.
After clicking on the addhomework button, the following box will open:

You can enter the title homework in the summary field and specify the end date of homework in the enddate field so that students can't submit their homework after that date.
3.AddQuiz : You can define different quizes so that your students can do them and the result will be displayed to you.
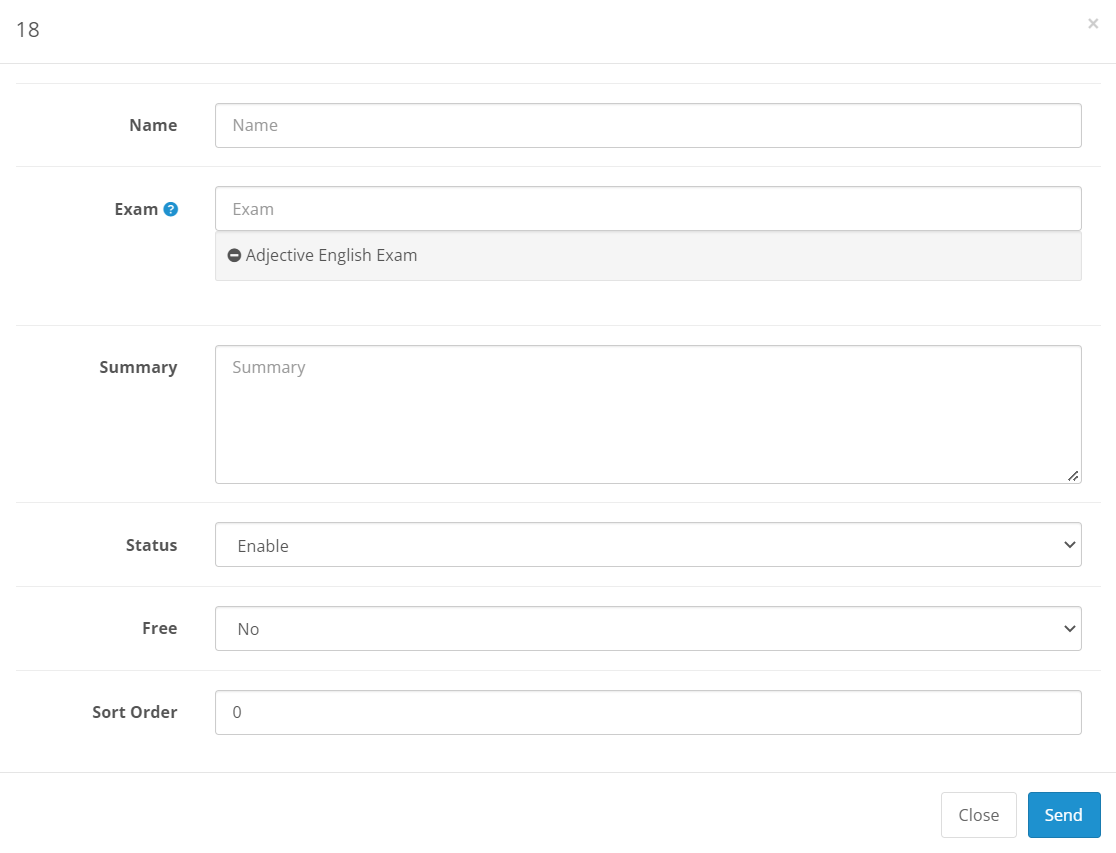
In this section, by clicking on the exam section, the exam list stored on the site will be displayed, and you can select one of the exams to be displayed in the students' account and to be able to participate in that exam.
Oclms submenus
The oclms menu shows all the features added by oclms
- Customers
- Instructors
- Income
- Question bank
- question category
- questions
- Import question
- Exam
- Homework
- File manager

Customers :
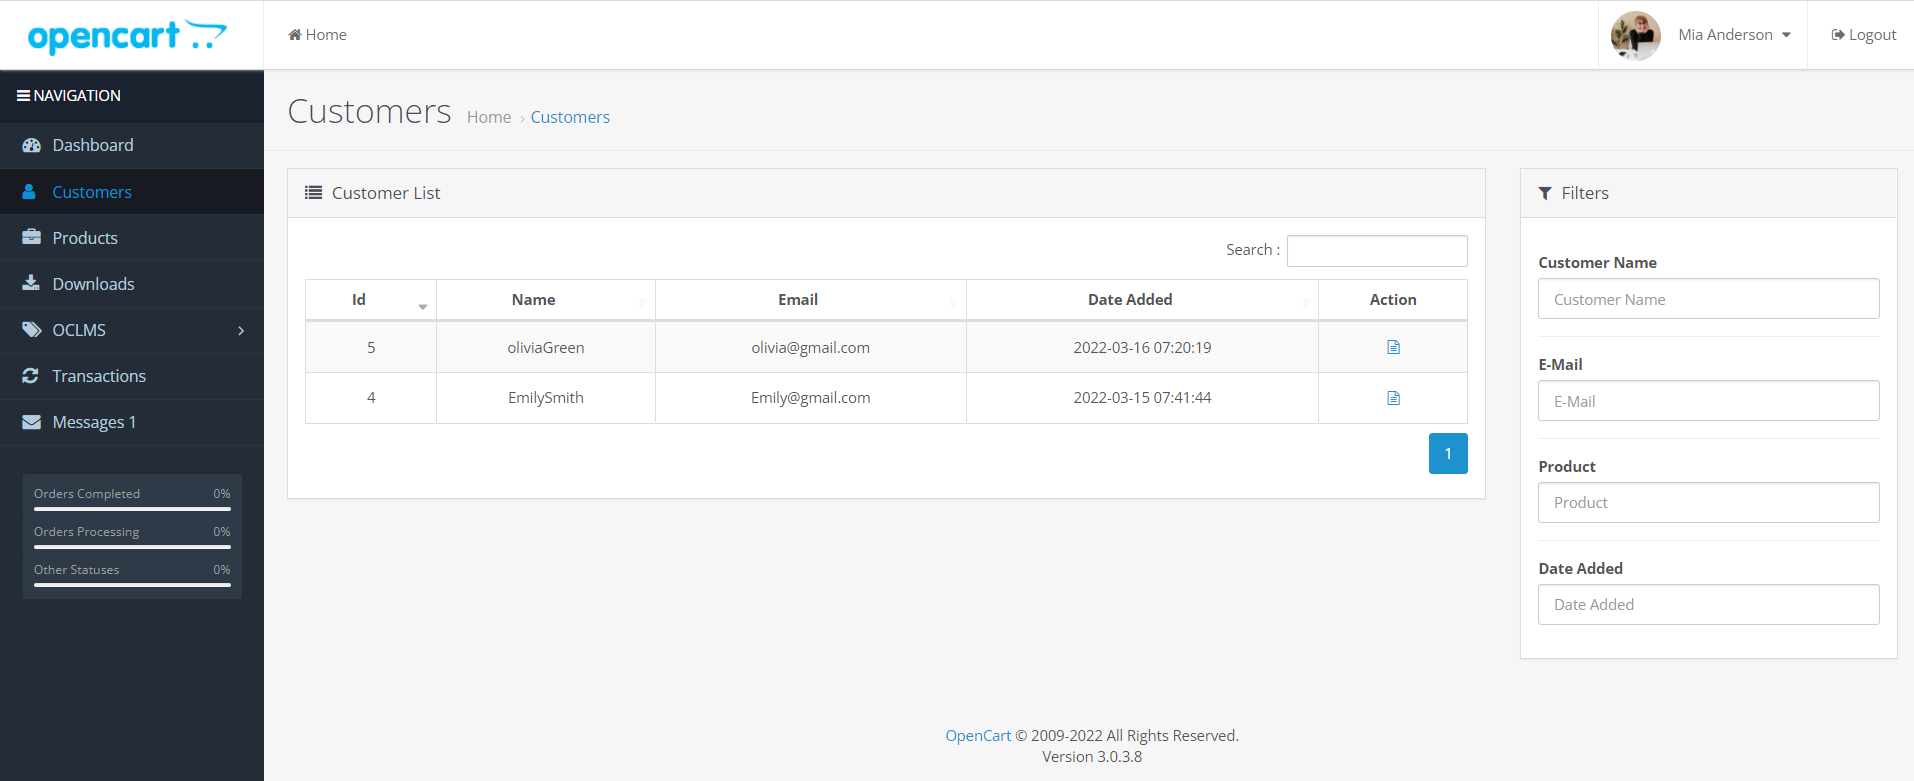
On this page, like the image below, you will see a list of all site users
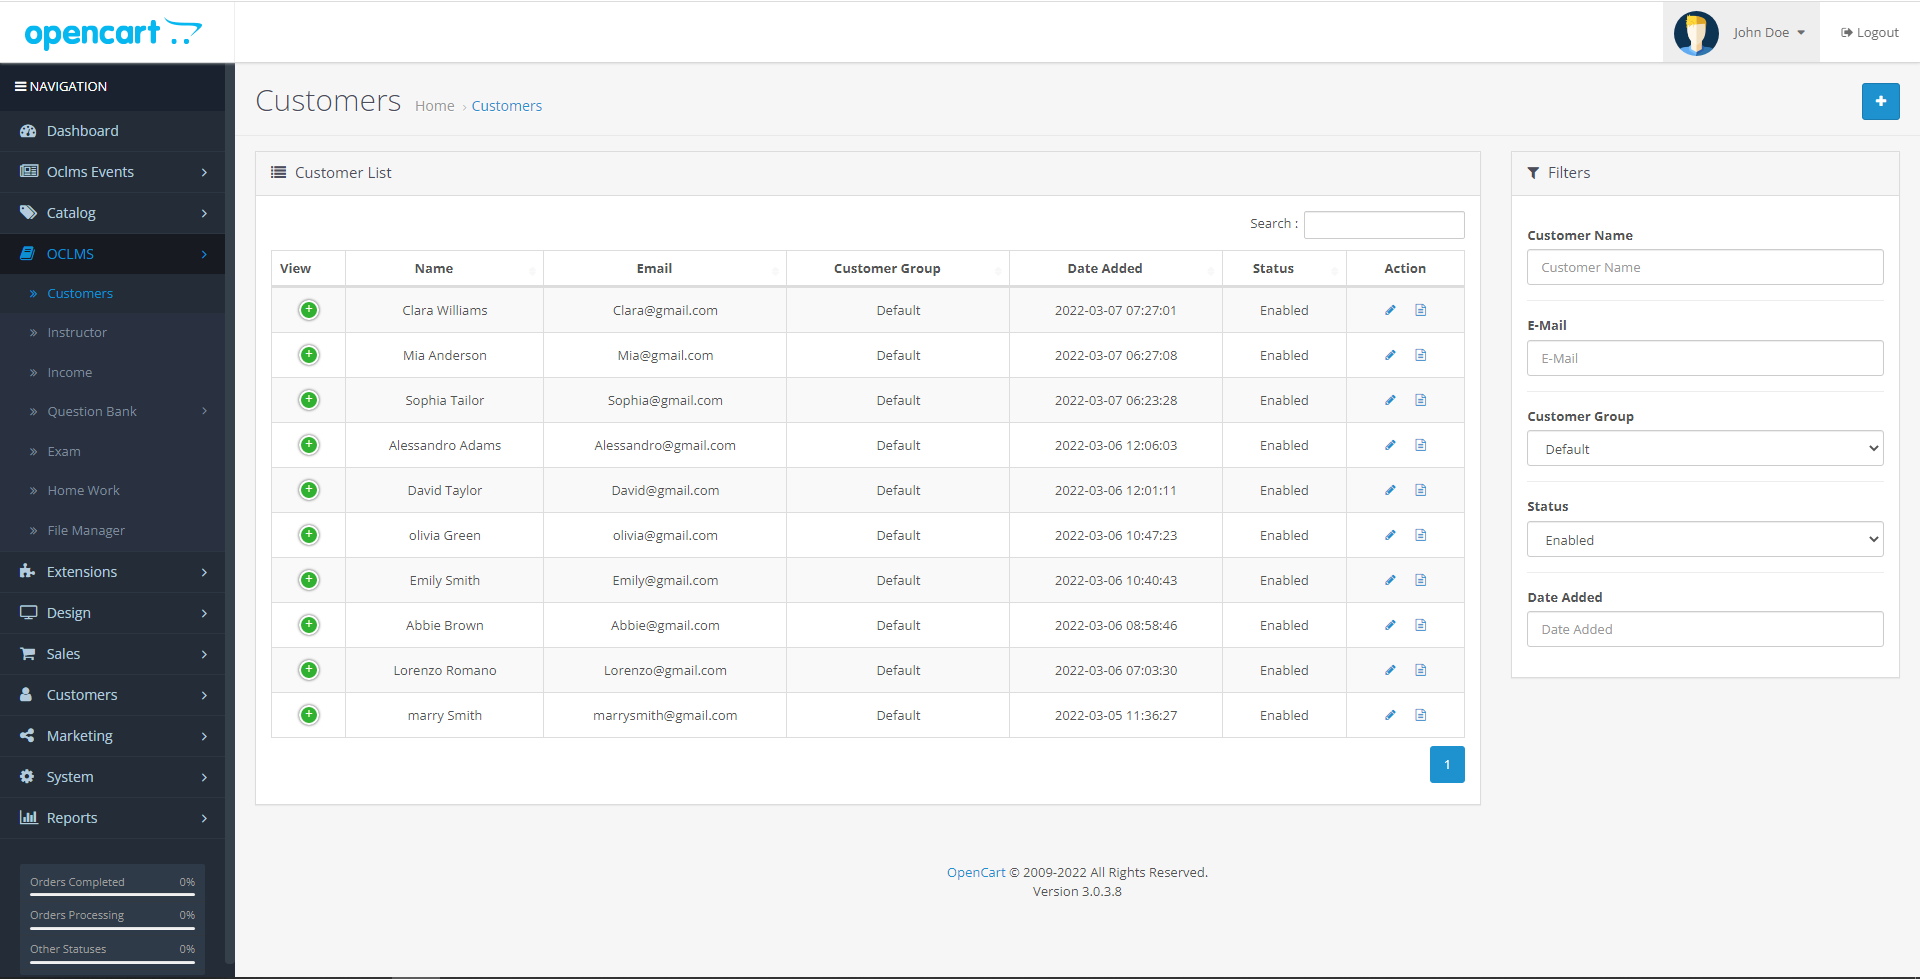
This list displays the information of all users
This information includes first and last name, email, user group, user registration date and user enabled status.
If you click on the edit button every time, you will enter the Edit Customer page related to opencart and you can change the user information.
But if you click on the info button, information about the customer's courses will be displayed.
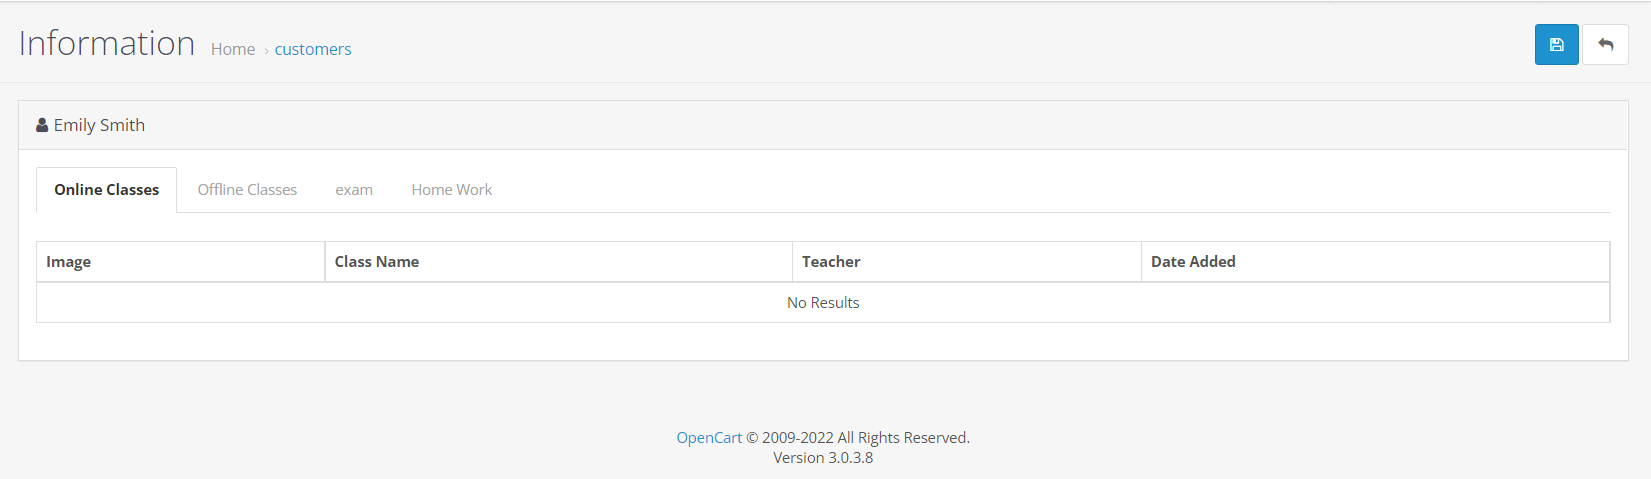
After entering the customer info page, you will be faced with the following page.
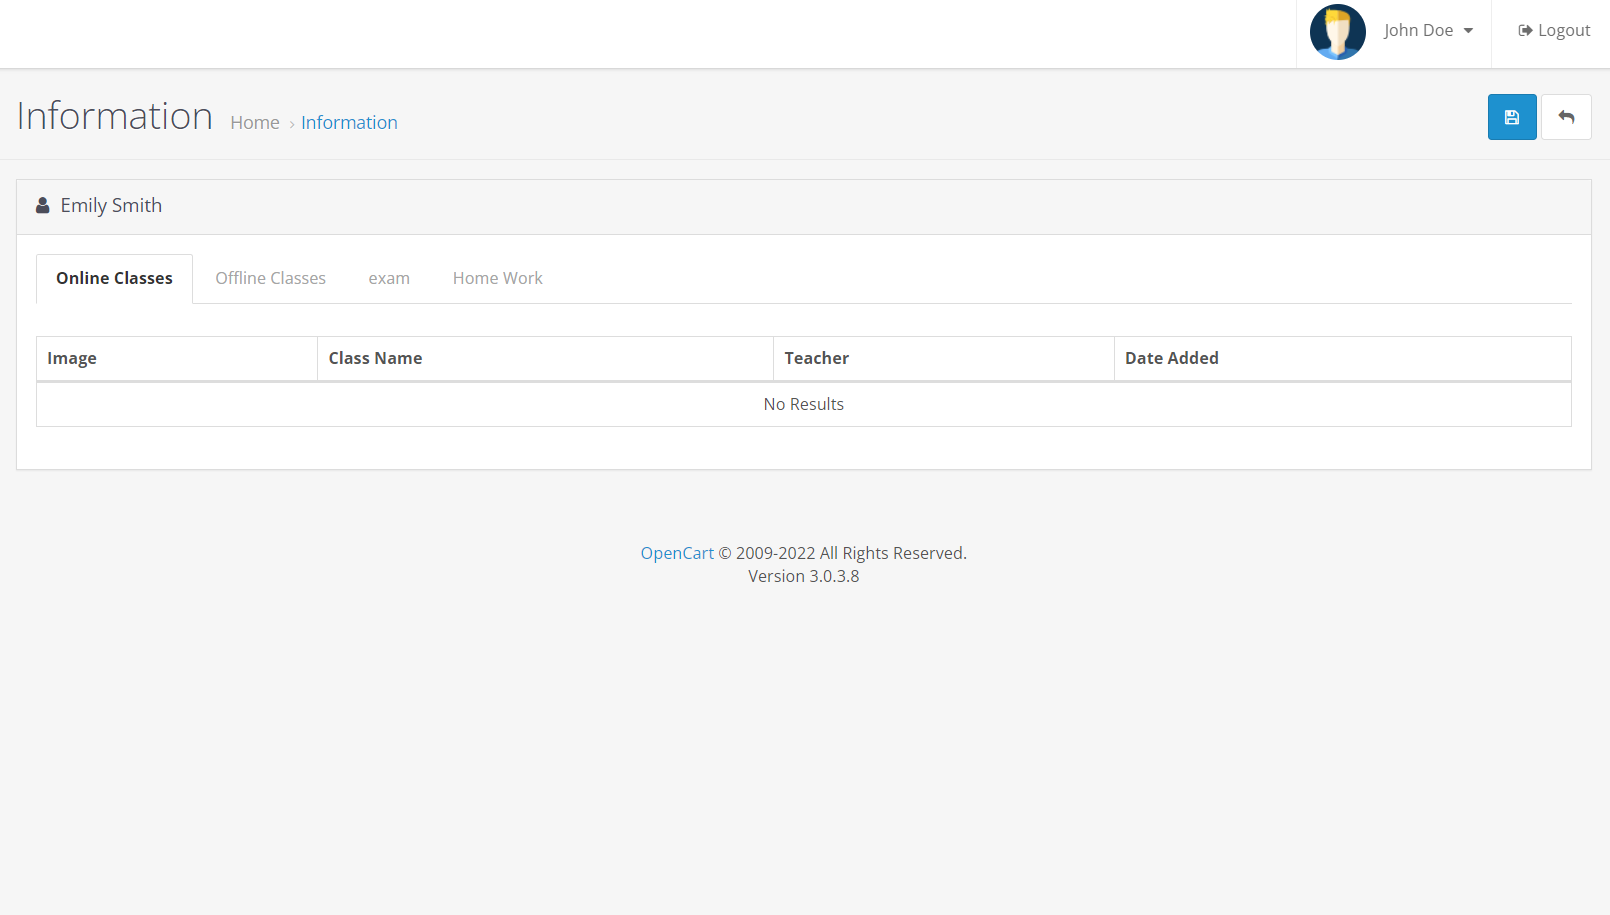
There are 4 tabs on this page, the first of which is related to the customer's online courses
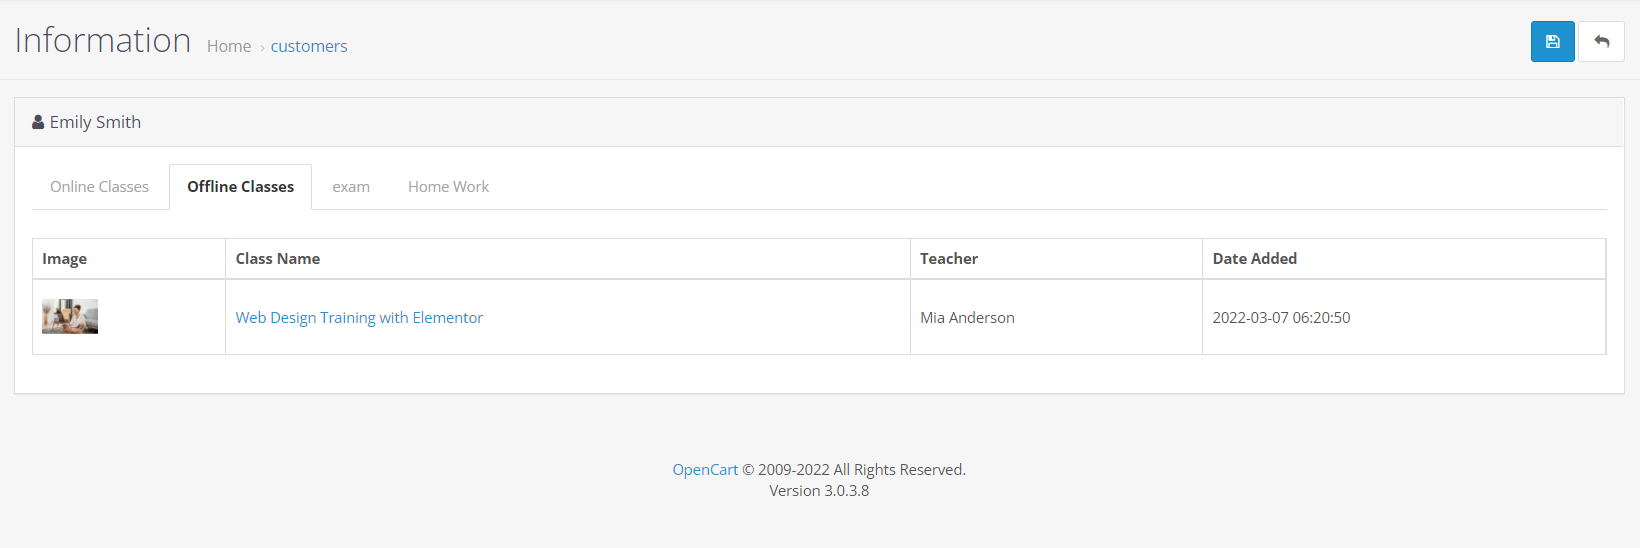
In the next tab that you see in the image below, offline courses are displayed
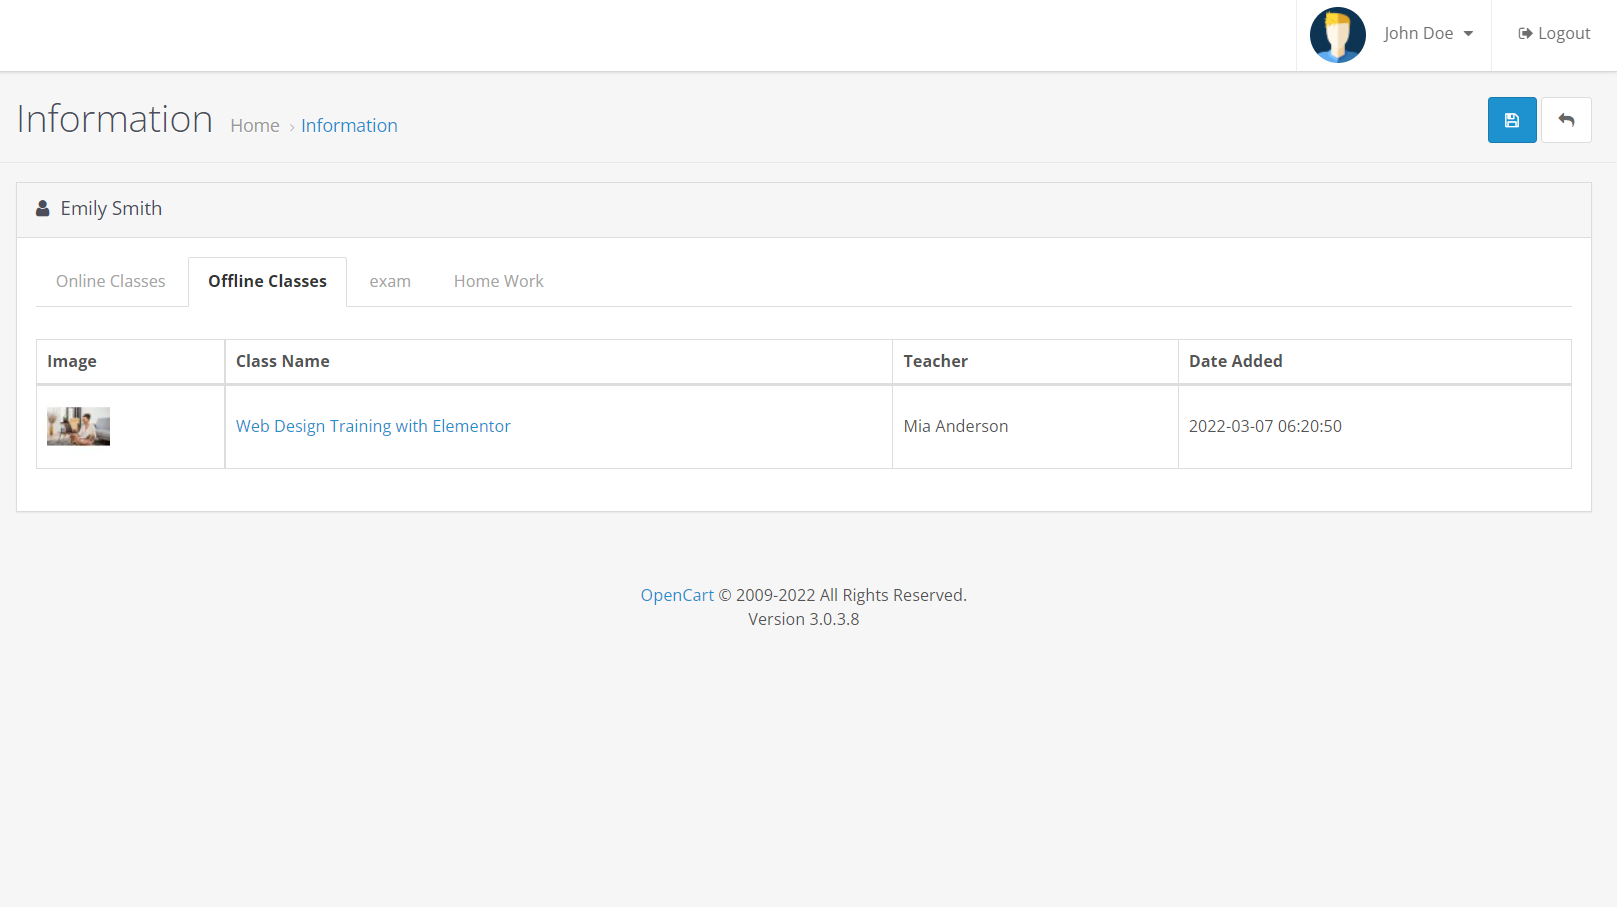
Here is a list of courses that the user has purchased and you can edit the course by clicking on the name
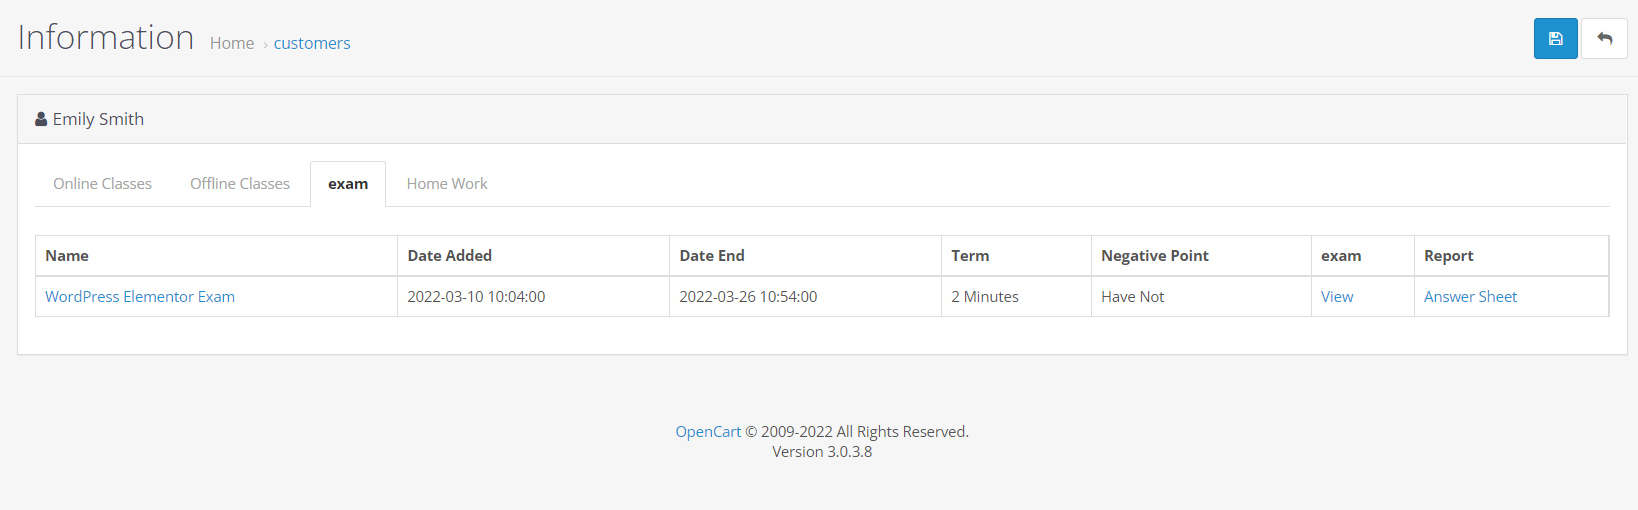
The next tab is the exam tab, which displays the exams related to the user's course lessons. You can see the image of this tab below
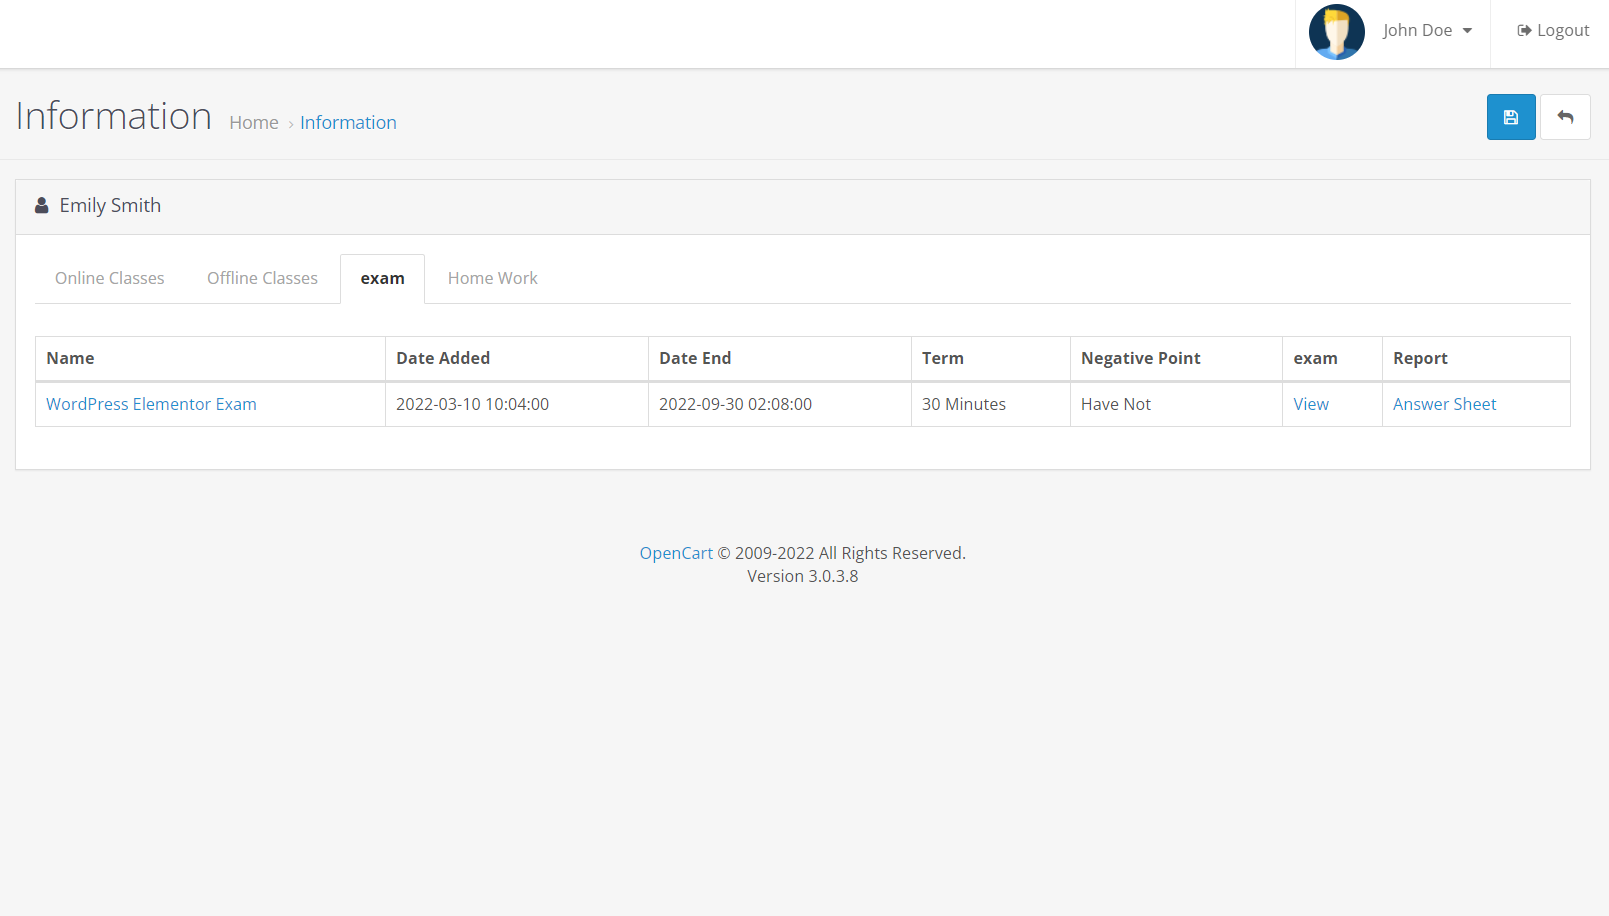
In this section, the list of all user exams is displayed and by clicking on the exam name, you enter the edit exam page and you can edit the exam information.
There are two links, view and report, which you can enter on the exam page by clicking on the view option, and you can view the exam questions.

This section shows the exam page to the admin as it is displayed to the students. The next column shows the answerrsheet link, which is clicked to display the students' exam answers.

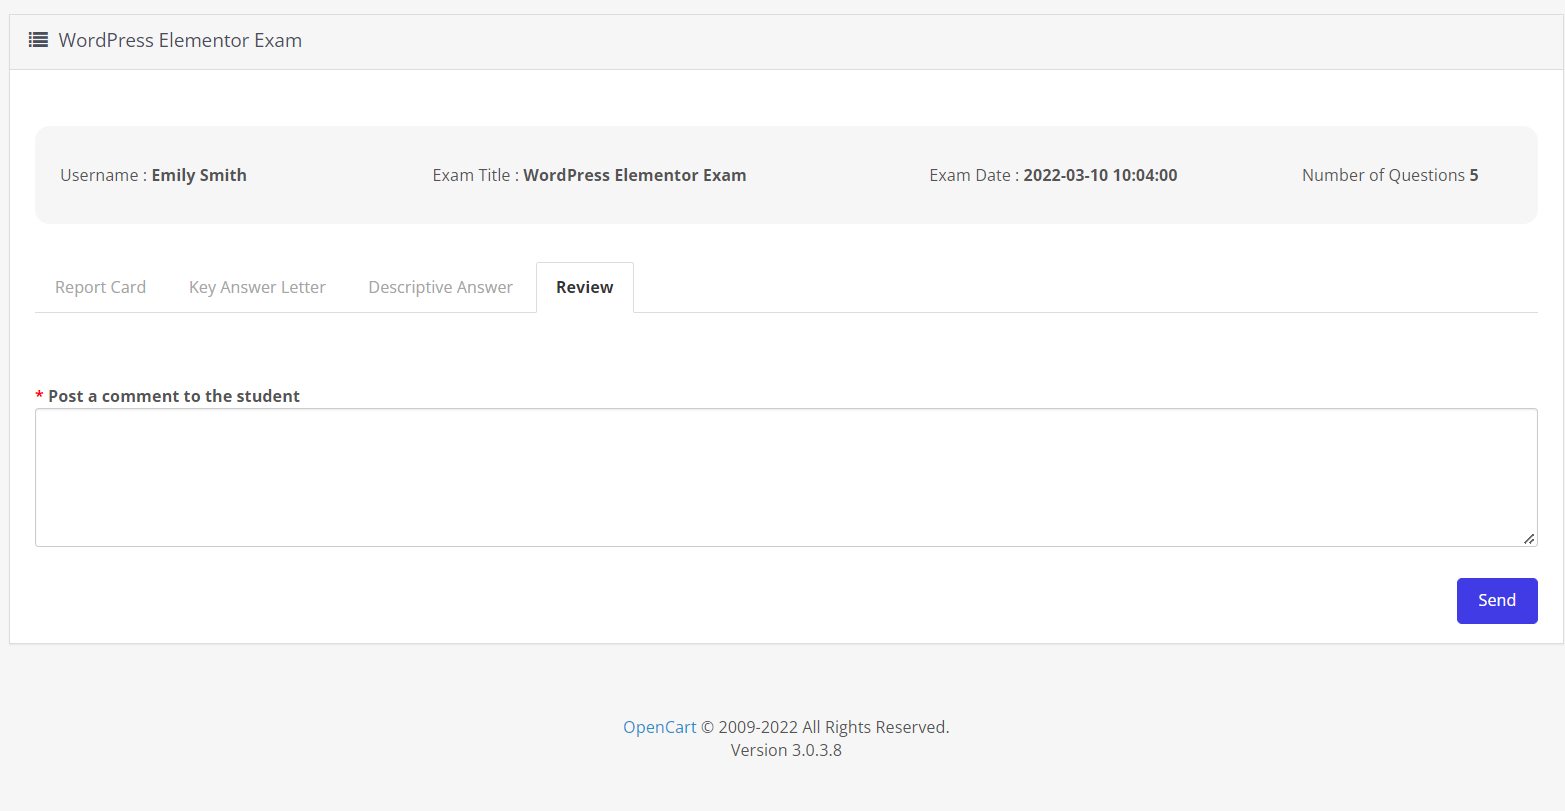
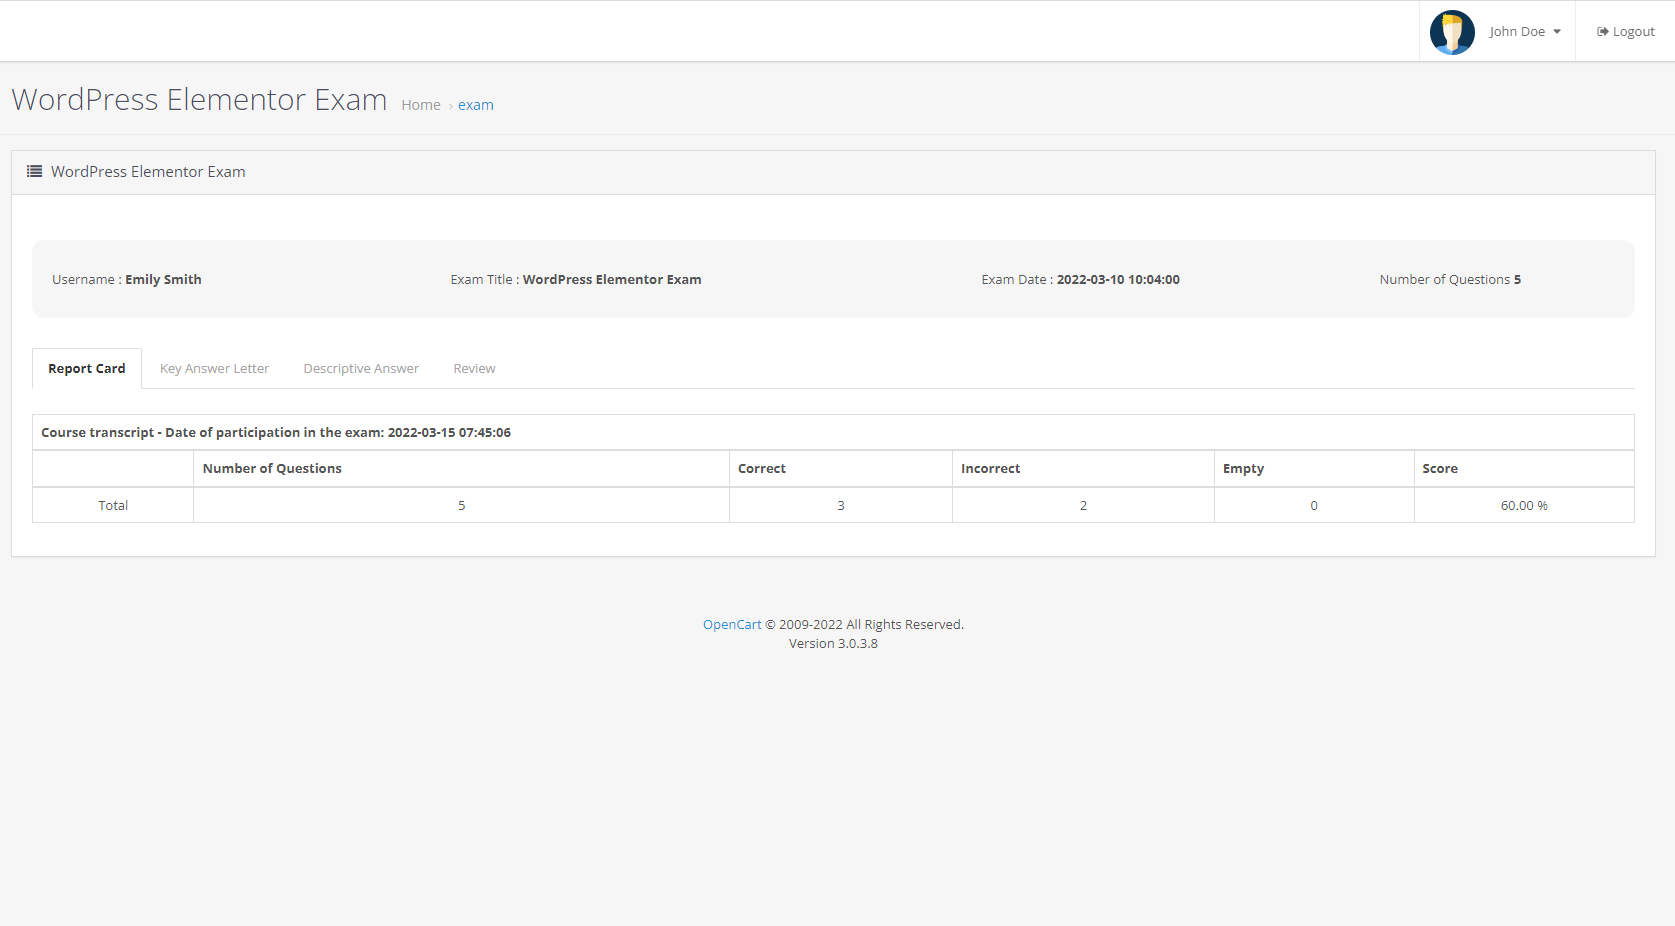
On this page, 4 tabs are displayed, the first tab of the exam report and the student's score is displayed.
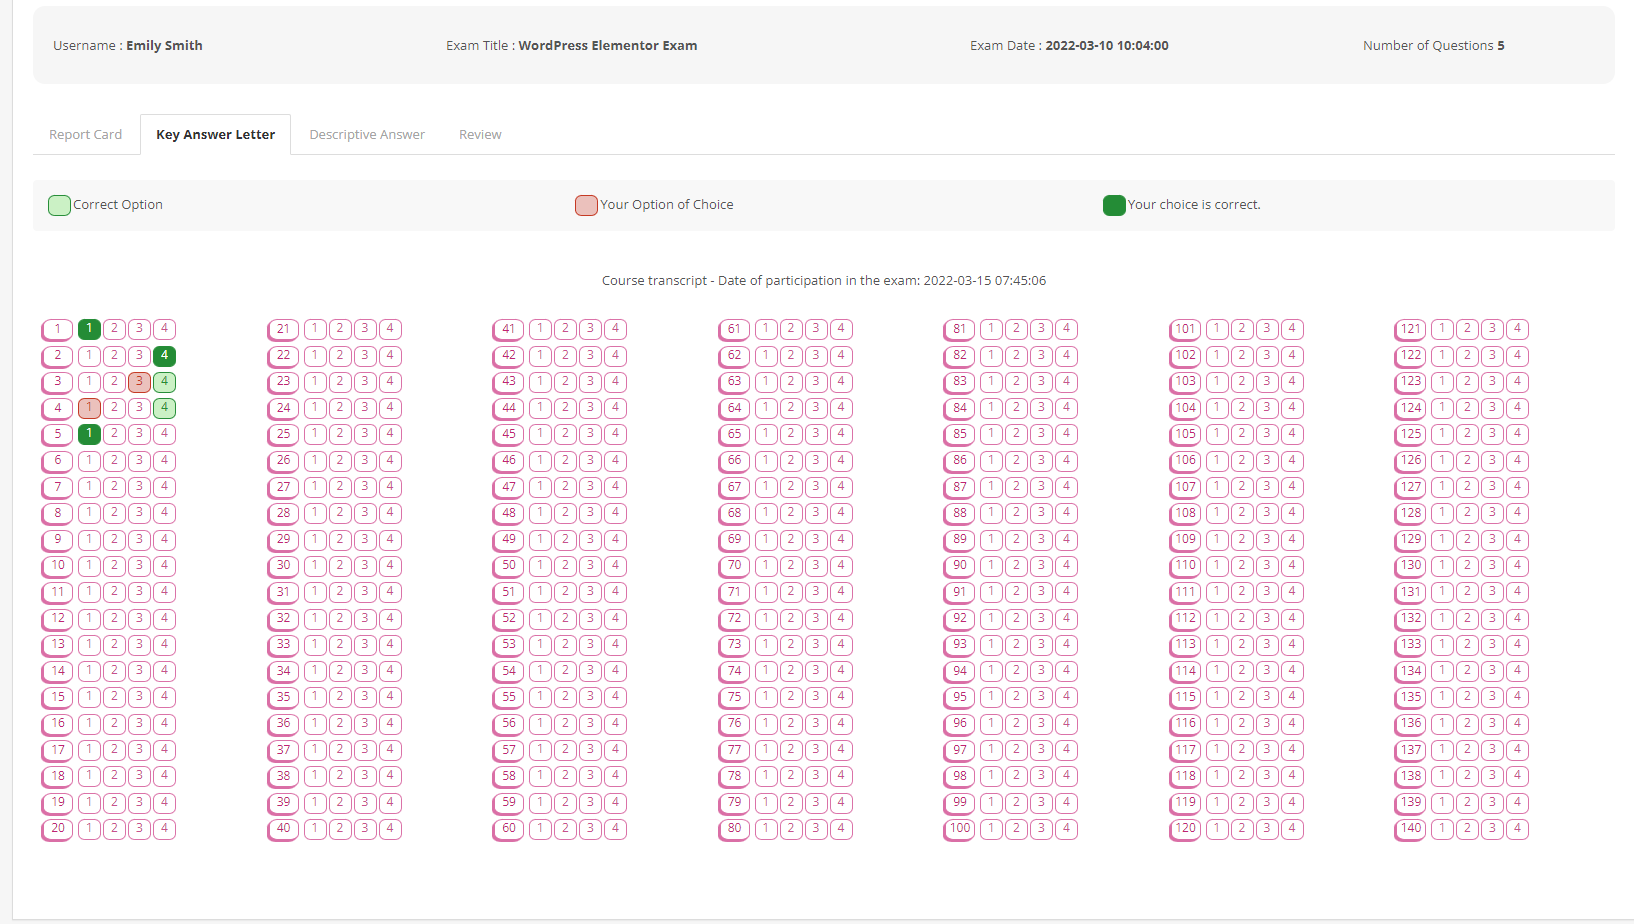
The second tab is the key answer letter tab, which is displayed as a test answer.

The third tab shows the test questions and test descriptive answers.

The next tab is the review tab, which displays students' opinions about the exam. Admin can also add comments for their exams.
Instructors :
This page displays a list of all teachers and you can see the image of this page below.
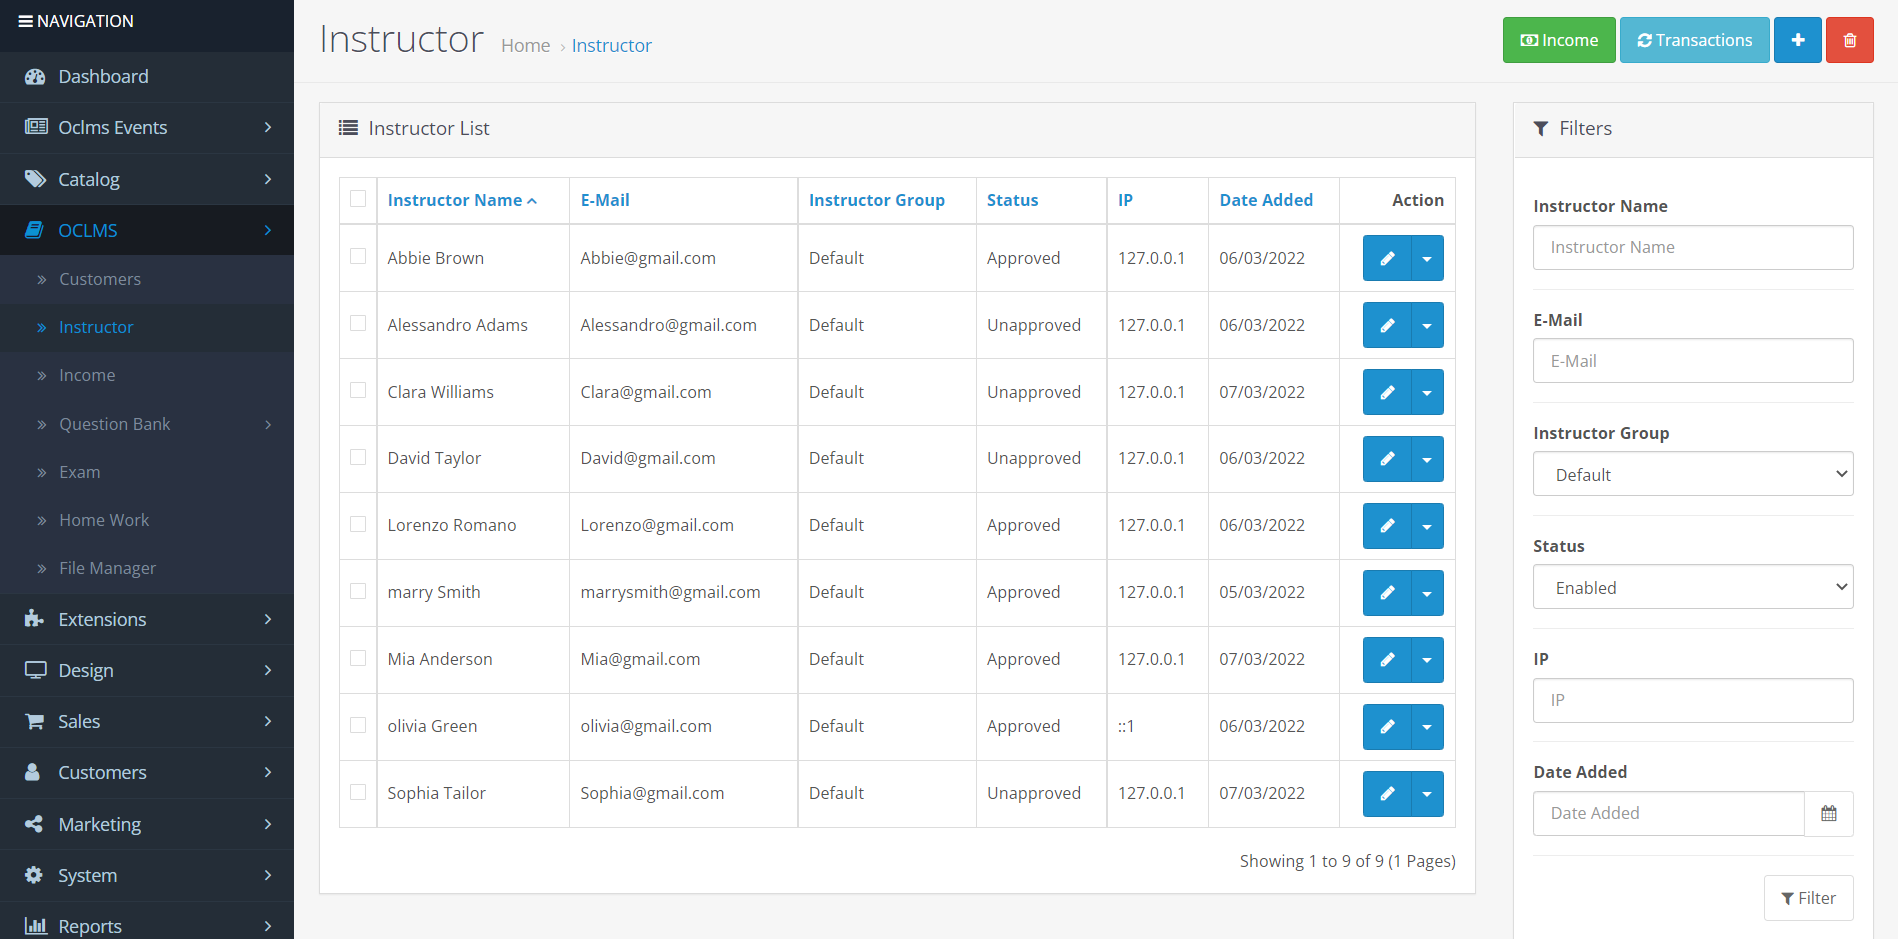
In each row there is an action section in which the information of each instructor is managed.
If you click on the edit button, you can edit the instructor information, but if you click on the down arrow button, a list like the one below will open.
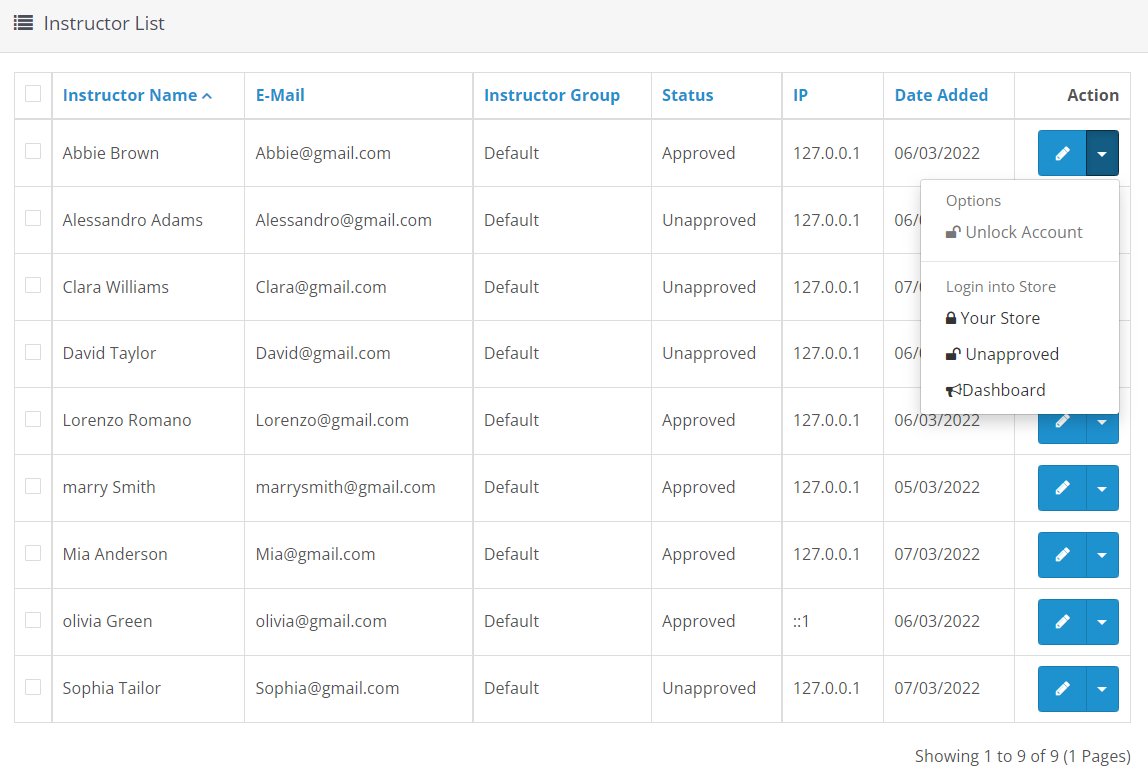
In this list you can approve or unapprove each instructor and access each instructor's dashboard.
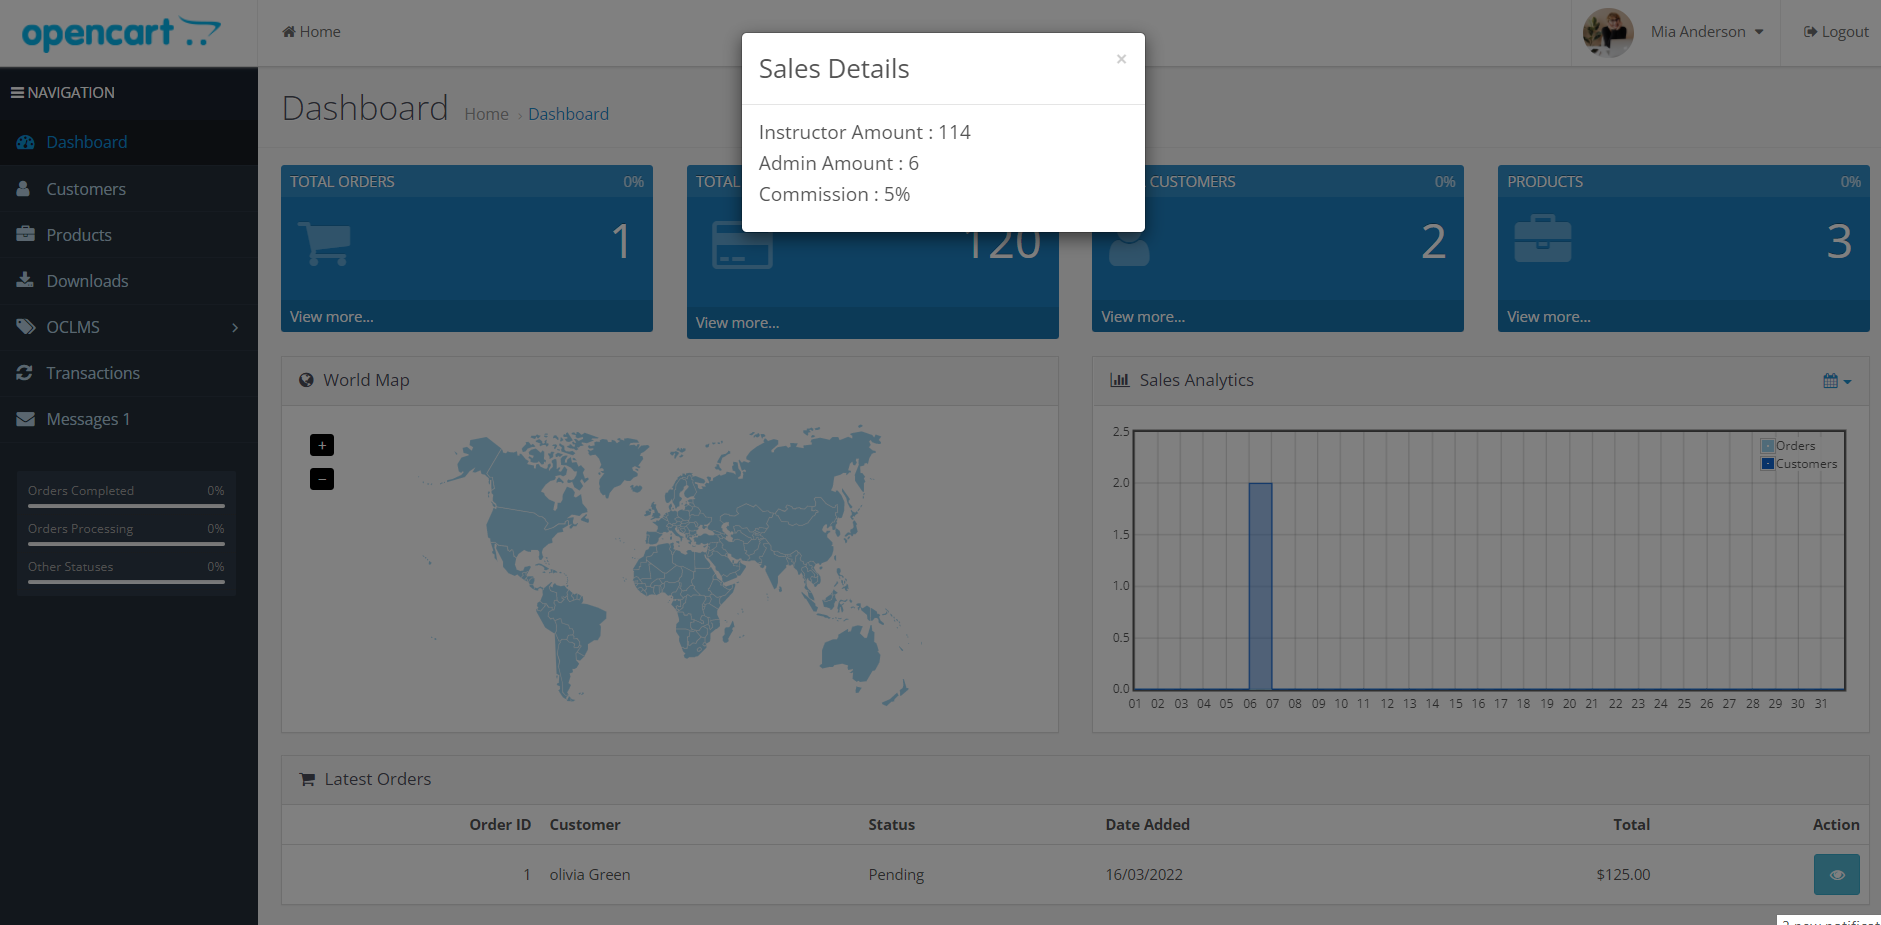
Each instructor's dashboard includes the instructor's products and courses, students, orders, and sales.
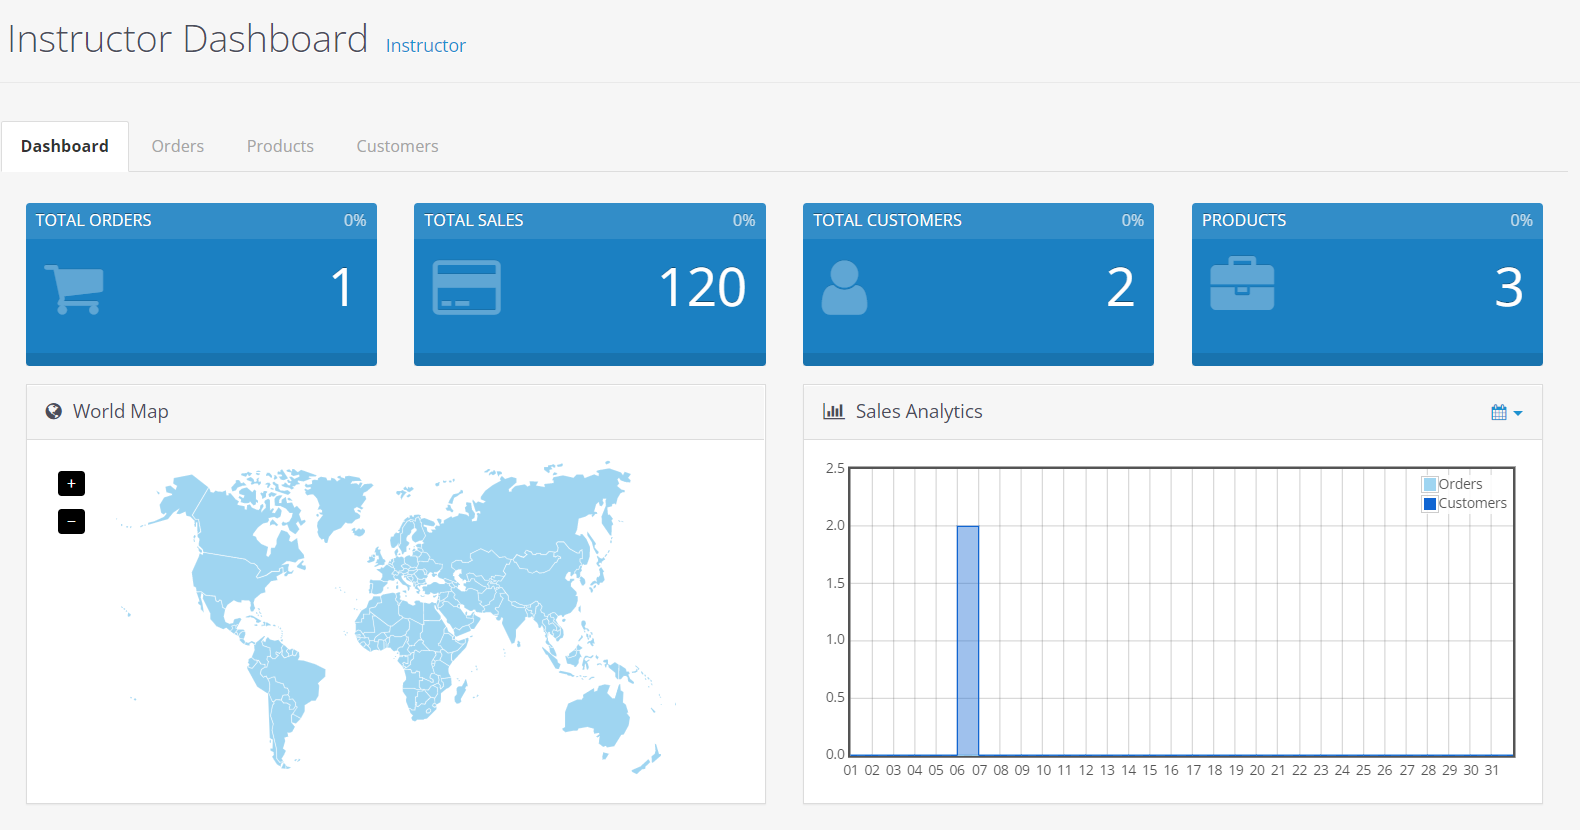
In this section, there are 4 tabs, the first tab includes: total number of orders, total sales, number of customers or students, and number of products, you can see the orders and customers as a chart in a historical interval.
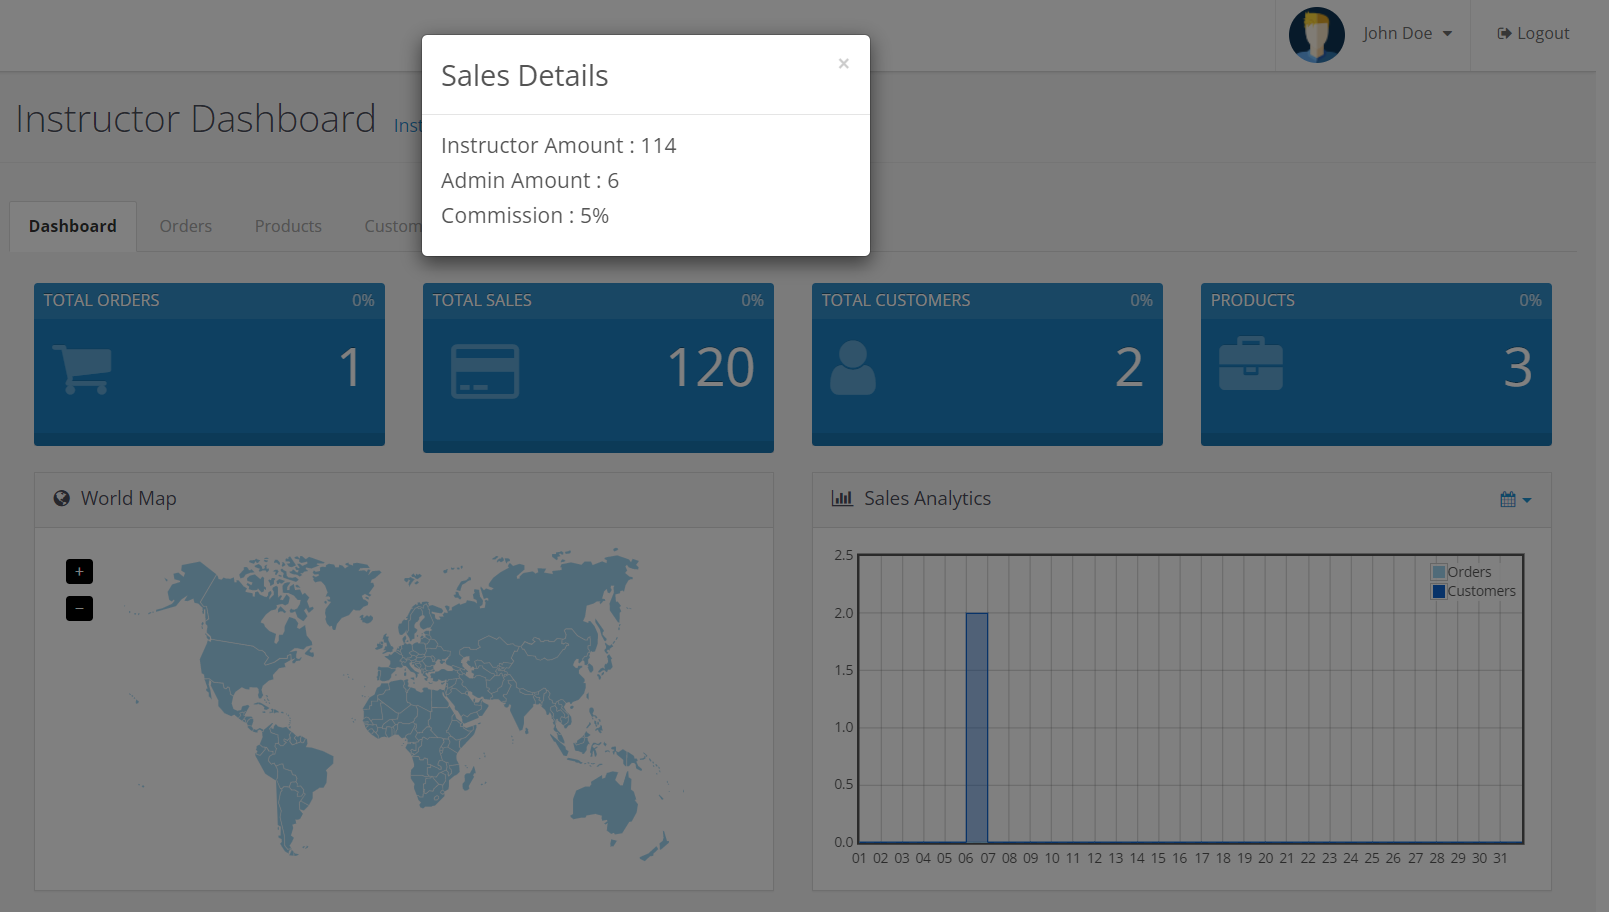
If the admin is intended for commission teachers, by clicking on the totalsales section, you can see the teacher's sales by considering the commission.
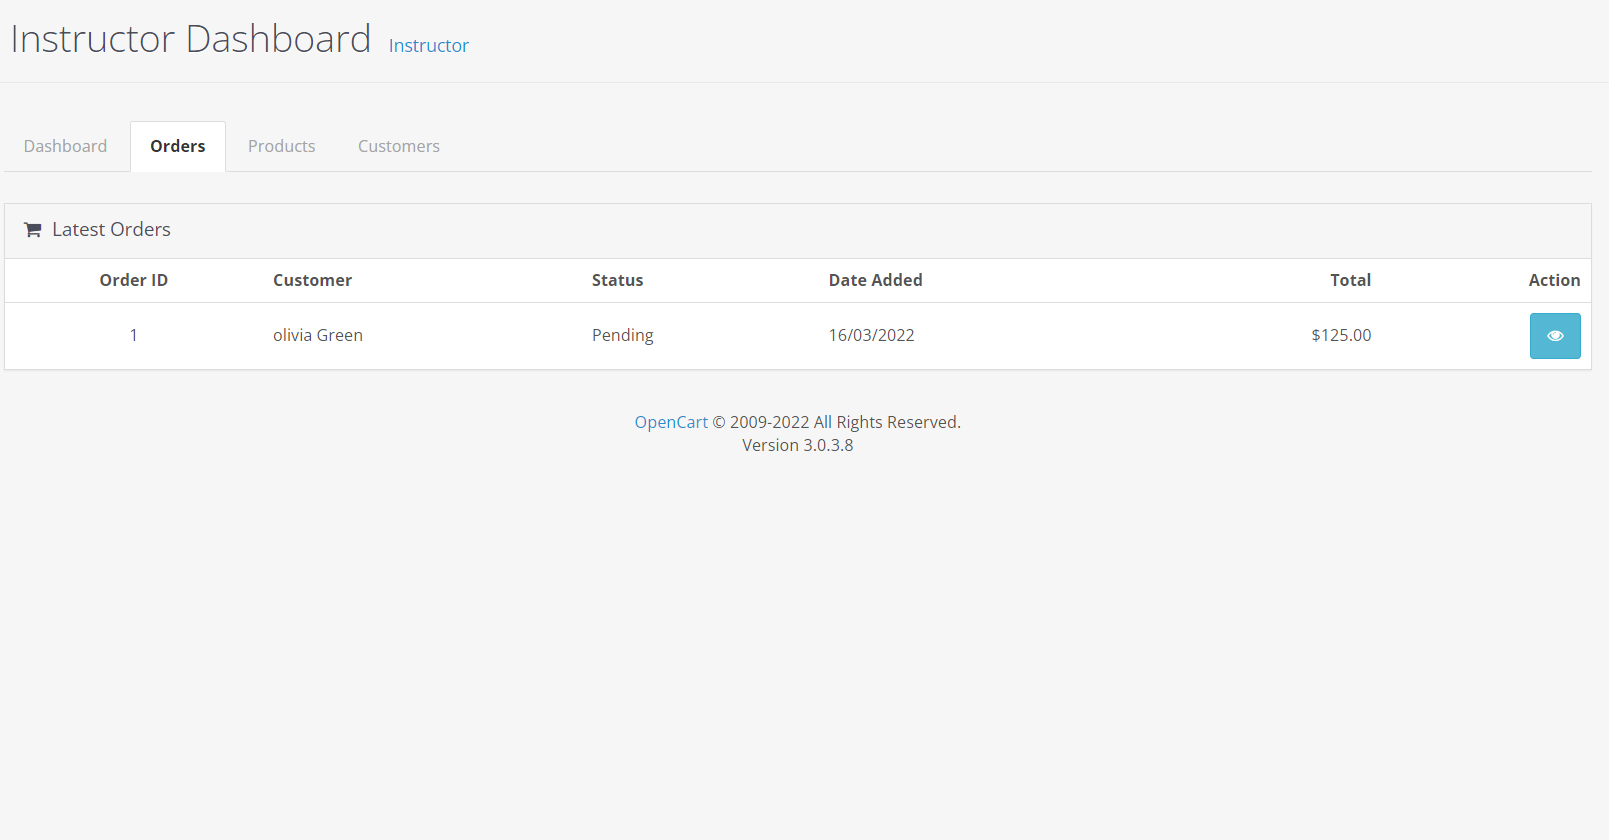
The second tab is the Orders tab, which shows students' orders of teacher's products.
Clicking on this tab will open a page similar to the one below
The next tab is the products tab and by clicking on this tab, a page like the one below will be shown.
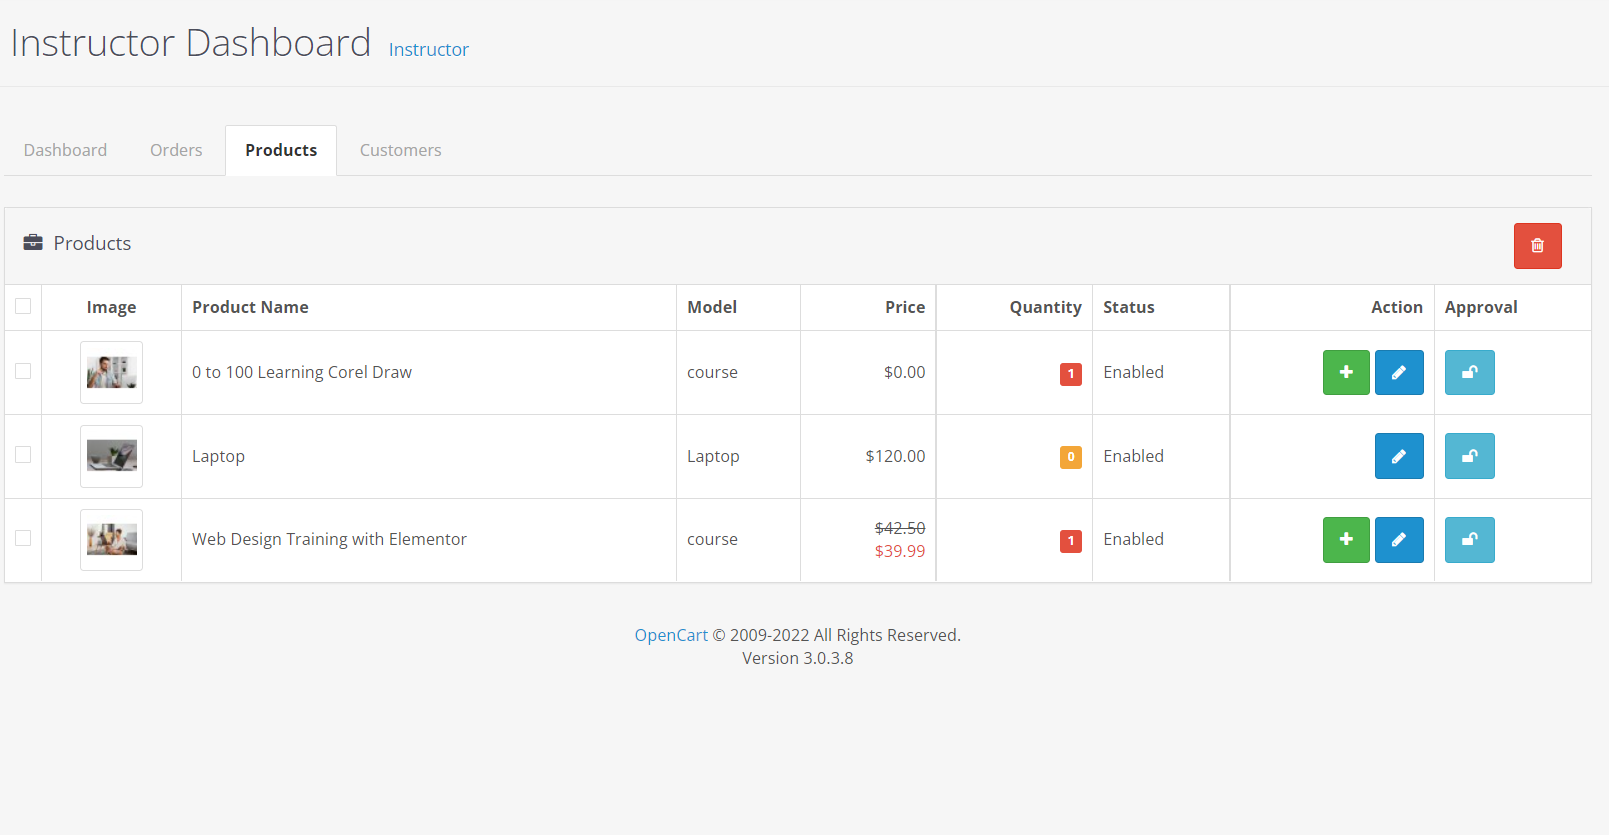
In this tab, all products and courses of the instructor are shown and you can approve or unapproved them.
You can even delete or edit teacher's products or add lessons to courses
The next tab is the customers tab, which by clicking on this tab, a page like the one below will be shown.
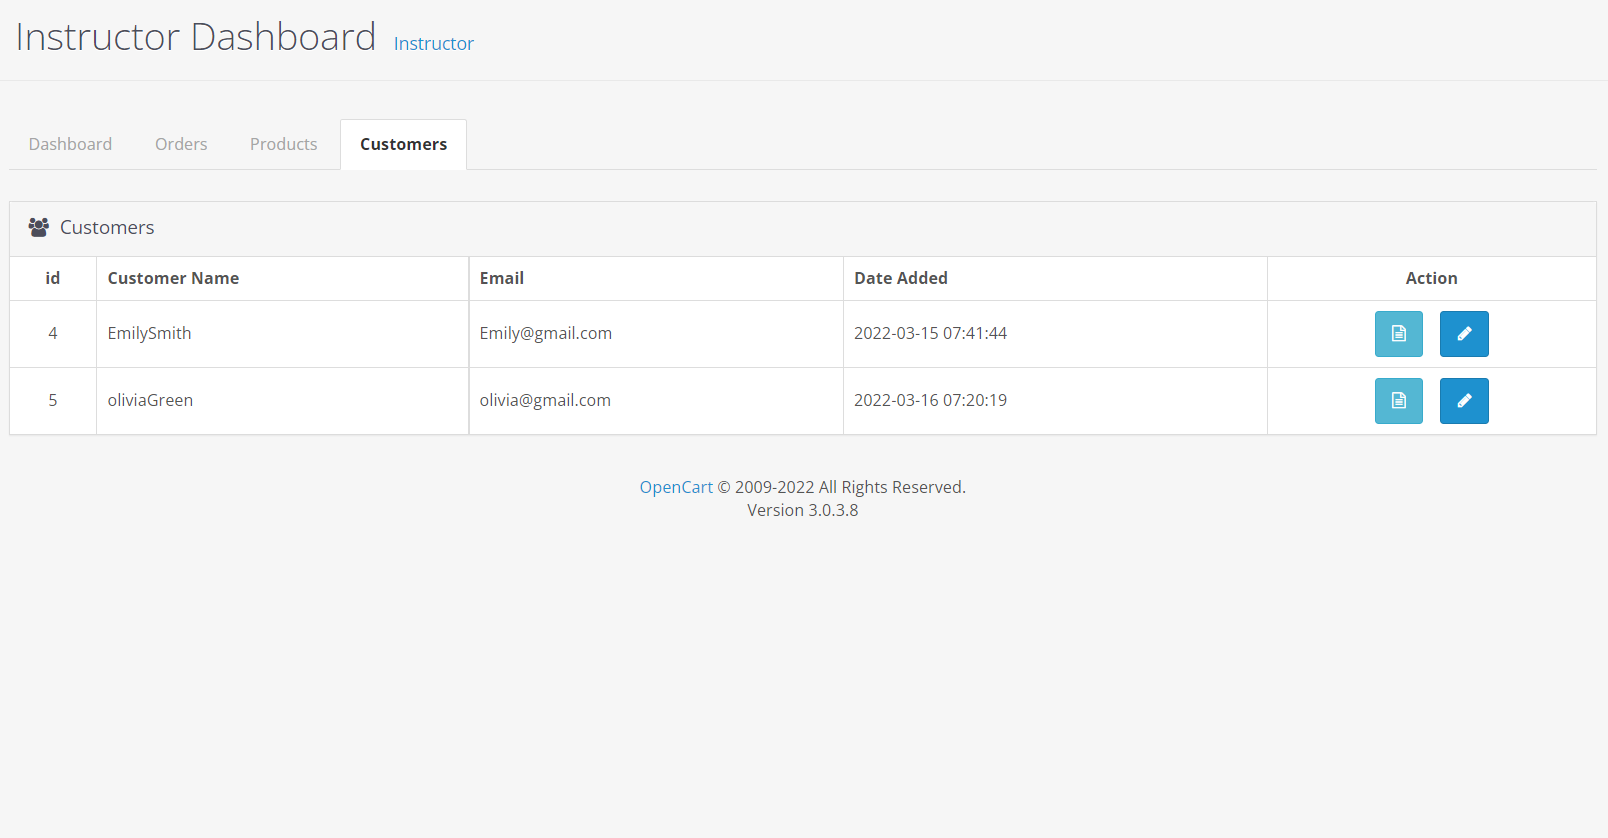
This page show a list of teacher instructors, and the admin can accses the editing page or students page.
Income
This section shown the teacher income list
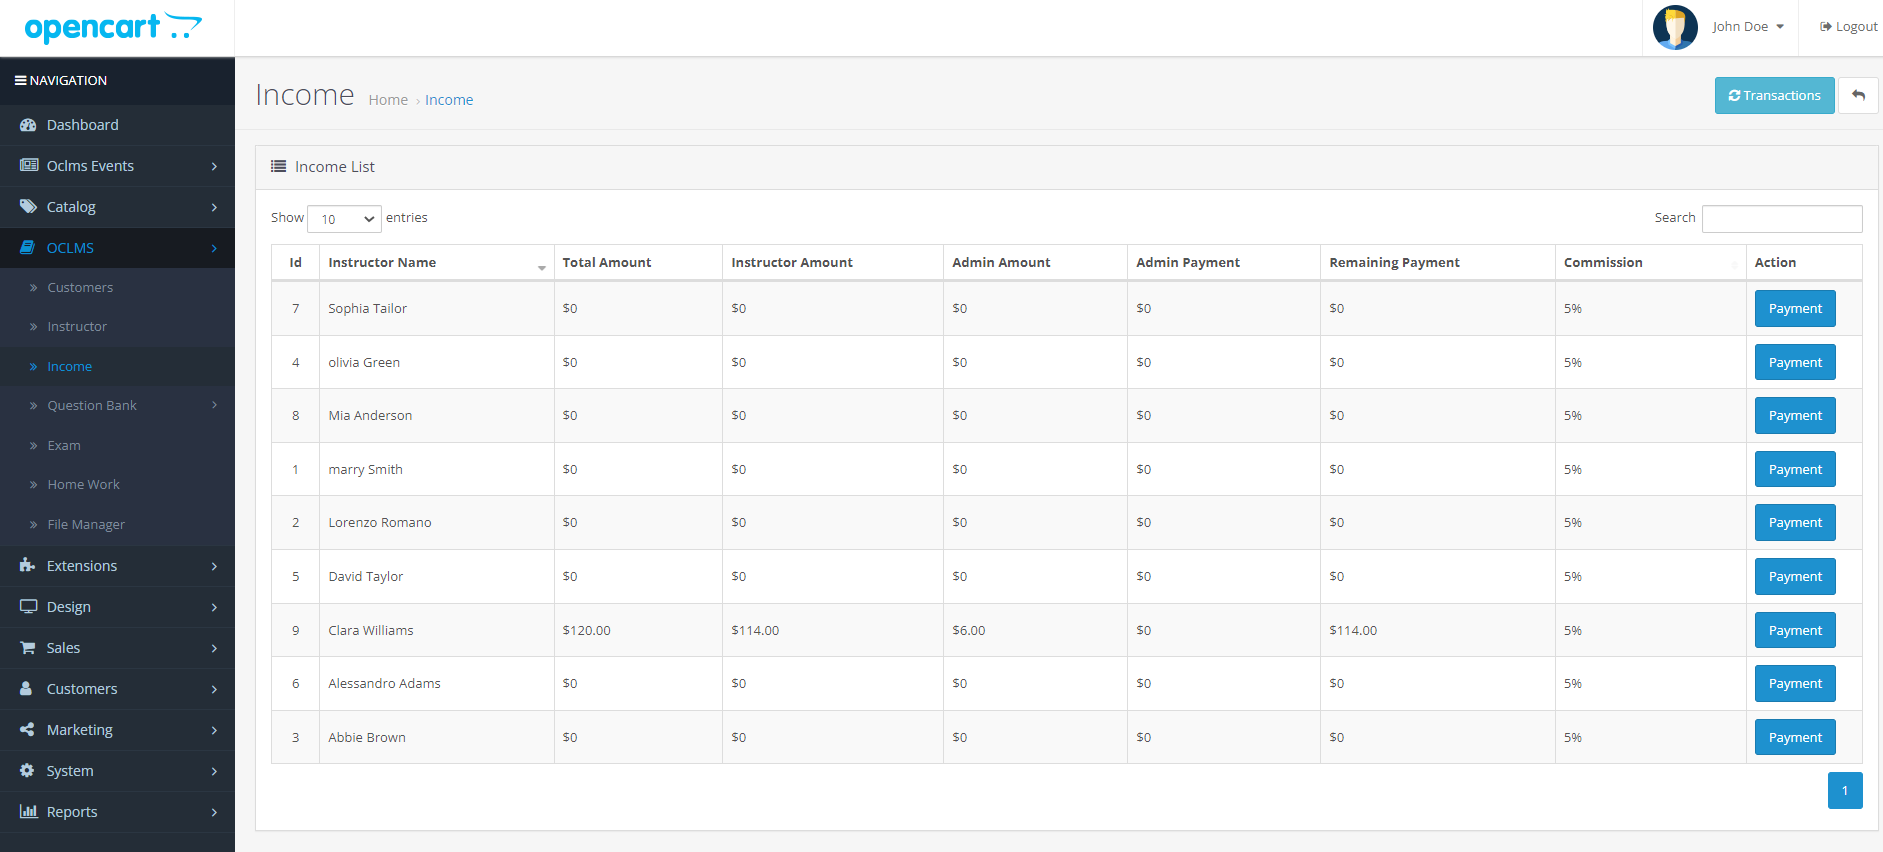
In this list, the names of all teachers are written and a series of calculations are performed in front of them, which we will examine in the following. To see more details in the image below, only one row is shown.

- Total amount : Shows the total sales of this instructor without calculating the commission.
- Instructor amount : Shows the total sales of the instructor by calculating the commission.
- Admin amount : Shows the admin profit from the commission with the income of this instructor.
- Admin payment : The amount of income earned by the instructor that the admin has deposited into the client's account.
- Remaining payment : The remaining amount that the admin must deposit into the instructor's account
- Commission : Percentage of commission that the admin has set for instructor
At the end there is a payment button that clicking on this button opens the box below.

In this box, there is the amount of remaining payment that the admin must pay.and another boxe for writing comment. Clicking the pay button will save the value of these two inputs in the list of transactions.
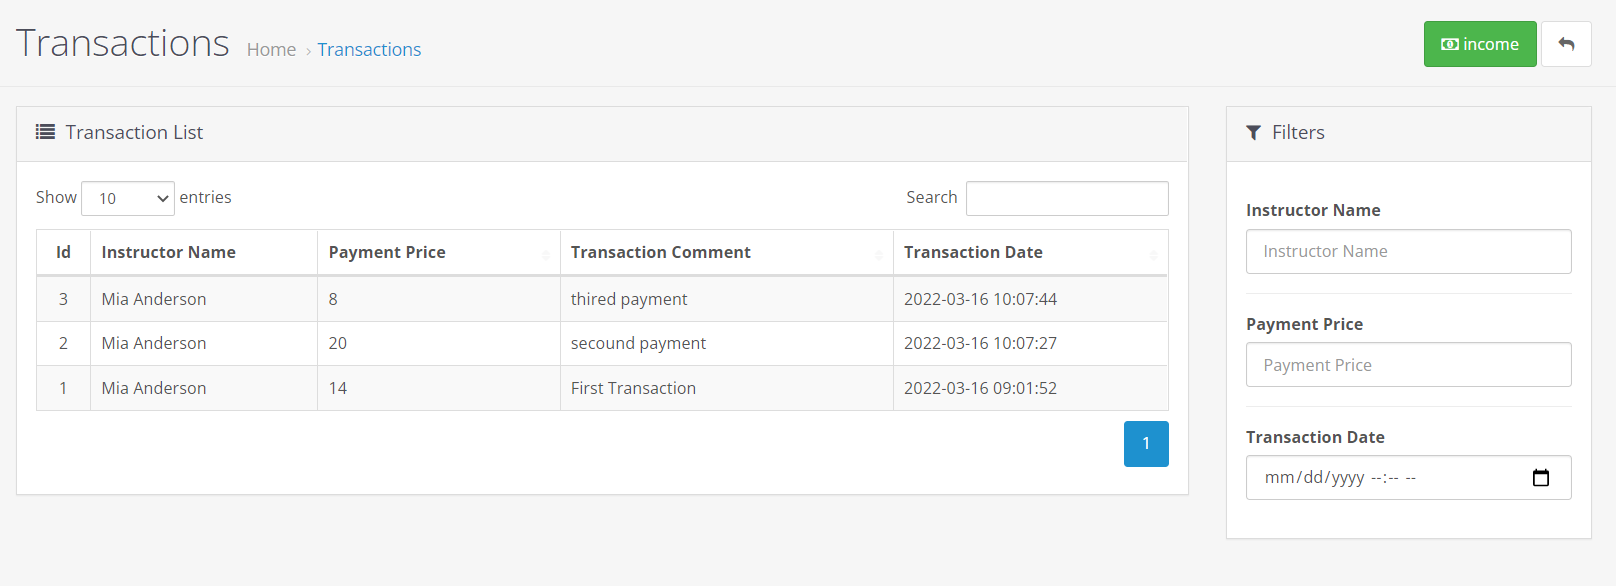
To view the list of transactions, click on the transactions button at the top right of the page.
Question Bank
Question Bank is divided into three parts
- Question Category
- Questions
- Import Question
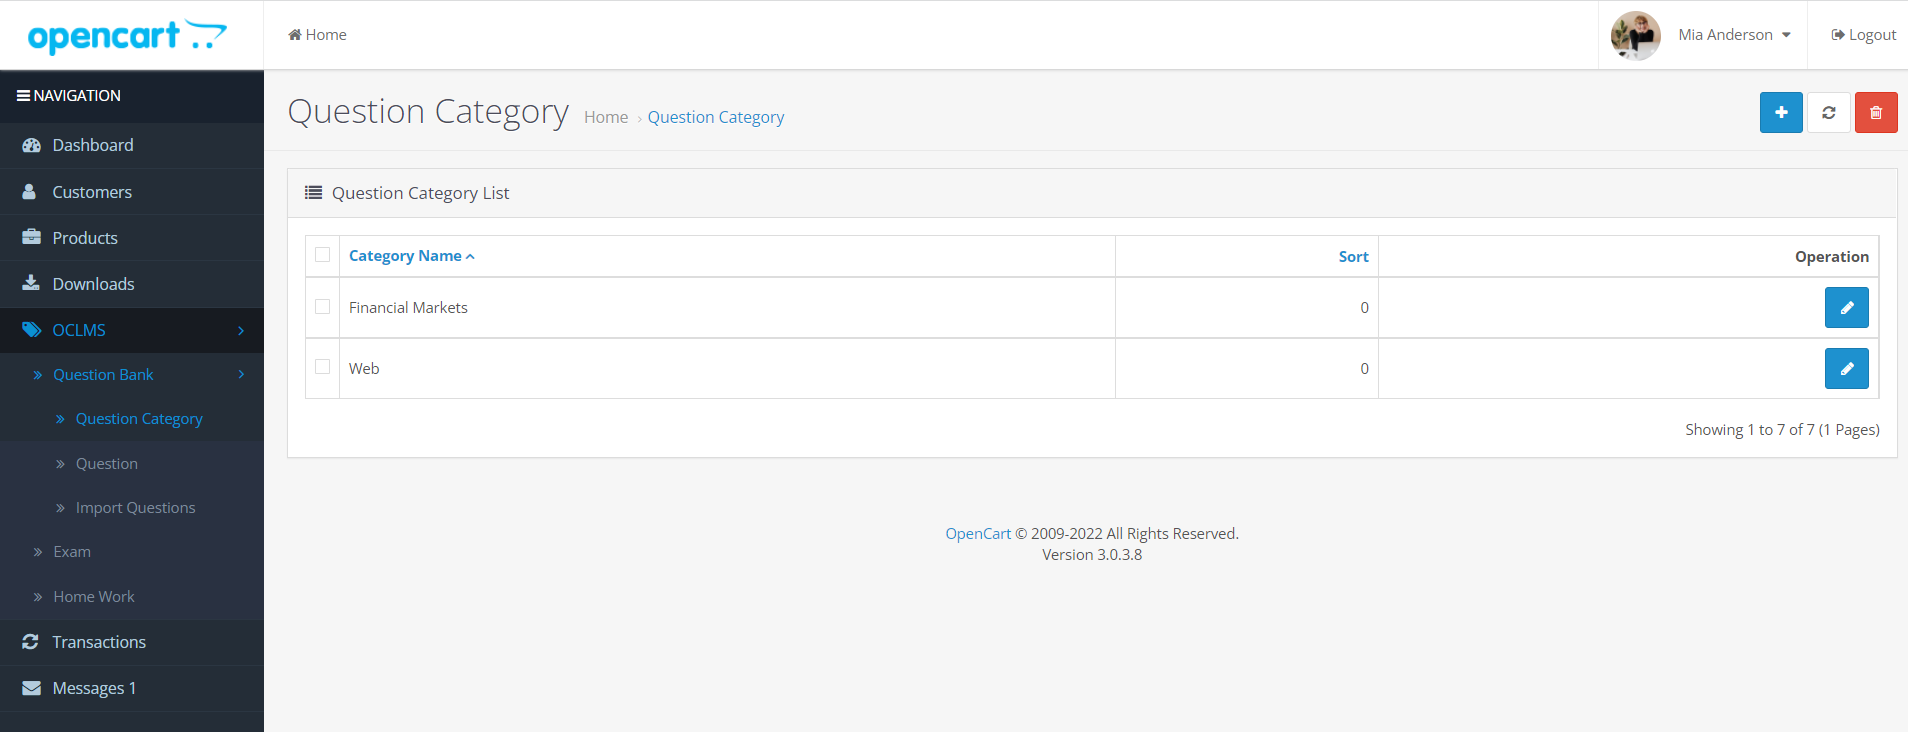
Question Category :
This section lists the questions to be used in the exams.
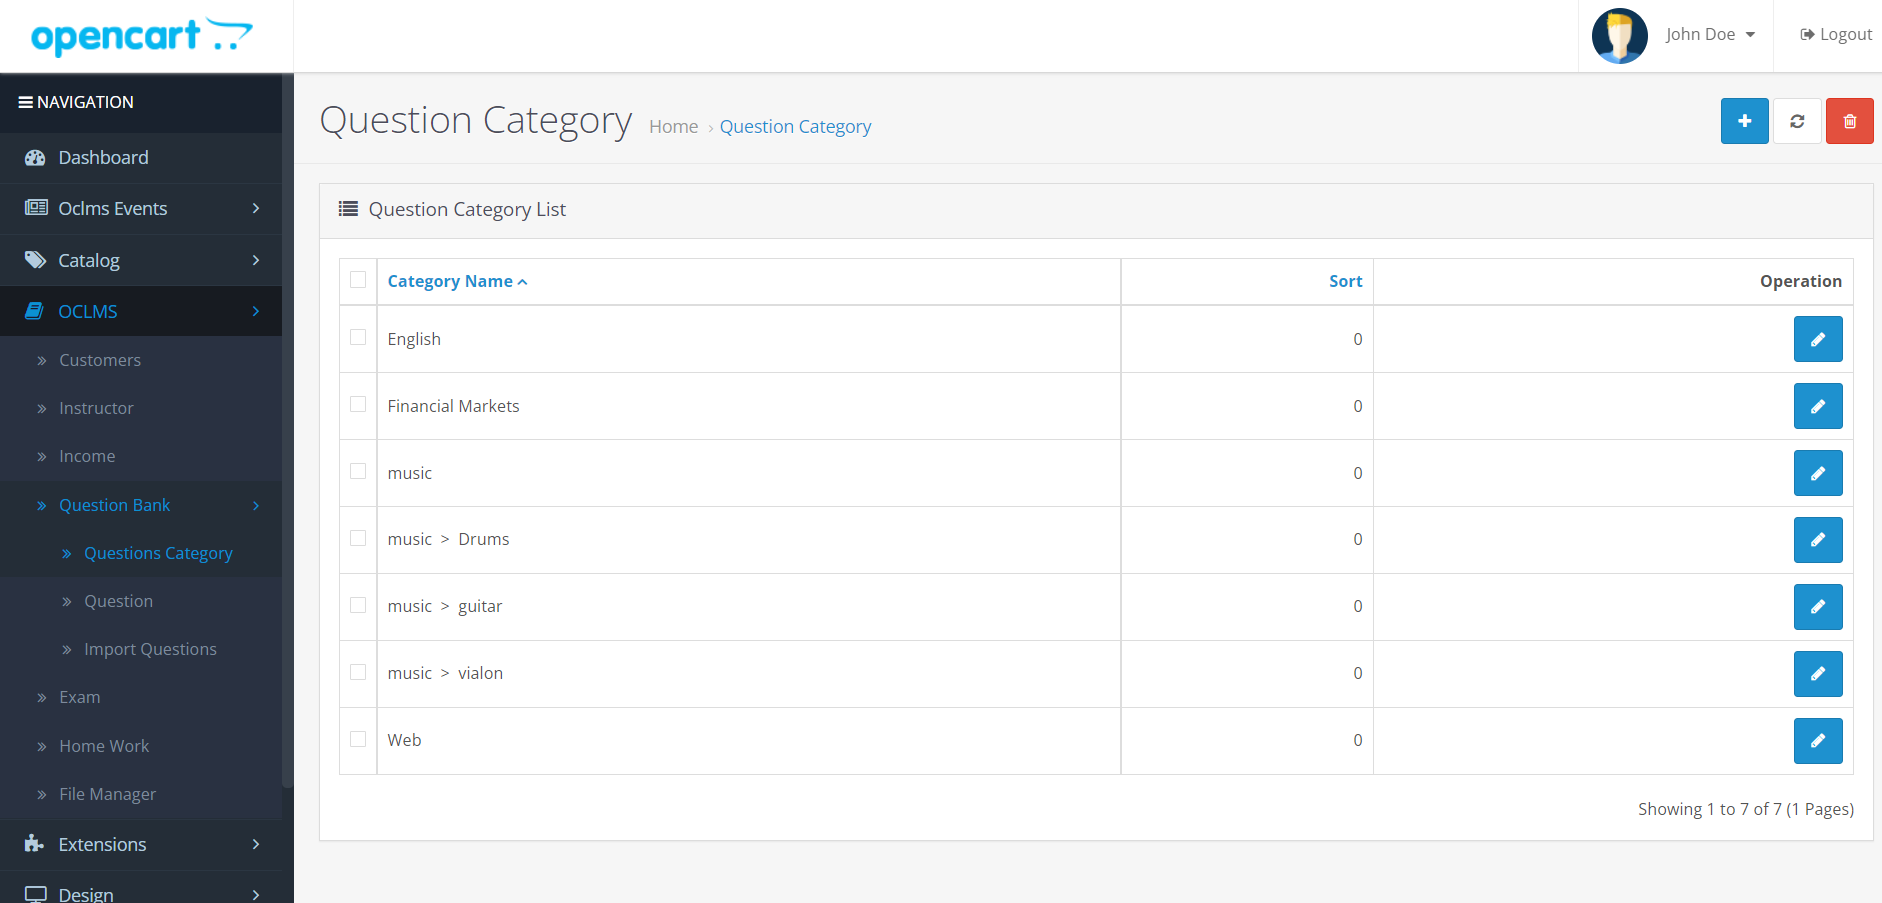
To add a new category, click on the blue button with + sign to enter the following page
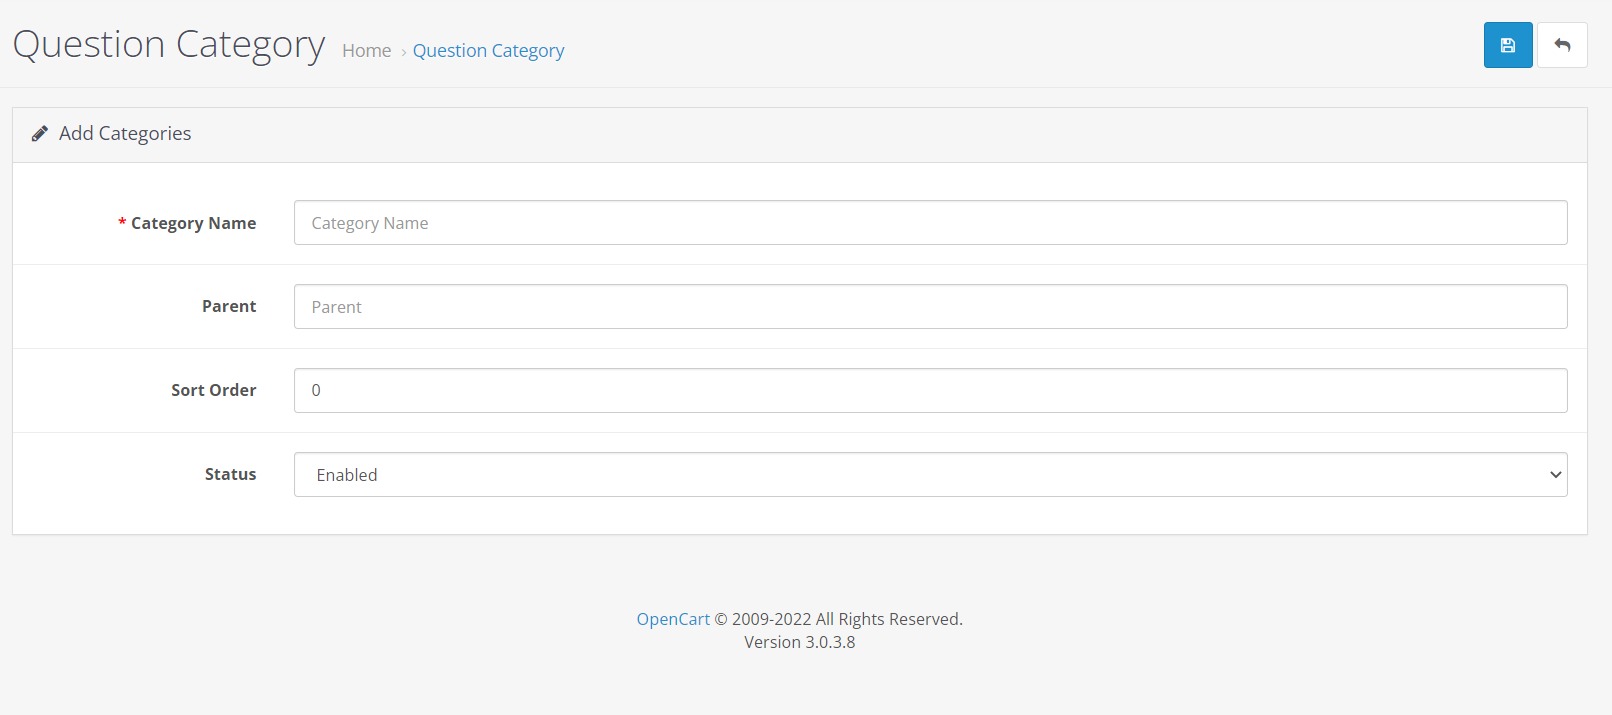
If your category is a subset of another category, a list of other categories will appear in the parent section, and you can place your new category under another category.
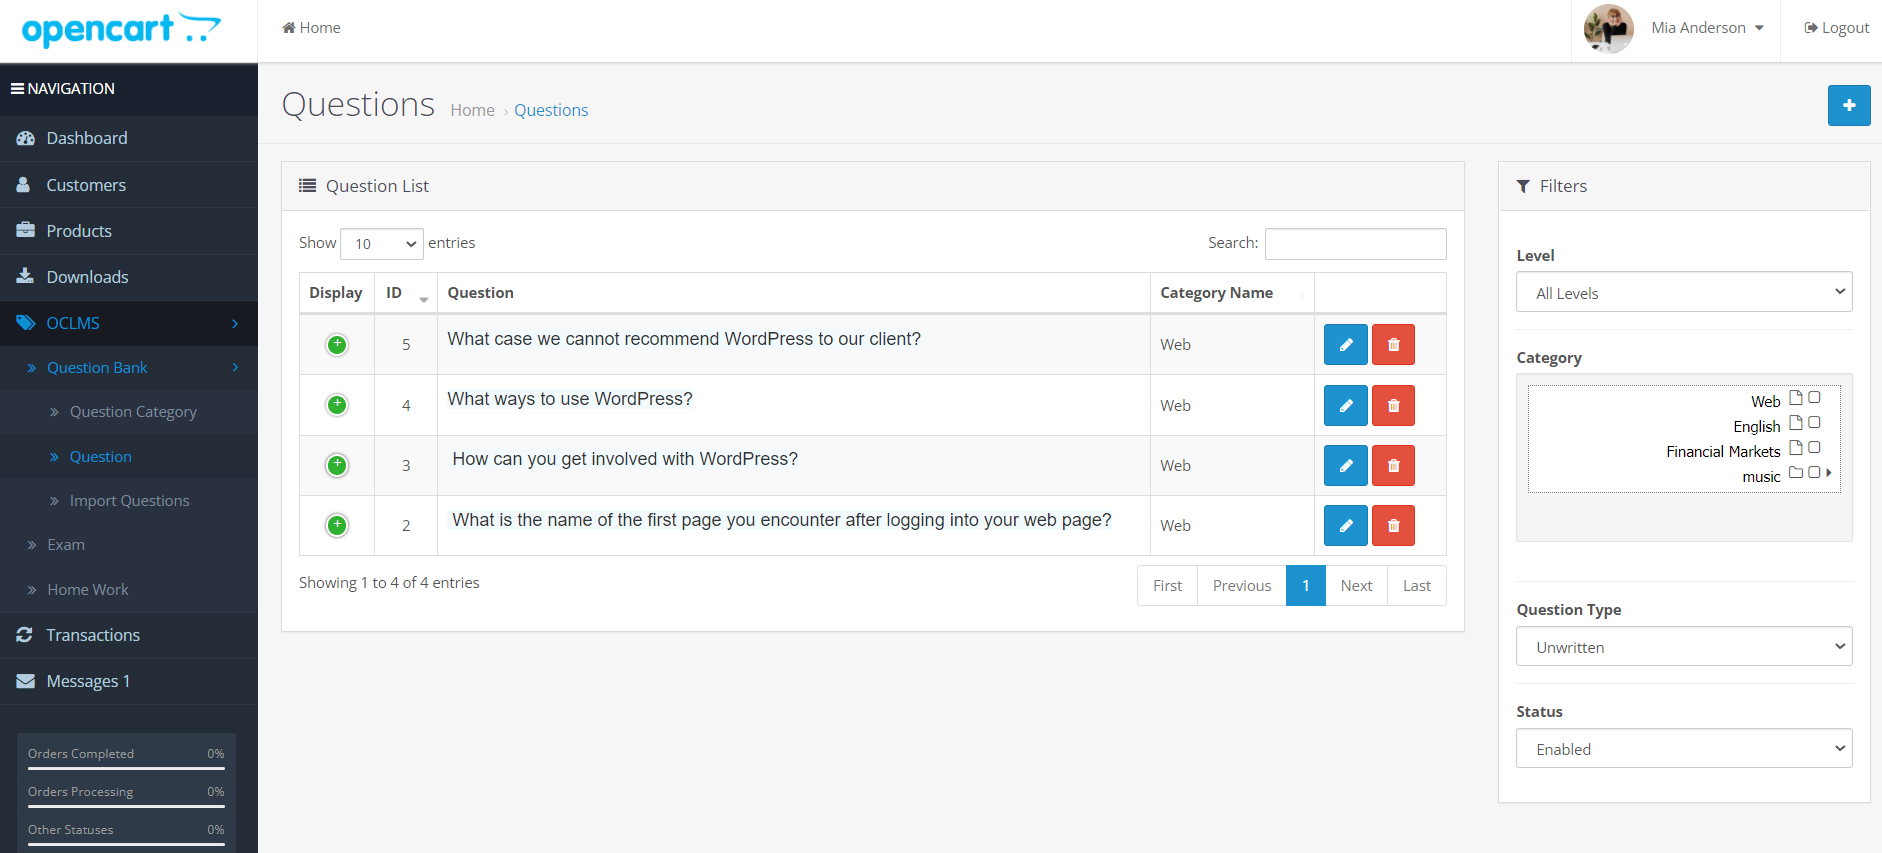
Questions :
In this section you can define your exam questions.
In the image below, you will see a list of defined questions.
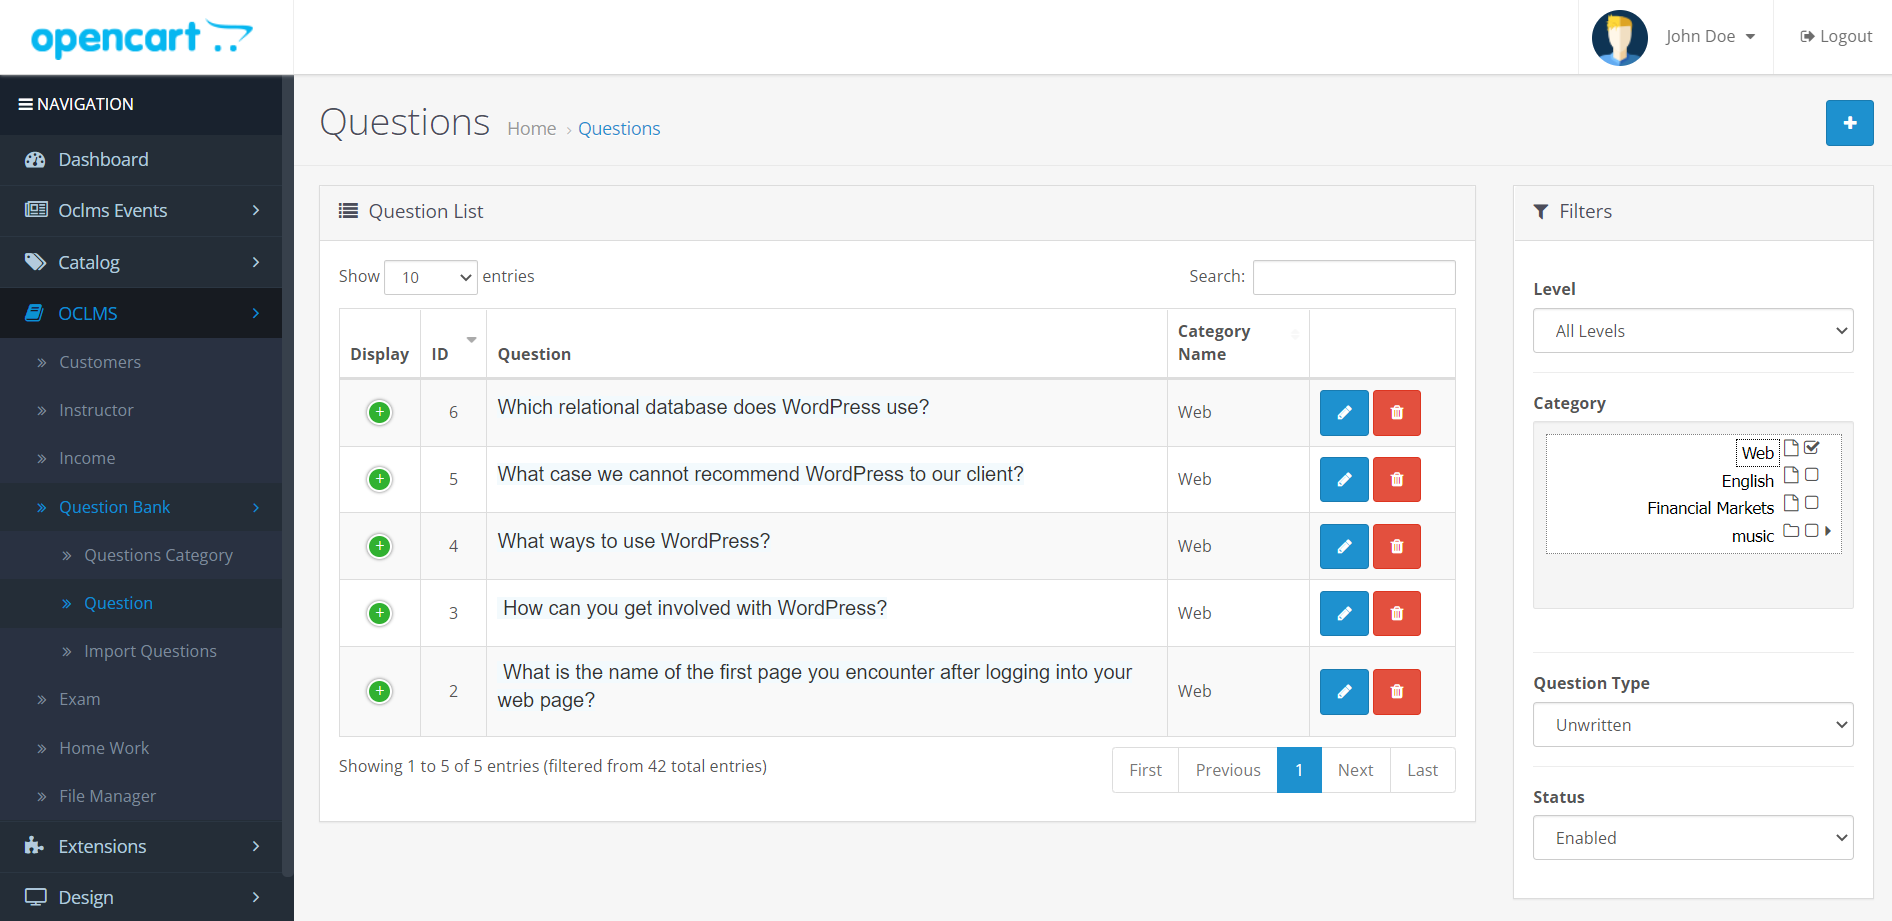
On the right side of this page there is a form where you can filter and search the questions you want using the options of this form.
Click the edit button to edit a question.
To add a question, click the blue button at the top left of the page with + sign to enter a page like the one below.
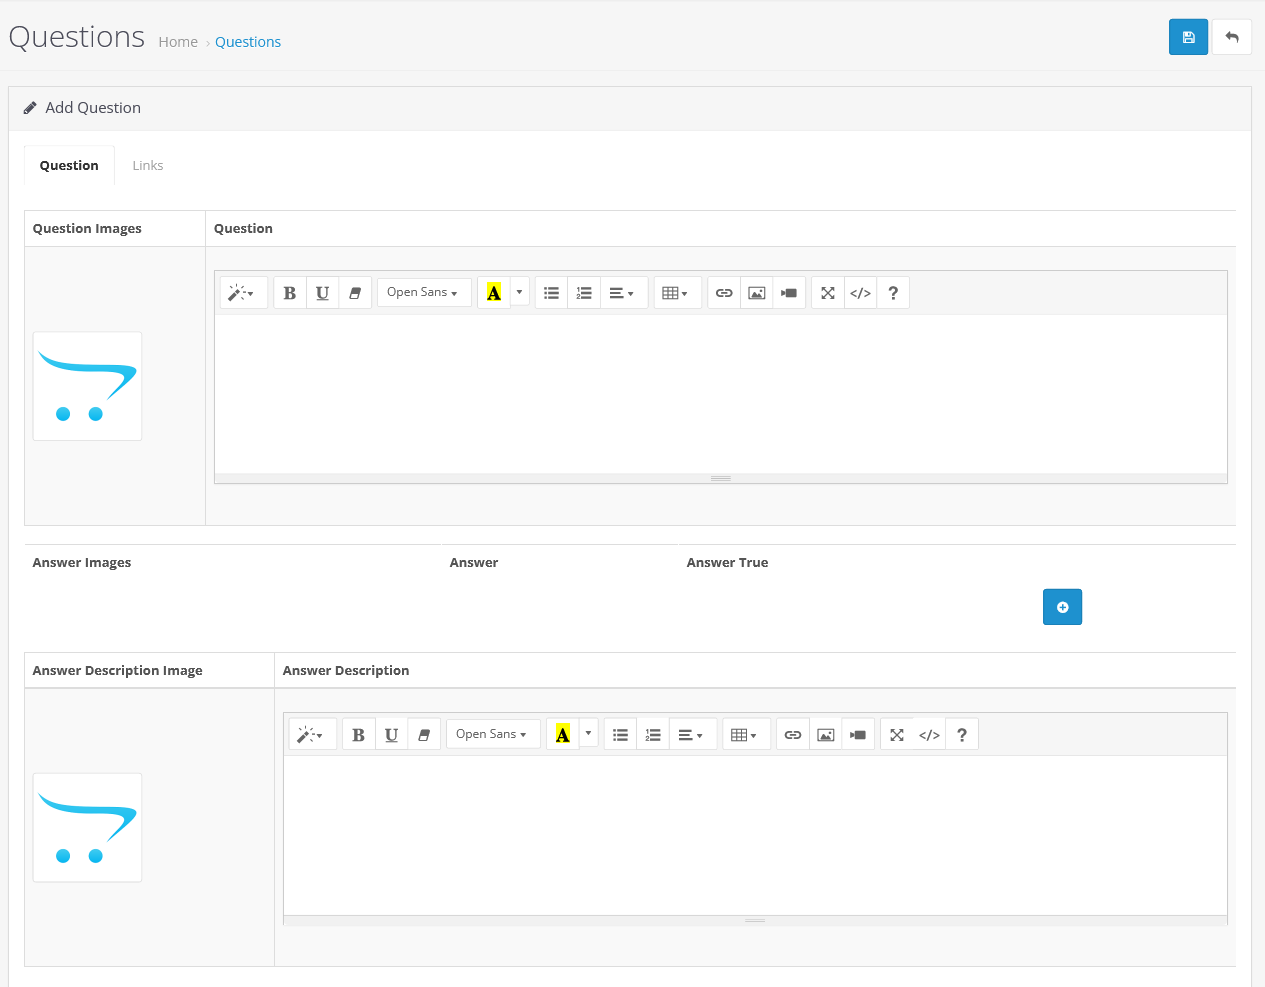
There are two tabs on this page, in the first tab we write the question and answer
In the Question section, the question is written, a little lower, you will see a + button with a blue color, which you must click on the number of options to add multiple-choice answer, and if you have a descriptive answer, write the answer in the answer description section.
In this tab, you can specify the category, level, type and status of the question.
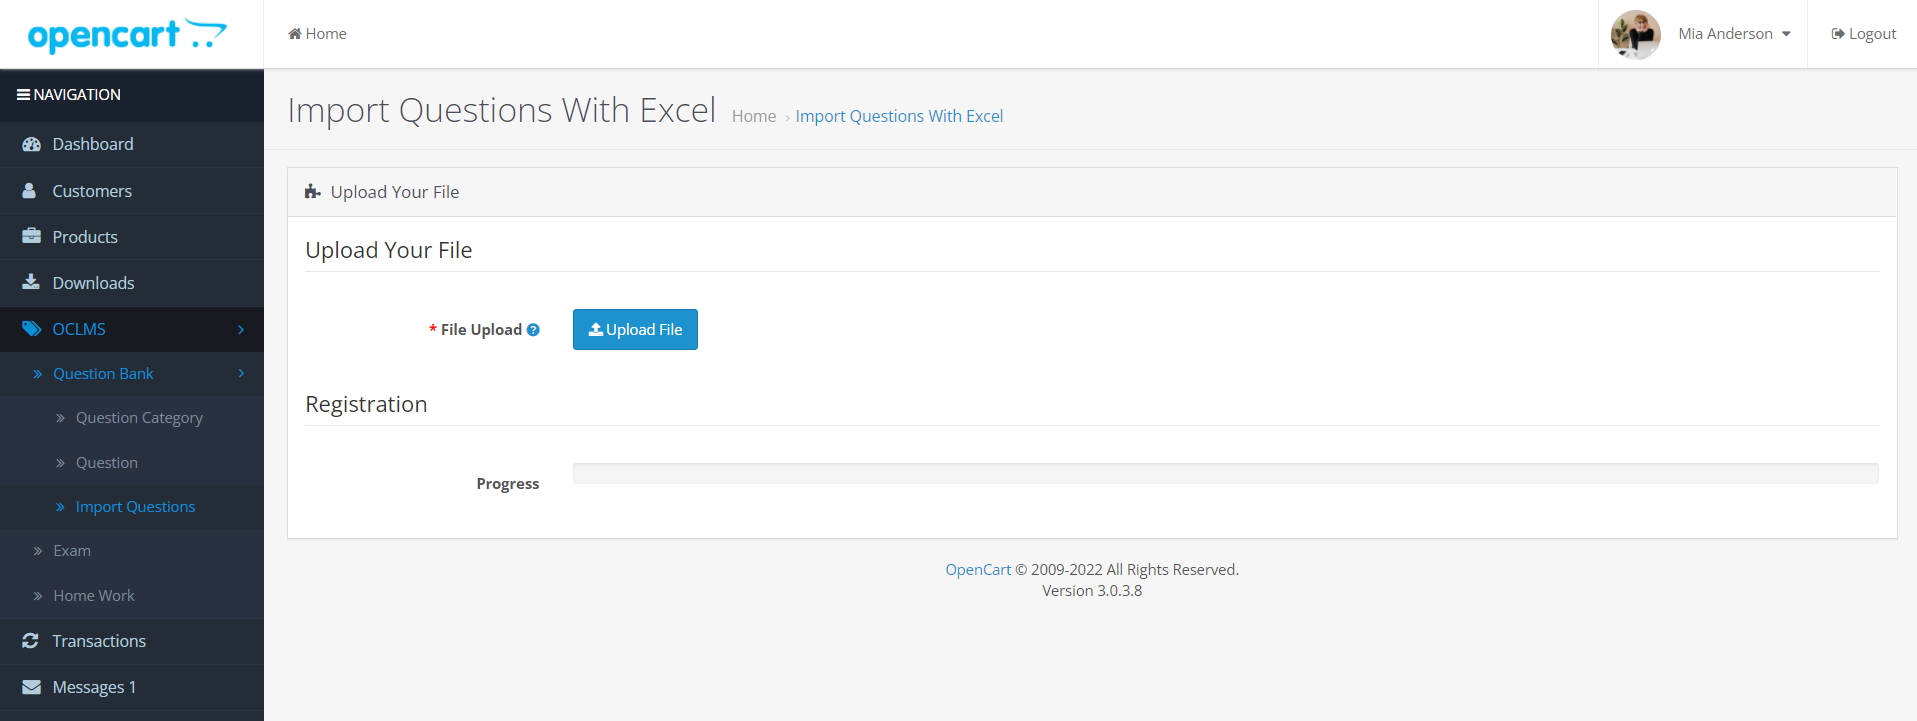
- Import Question :
In this section you can enter the questions through the excel file.
On this page, by clicking the upload button, you can upload your Excel file and questions will be added
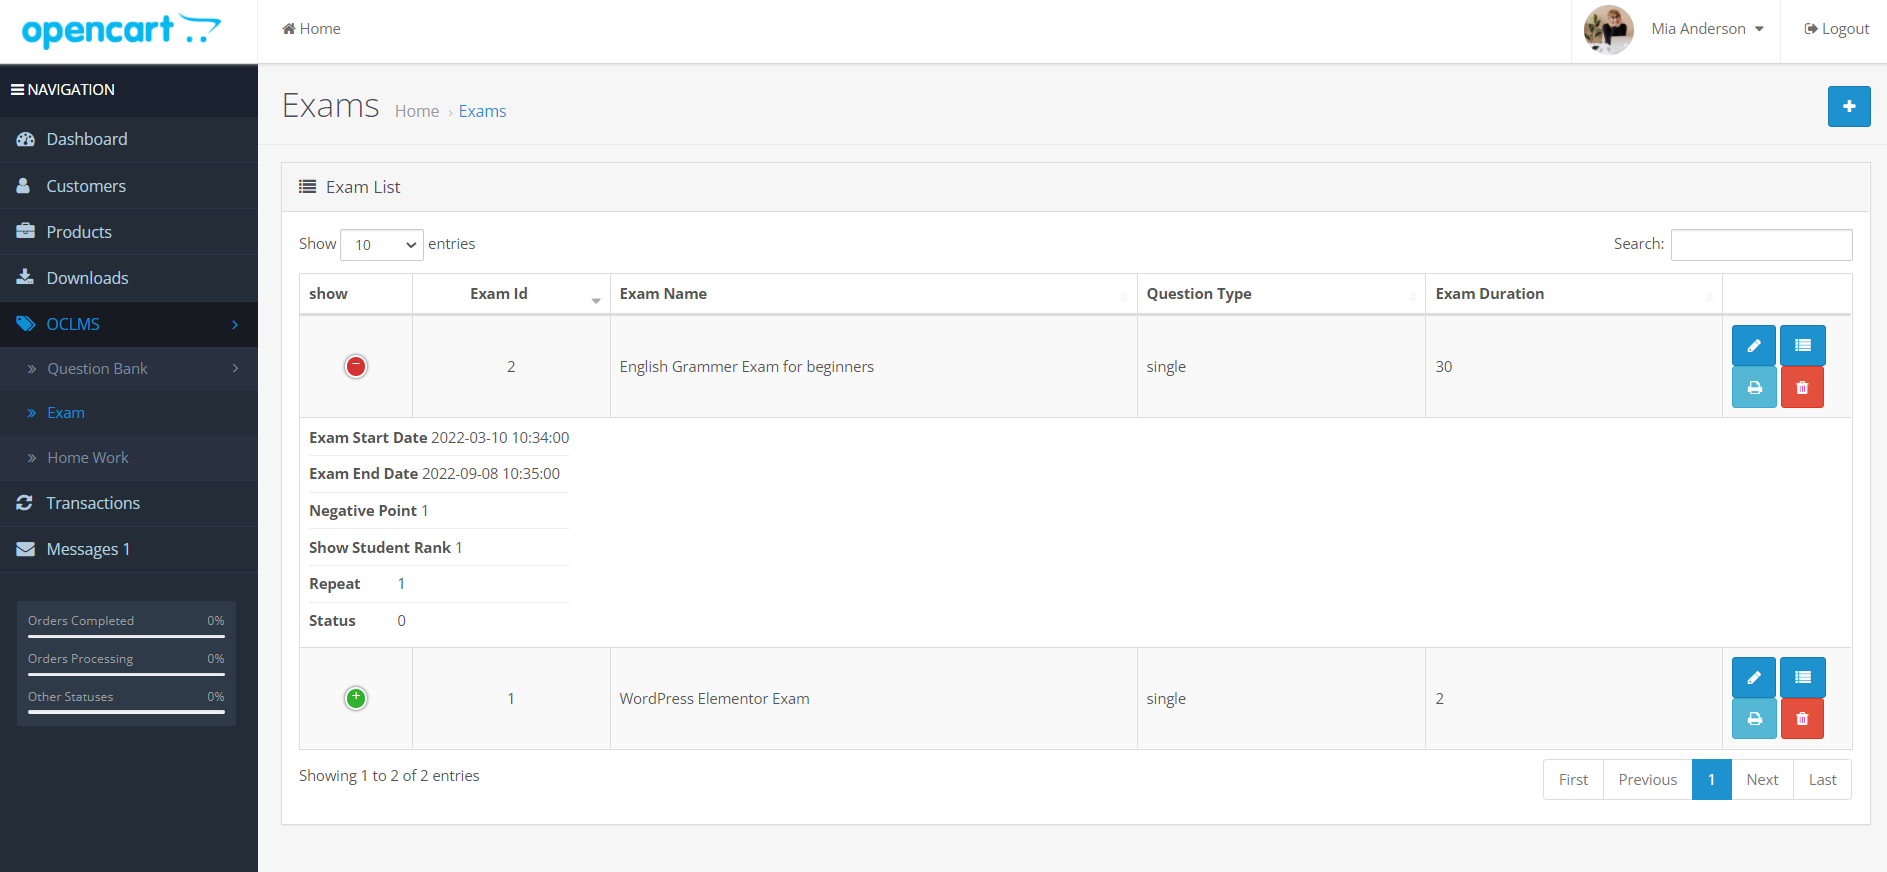
Exam:
This page show a list of exams defined by the admin
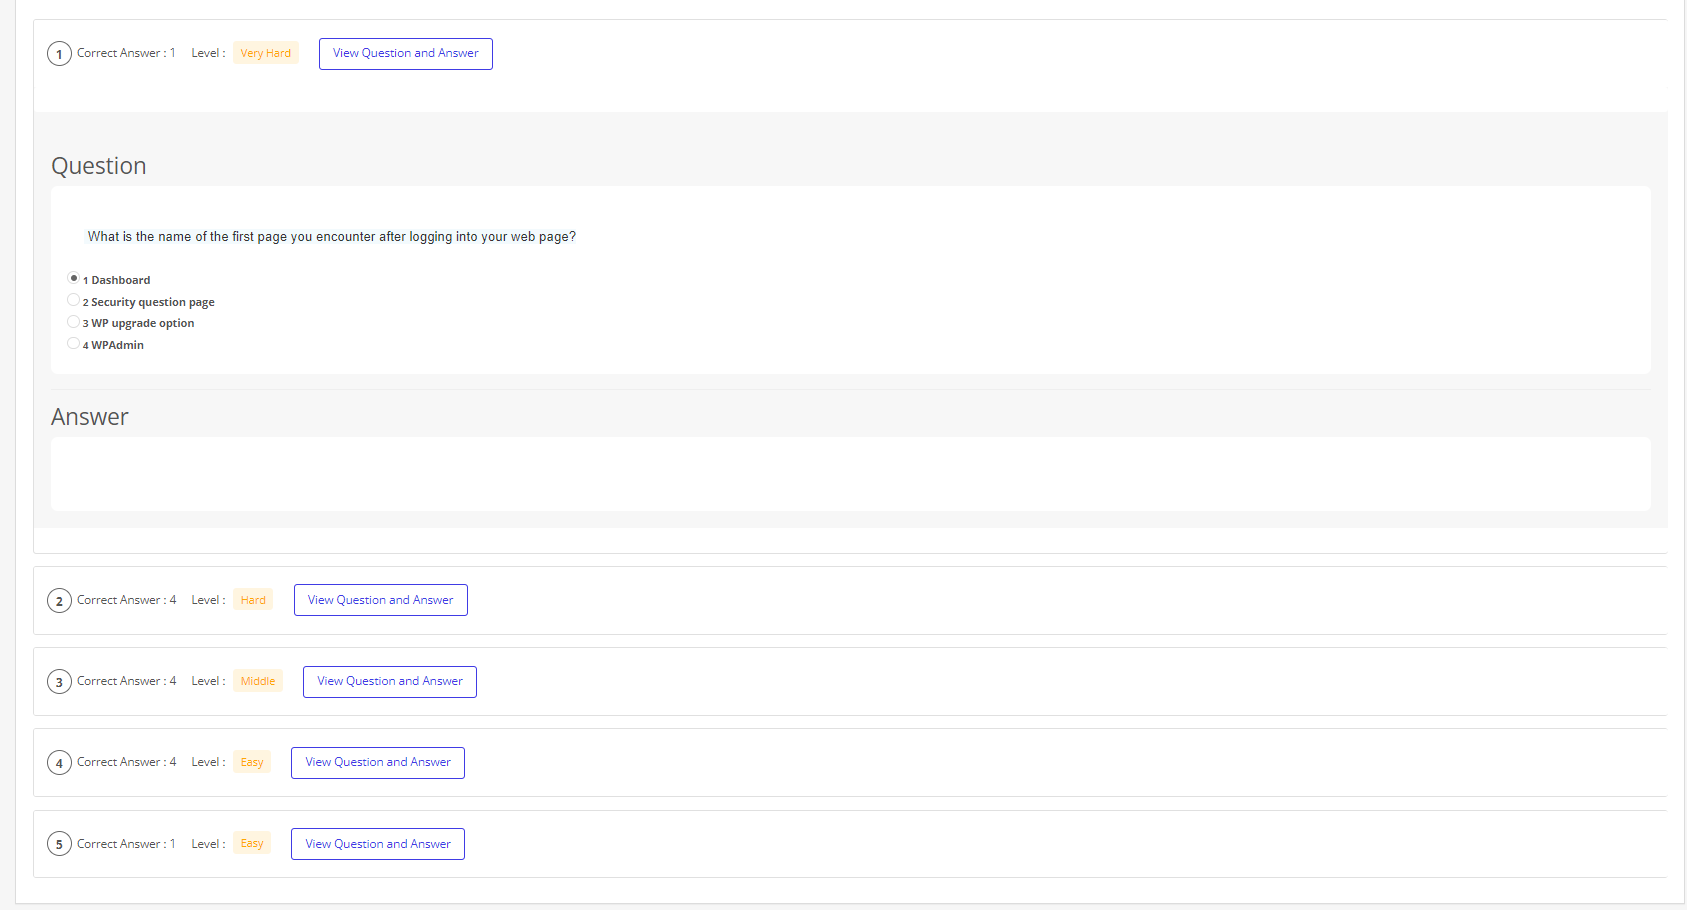
By clicking on the green button to the left of each row, as in the image above, you can see the details of each exam. On the right side of each row, you will see 4 buttons. By clicking on the Edit button, you can edit the exam.
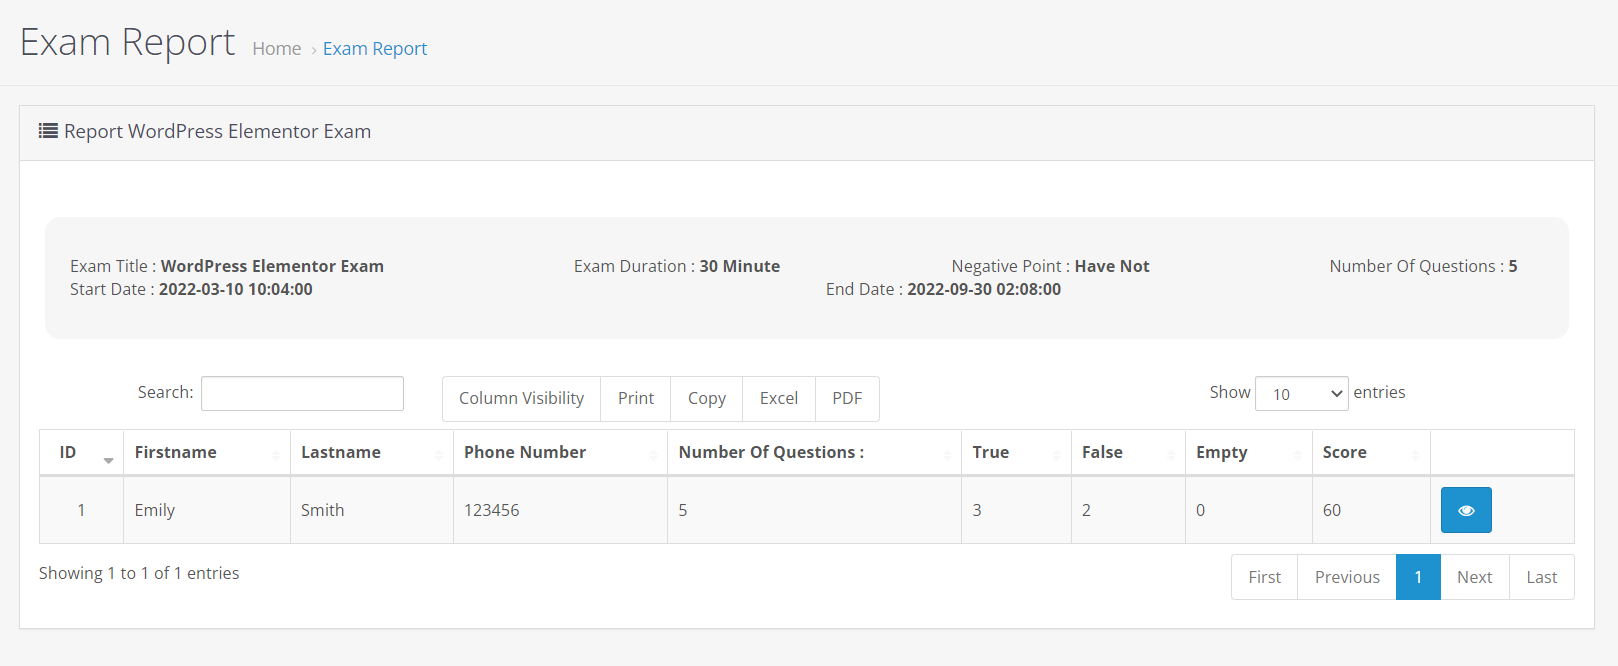
Next to the edit button is the Report button, which displays the transcripts of the students who took the exam, as shown below.

In this list, by clicking on the view button of each row, you will enter the student report page.
On the exam list page, you can print the exam questions by clicking the print button.
To add a quiz to the Exam list page, click the add option at the top right of the page to enter the following page.
This page contains two tabs that the first tab that you see above specifies the name, description, settings and start date of the end of the exam.
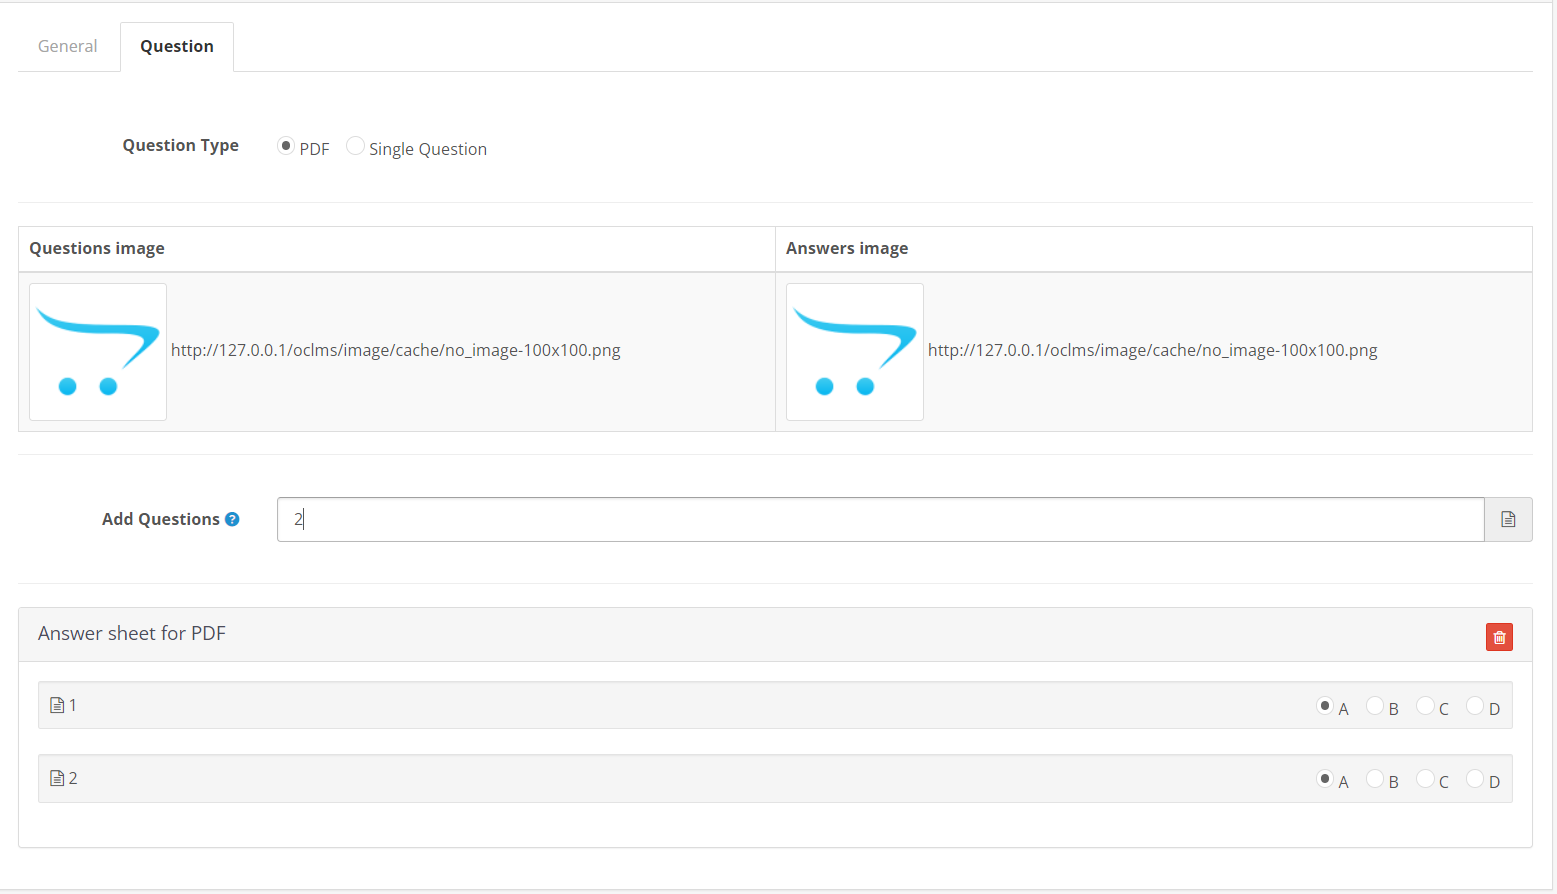
In the second tab that you see below, you can add exam questions.

There are two ways to add a question. The first way you see above is the pdf mode, where we enter the exam questions from the question image section, and for the answers in the add Question section, you enter the number of questions, and on the left button of this input, which Click on the specified file to create a 4-choice row for the number of questions you have, and add the correct answers in these rows.
The second way is to add individual questions, which you can see below.
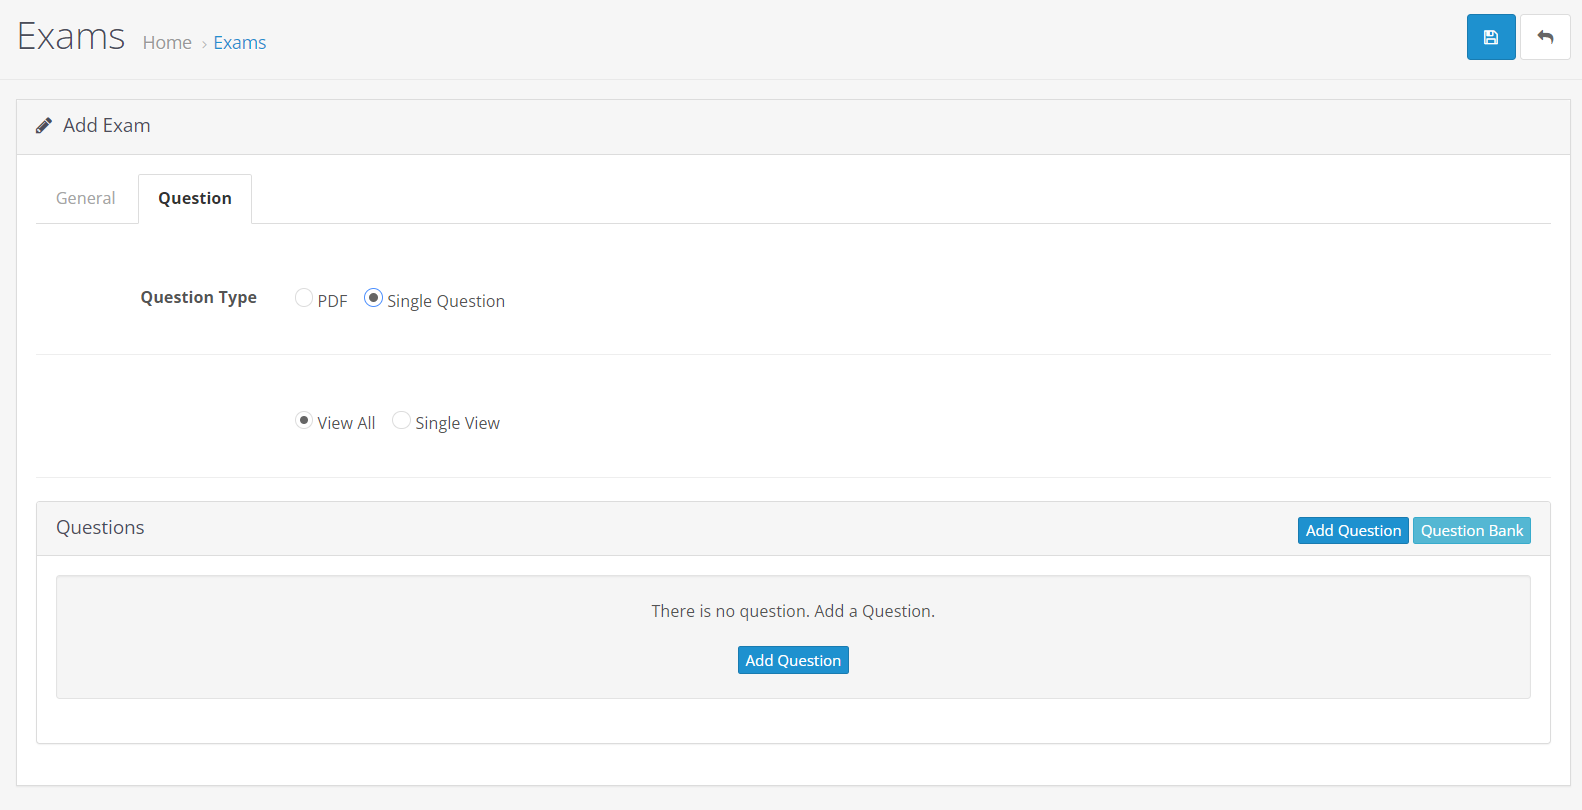
In this section, there are two modes. The first mode is addquestion, which by clicking on this option, you will enter the Questions page, and you can add your desired questions directly and enter the exam.
The second way is to use the questions that have been added in the questions section. To do this, you must click on the question bank button to open your sub-box.
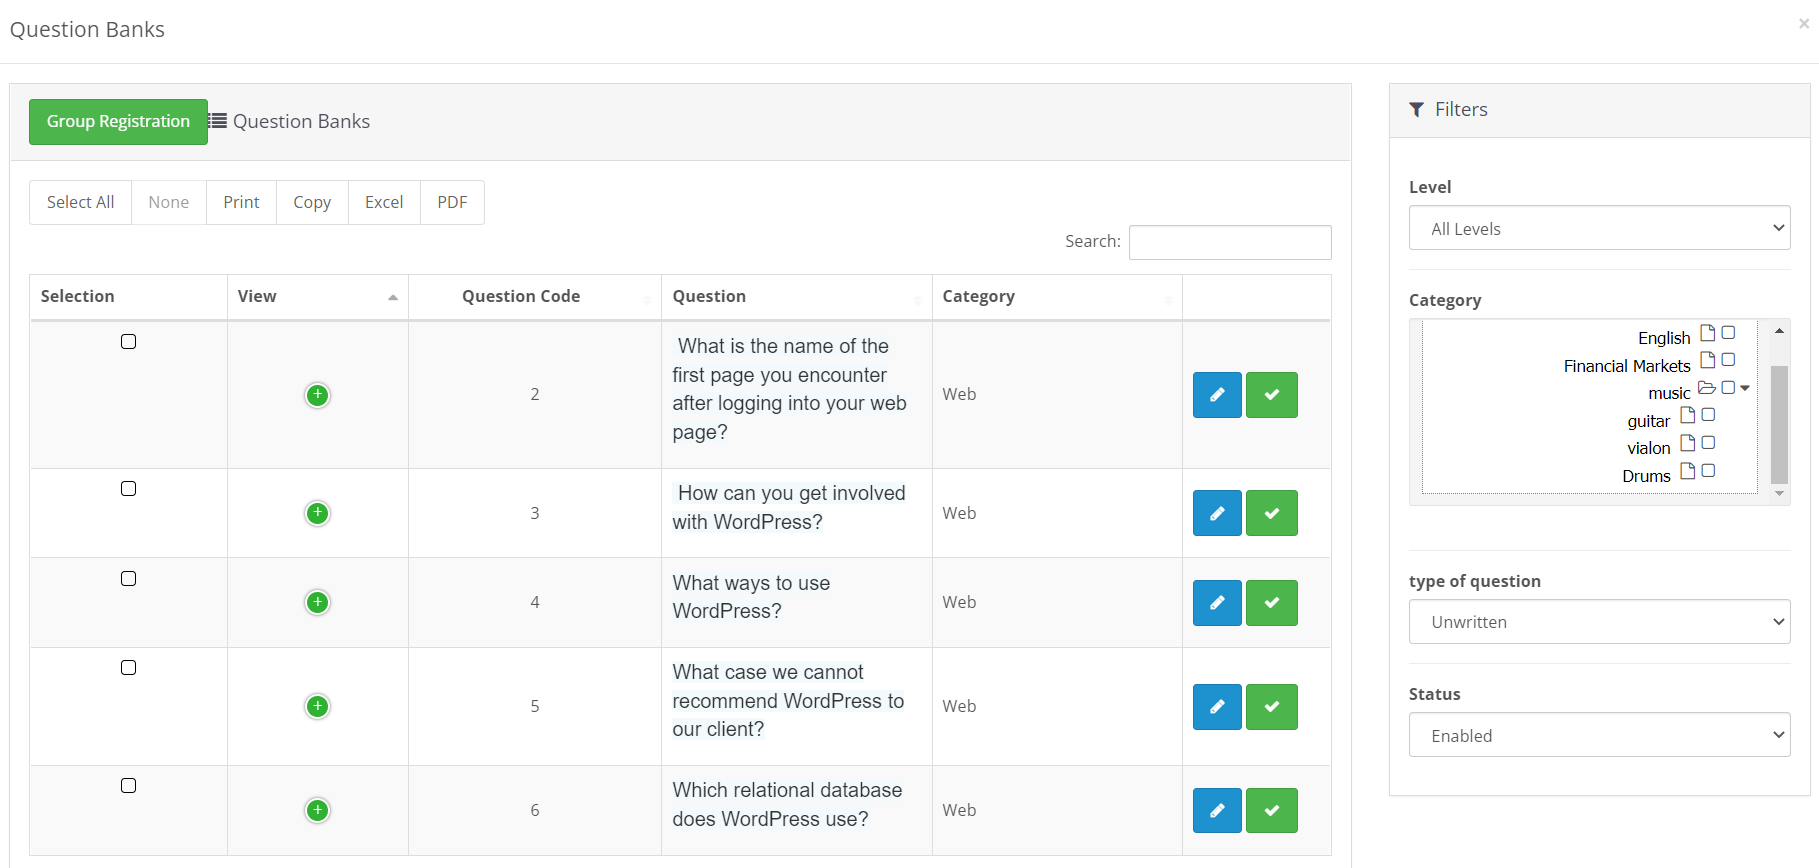
Any question you need in your exam can be added to your exam by clicking the green button with a check mark in each row.
homework :
This page lists all the defined homework.
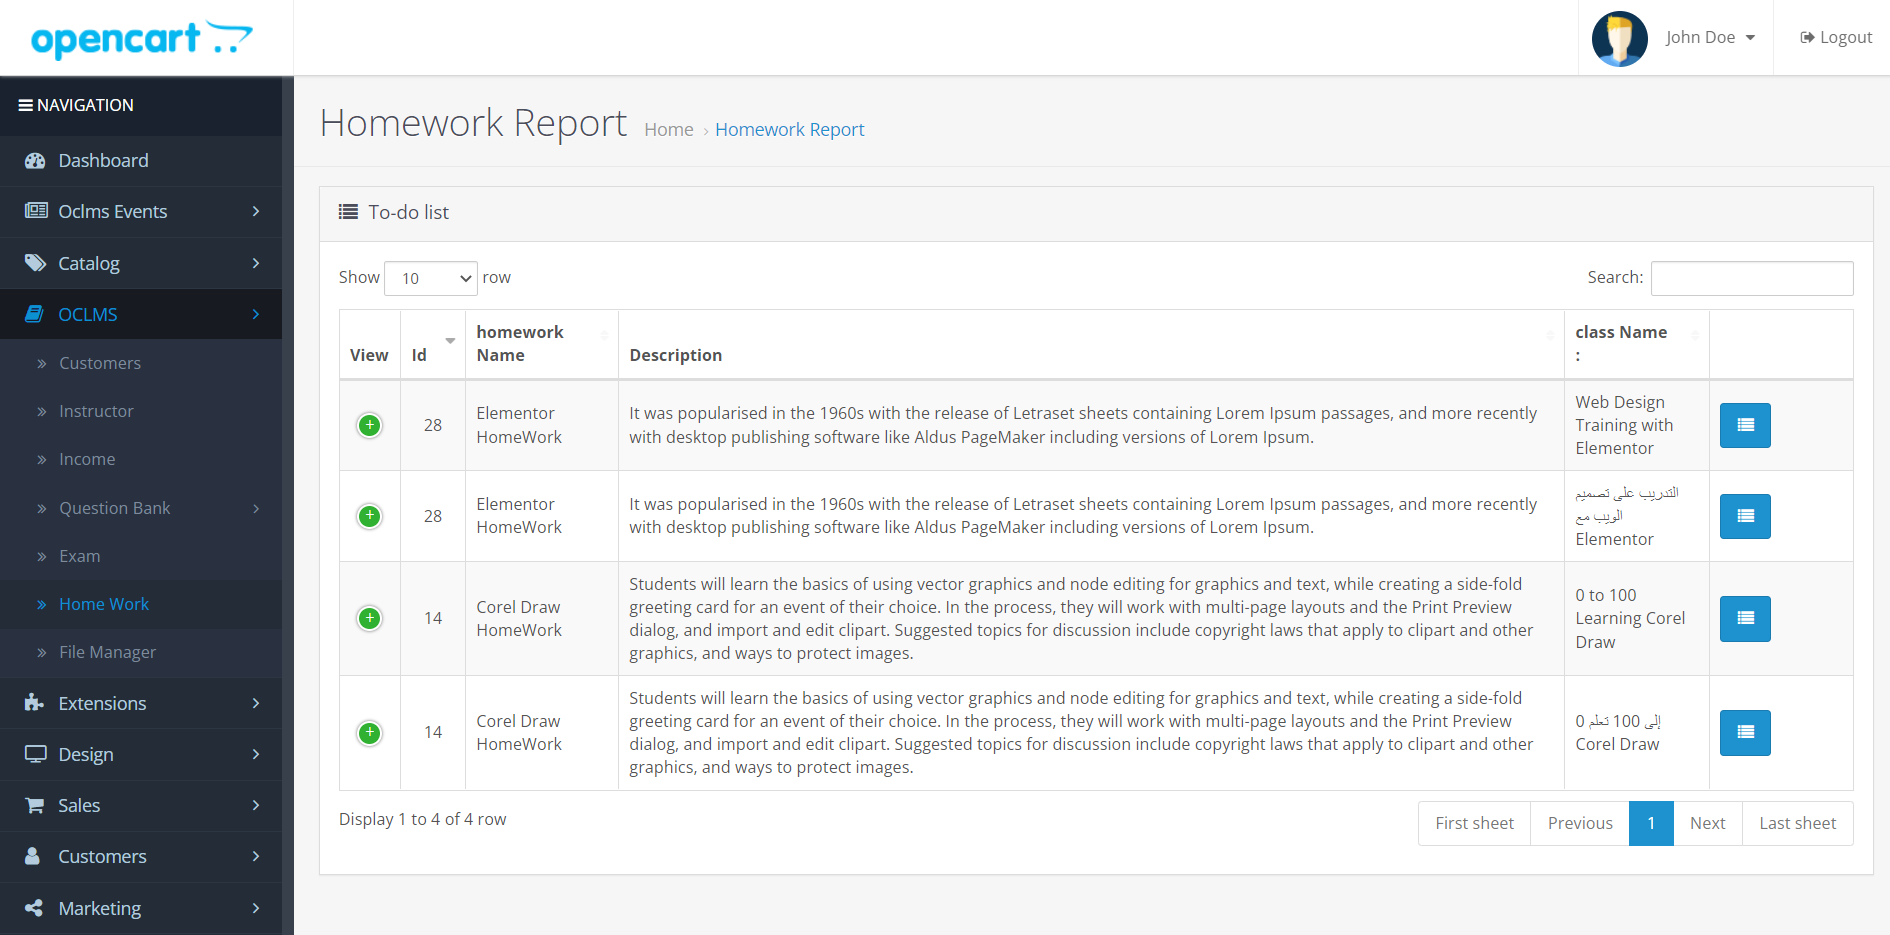
By clicking on the action of each task, the list of students who have done that task will be displayed along with the download file uploaded by the student as shown in the image below.
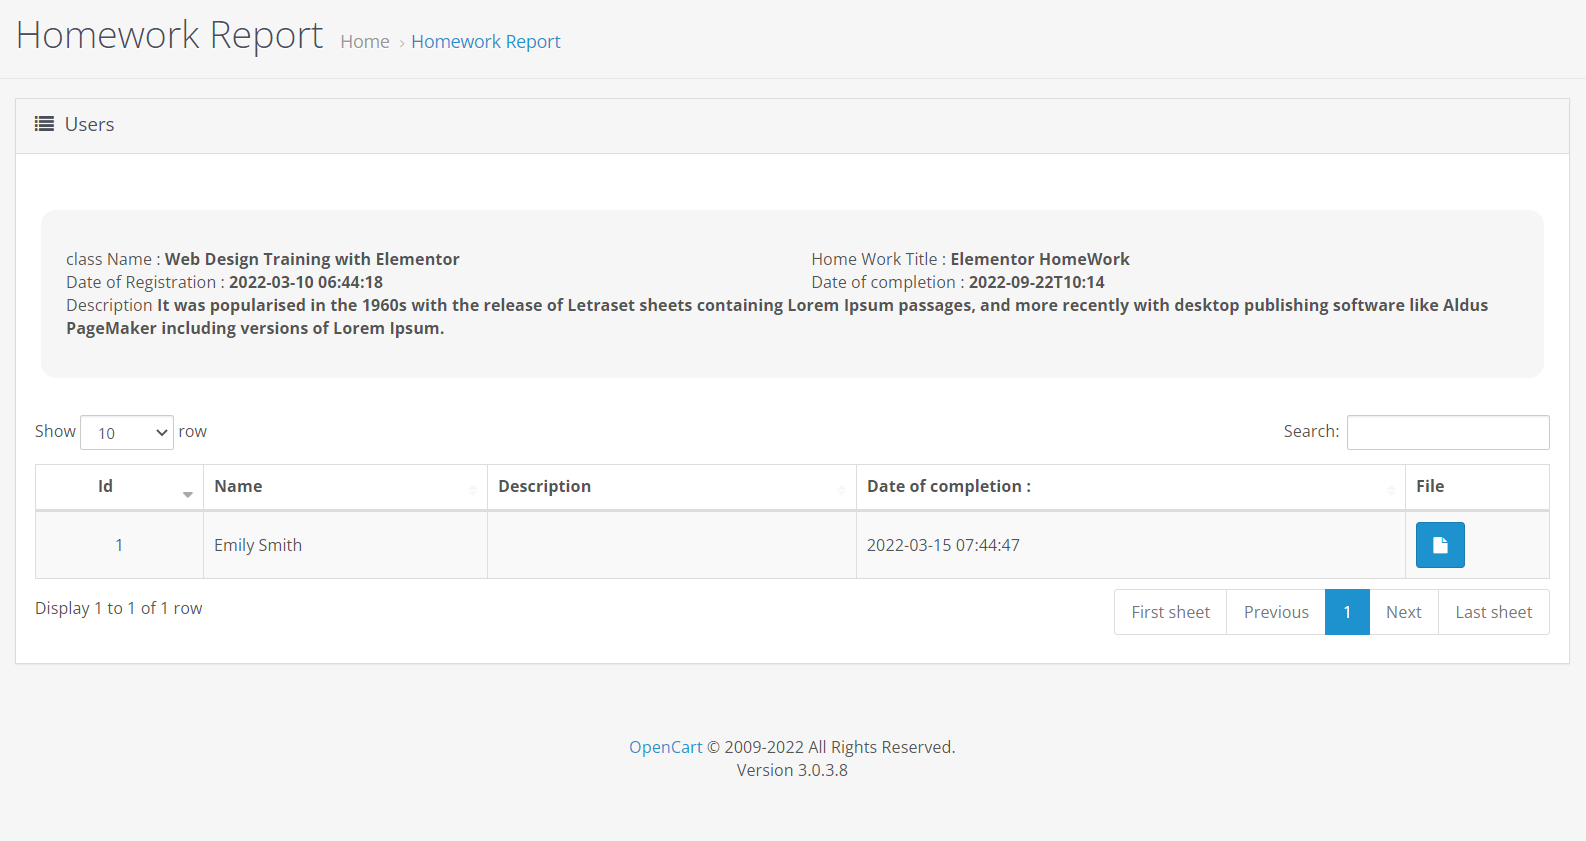
By clicking on the file button, you can download the student,s uploaded file
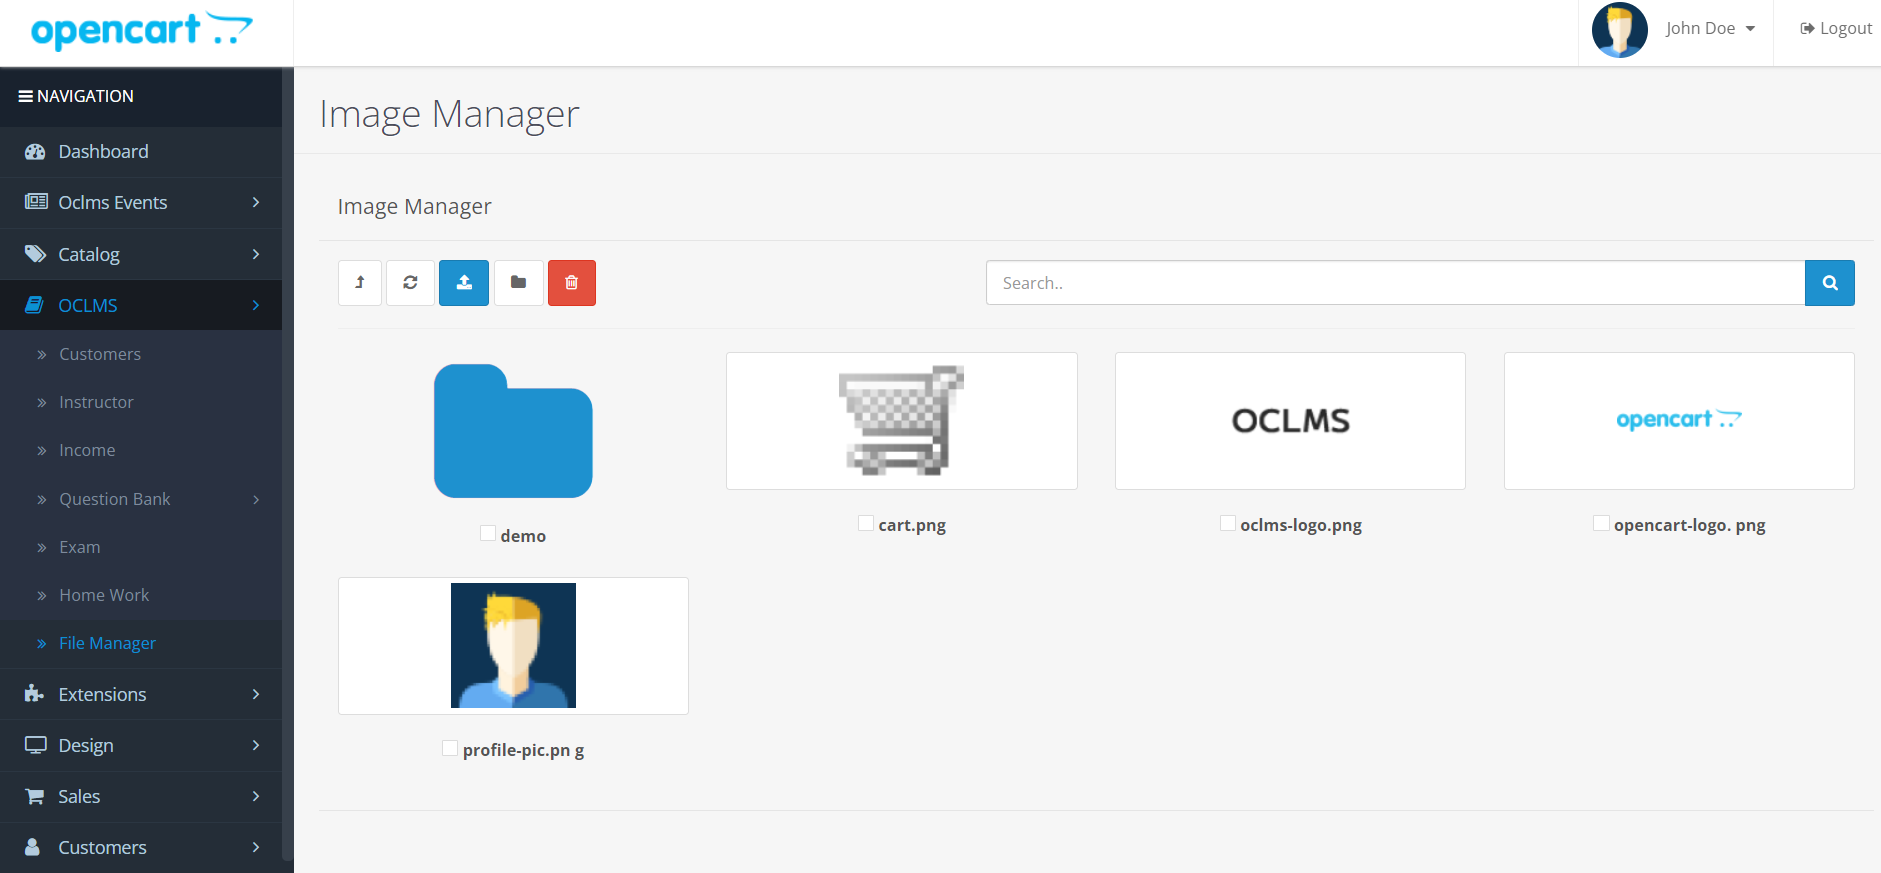
File Manager :
This page is very similar to opencart filemanager itself and holds all the files and images of the website and you can manage them.
How to install the theme :
The Retrina team has designed several themes that make your website more user-friendly.
Whenever you want, you can change the theme of your website and download new themes from the website ... and install the theme you want by following the steps below.
- Unzip the theme file after downloading
- After extracting the file, you will see a zip file. (Do not unzip this zip file in any way.)
- open the admin section of the website
- After entering the admin panel, select the Extensions / Installer menu from the left menu to open the following page.
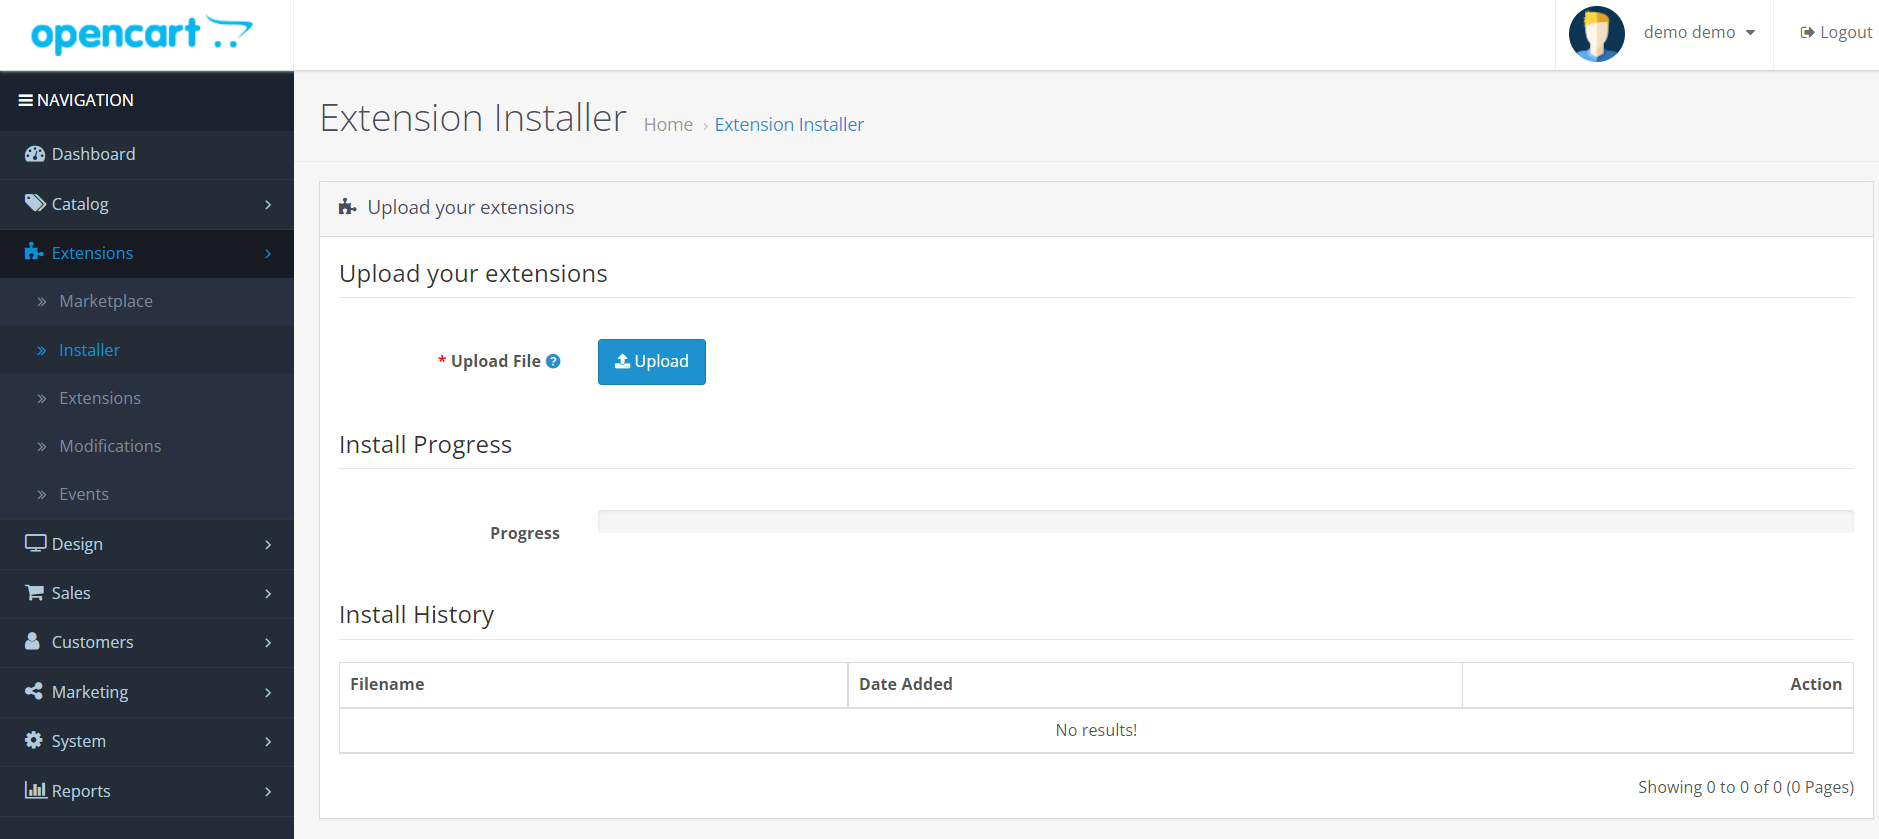
- Click onthe upload button and select the zip file named oclms_theme.ocmod.zip from the theme downloaded folder to complete the progress operation.
- If you installed oclms module from opencart then click on the upload button again and follow this path: (oclms/oclms_themes/your uploaded theme name/install.ocmod.zip). Double-click on this file to complete the progress operation.
- From the menu on the left, select the Extensions / Modification menu to enter the following page
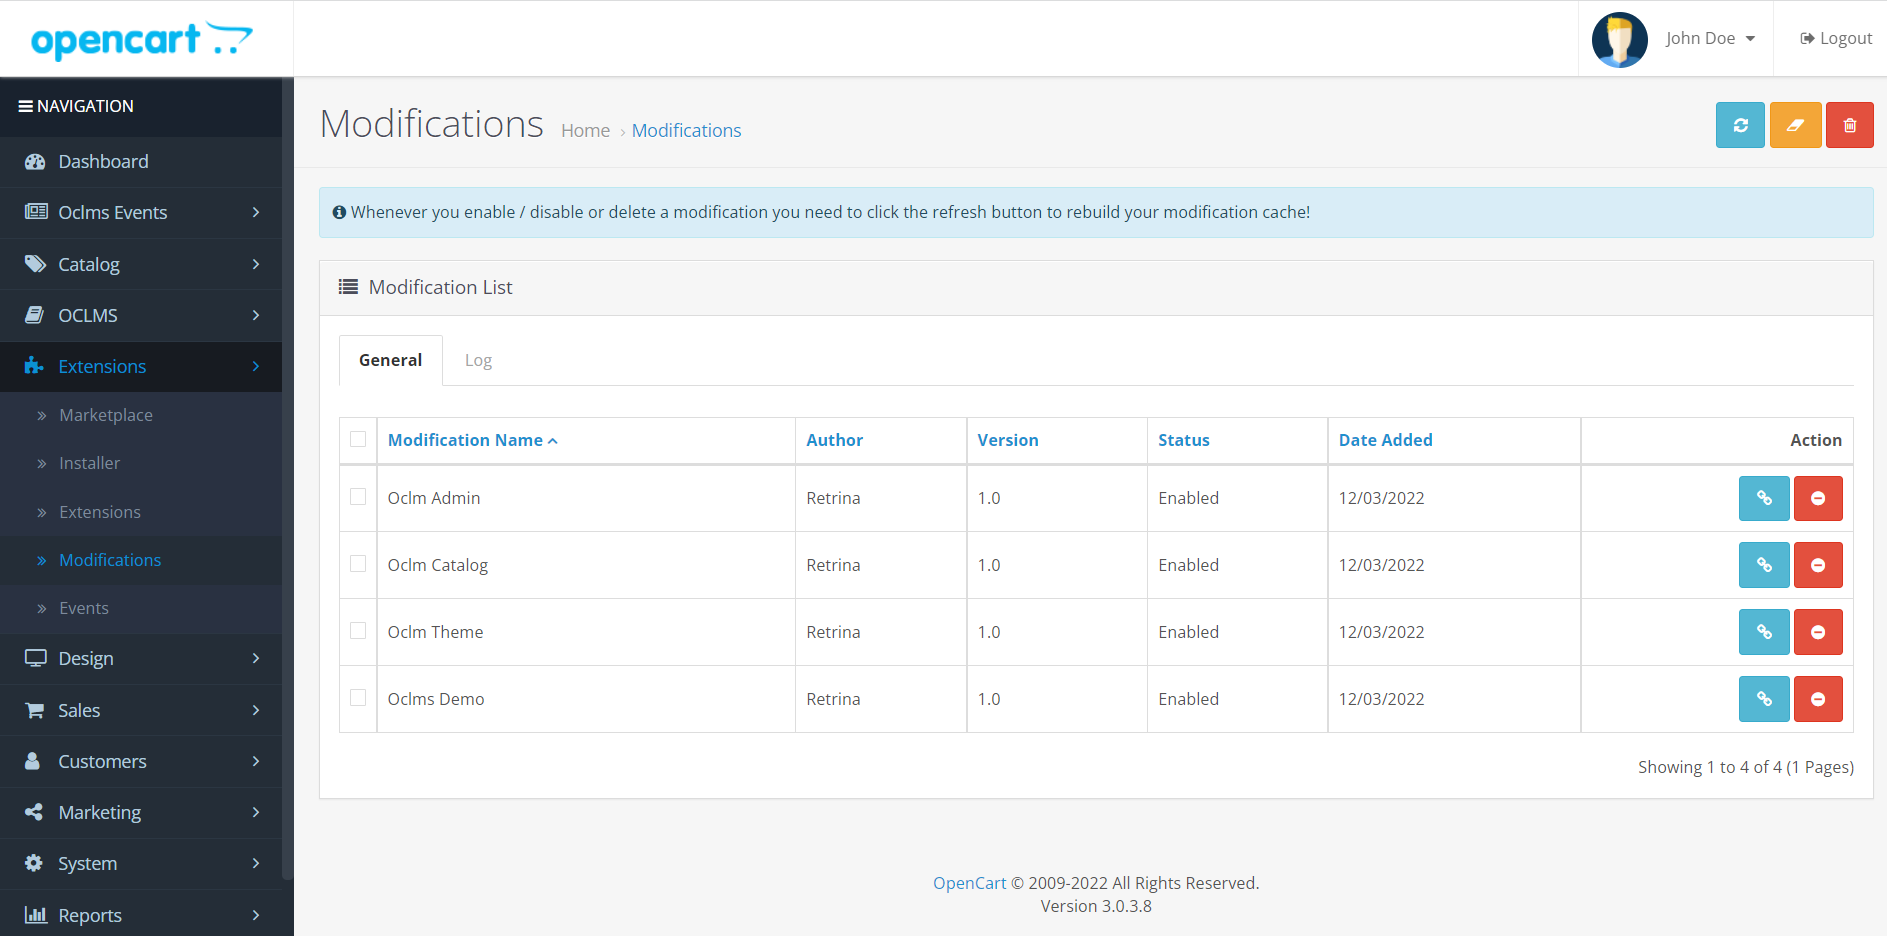
- In this page, click on the refresh button from the top right
- Then enter the Extensions / Extensions submenu and select the Themes option from the Extension Type section to open the following list for you
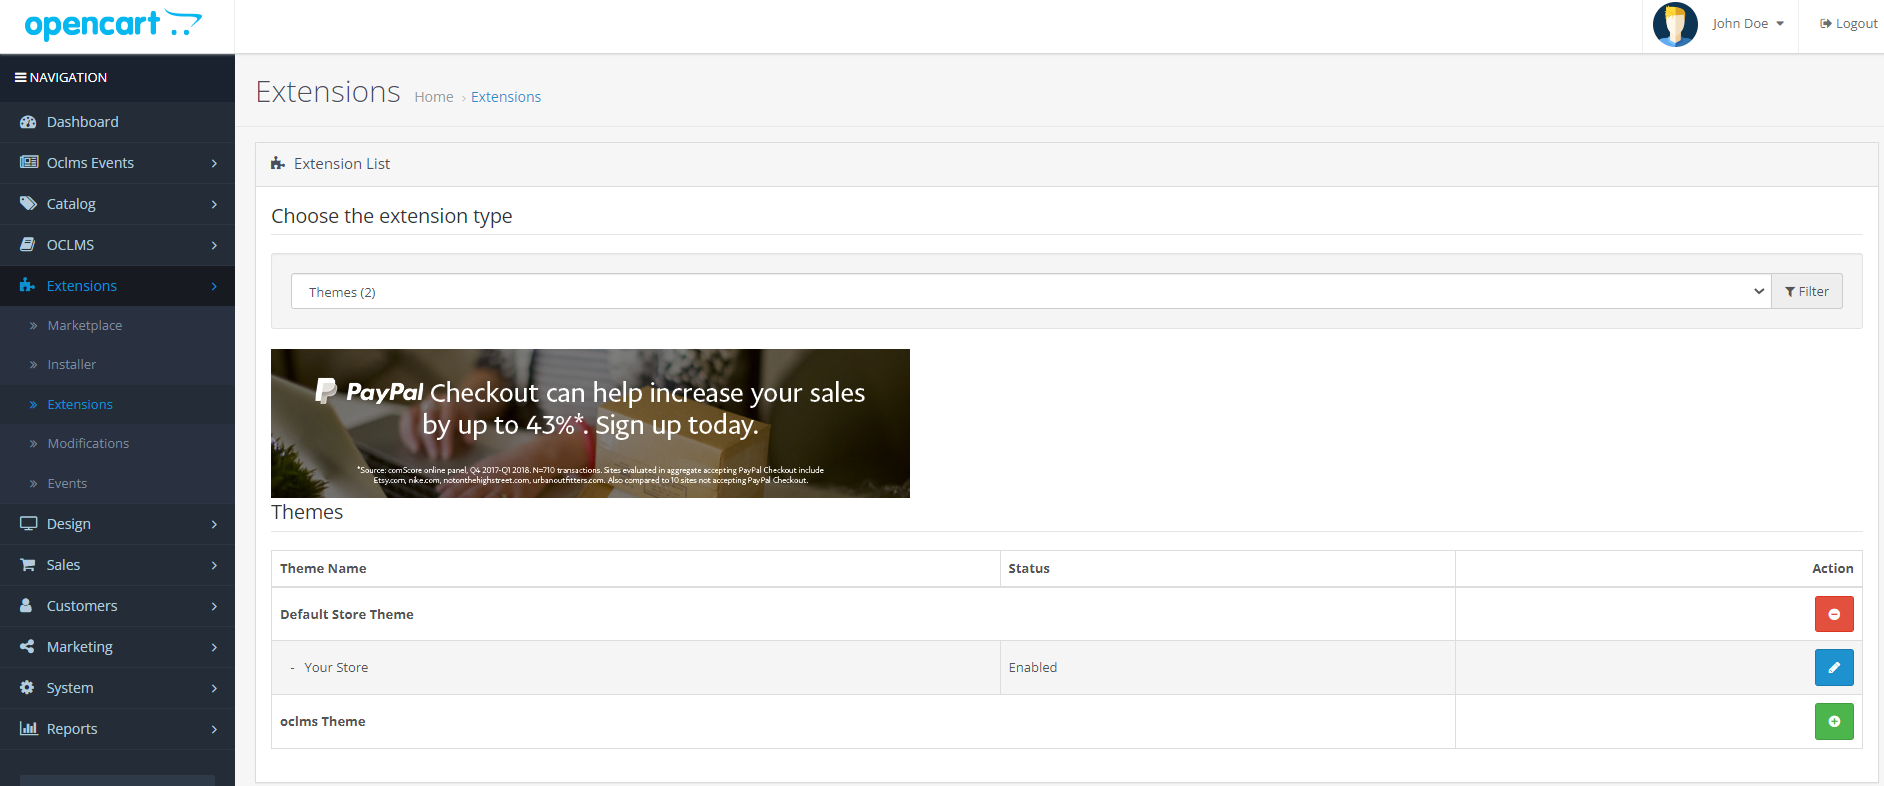
- As you can see, the theme you want has been added to the list of opencart themes
- On the right side of the name of your installed theme, click on the install button, which is a green button with a + sign to install the theme you want
- After installing the theme, the list of themes is displayed as follows
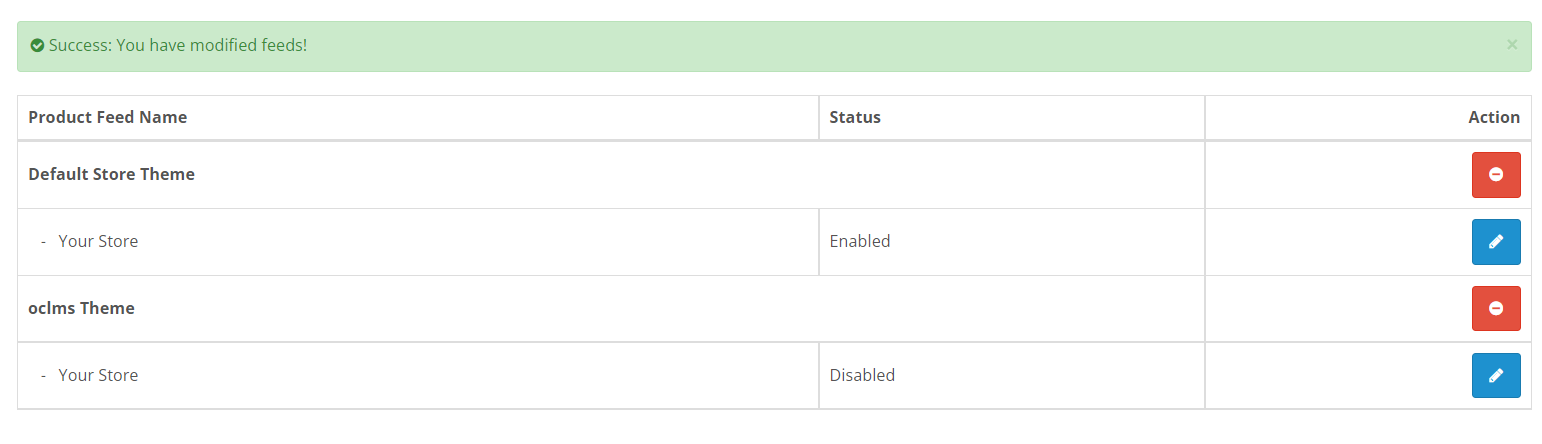
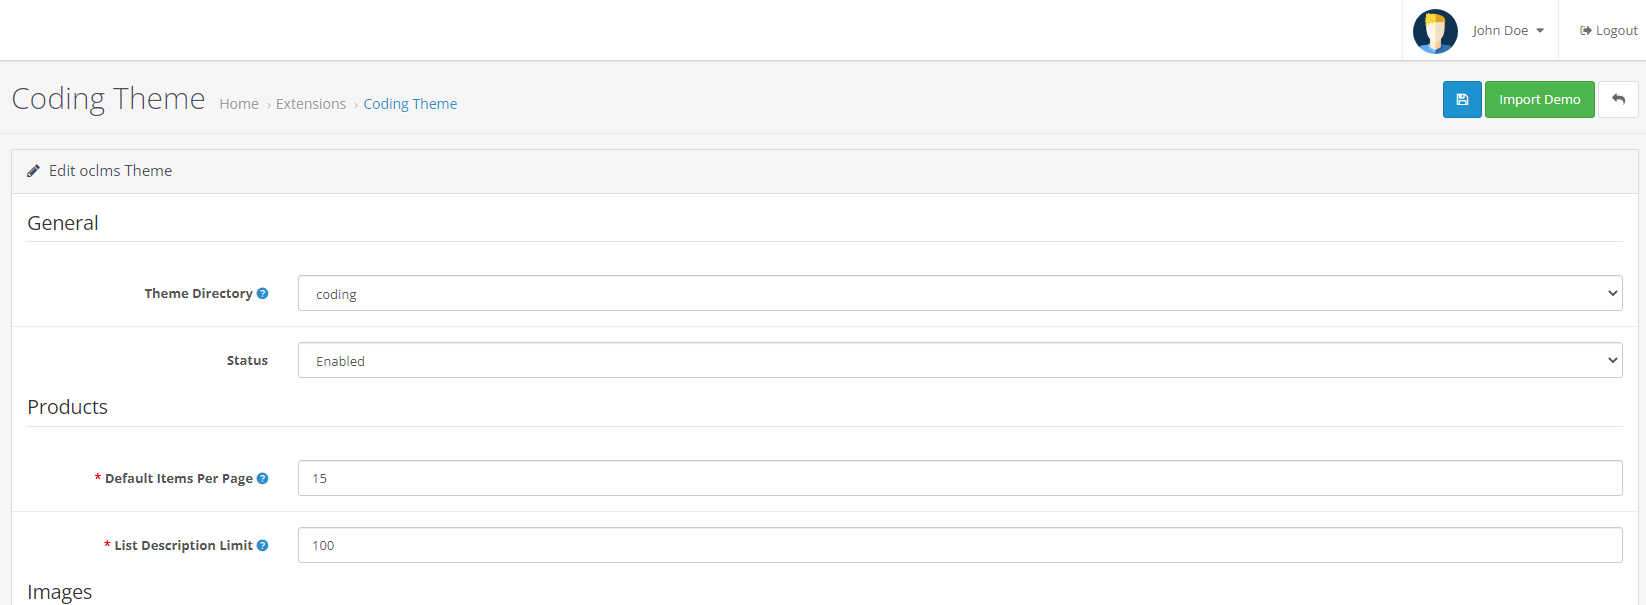
- An edit button has appeared next to the theme name. Click on this button to open the following page for you
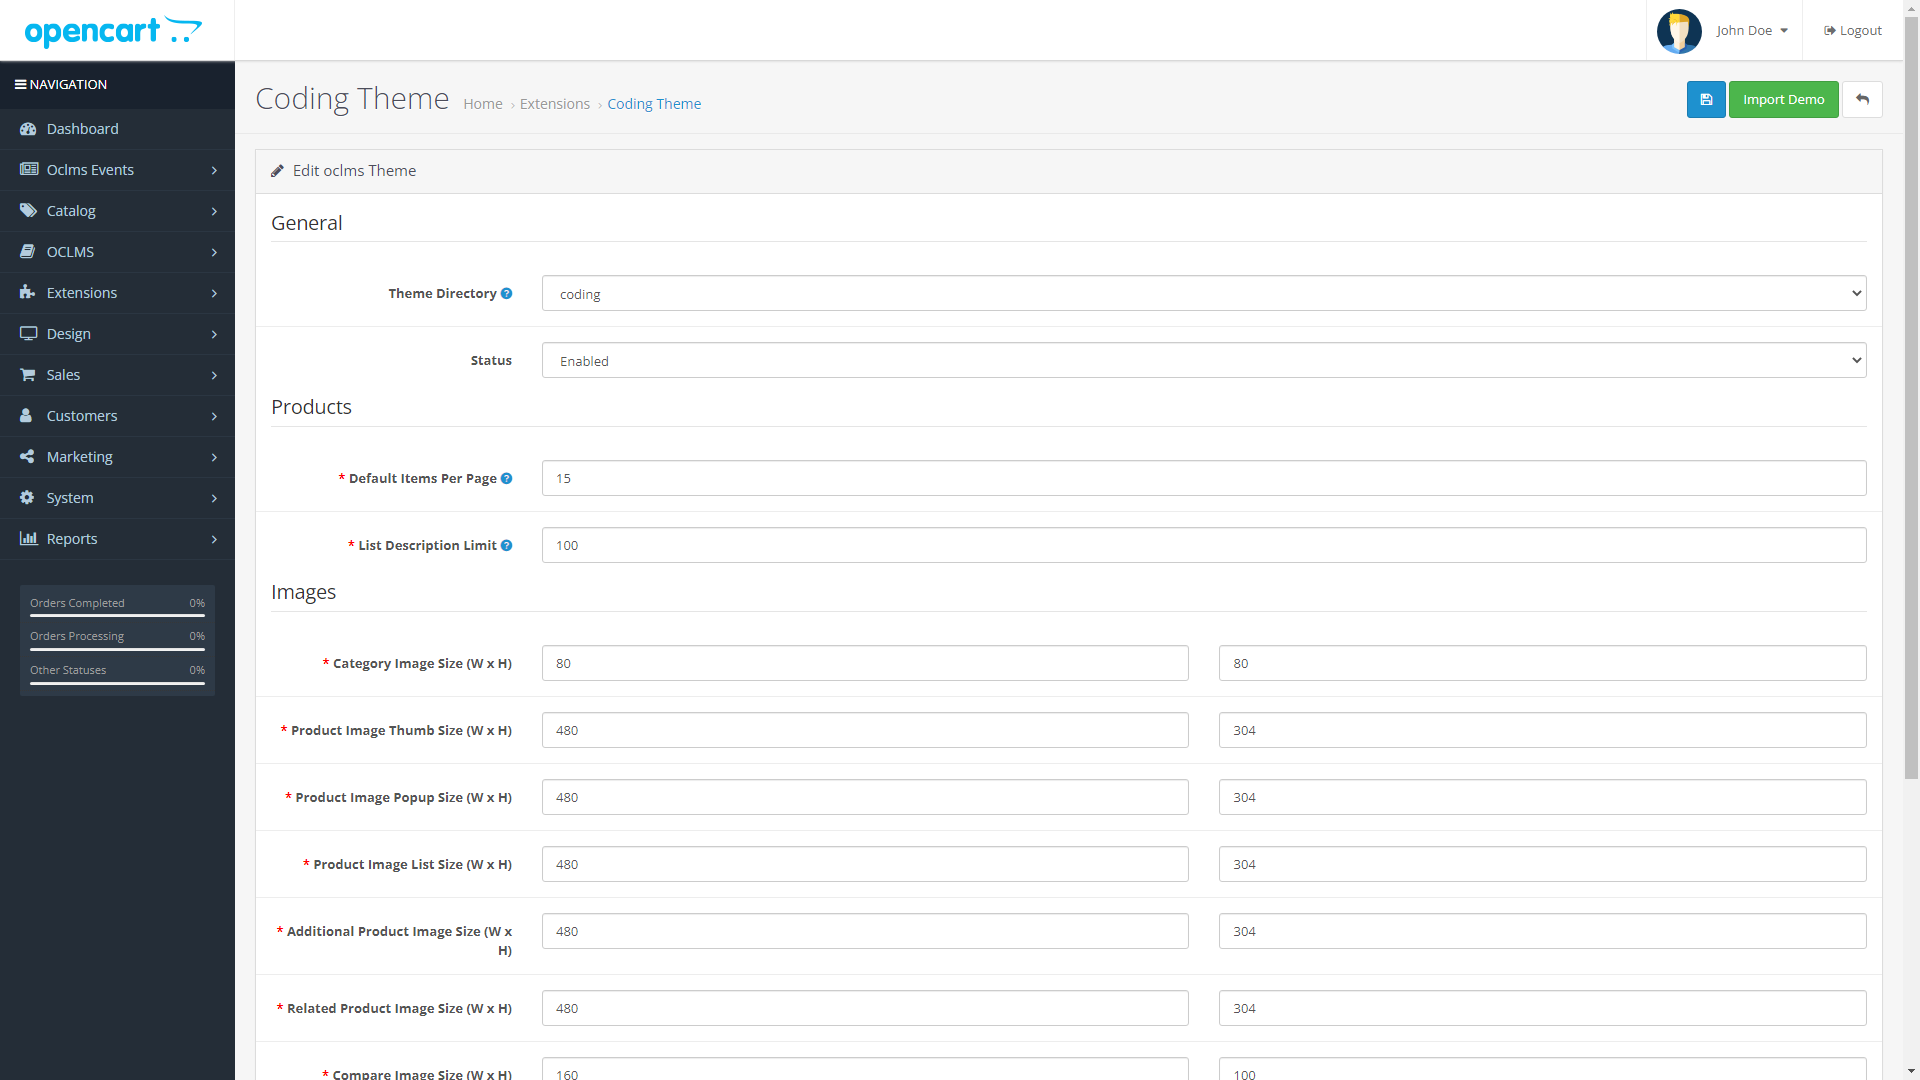
- On this page, make your desired settings and then from the status section, click on the Enabled option and then save your settings
- From the menu on the left, enter the System / Setting submenu to open the following page
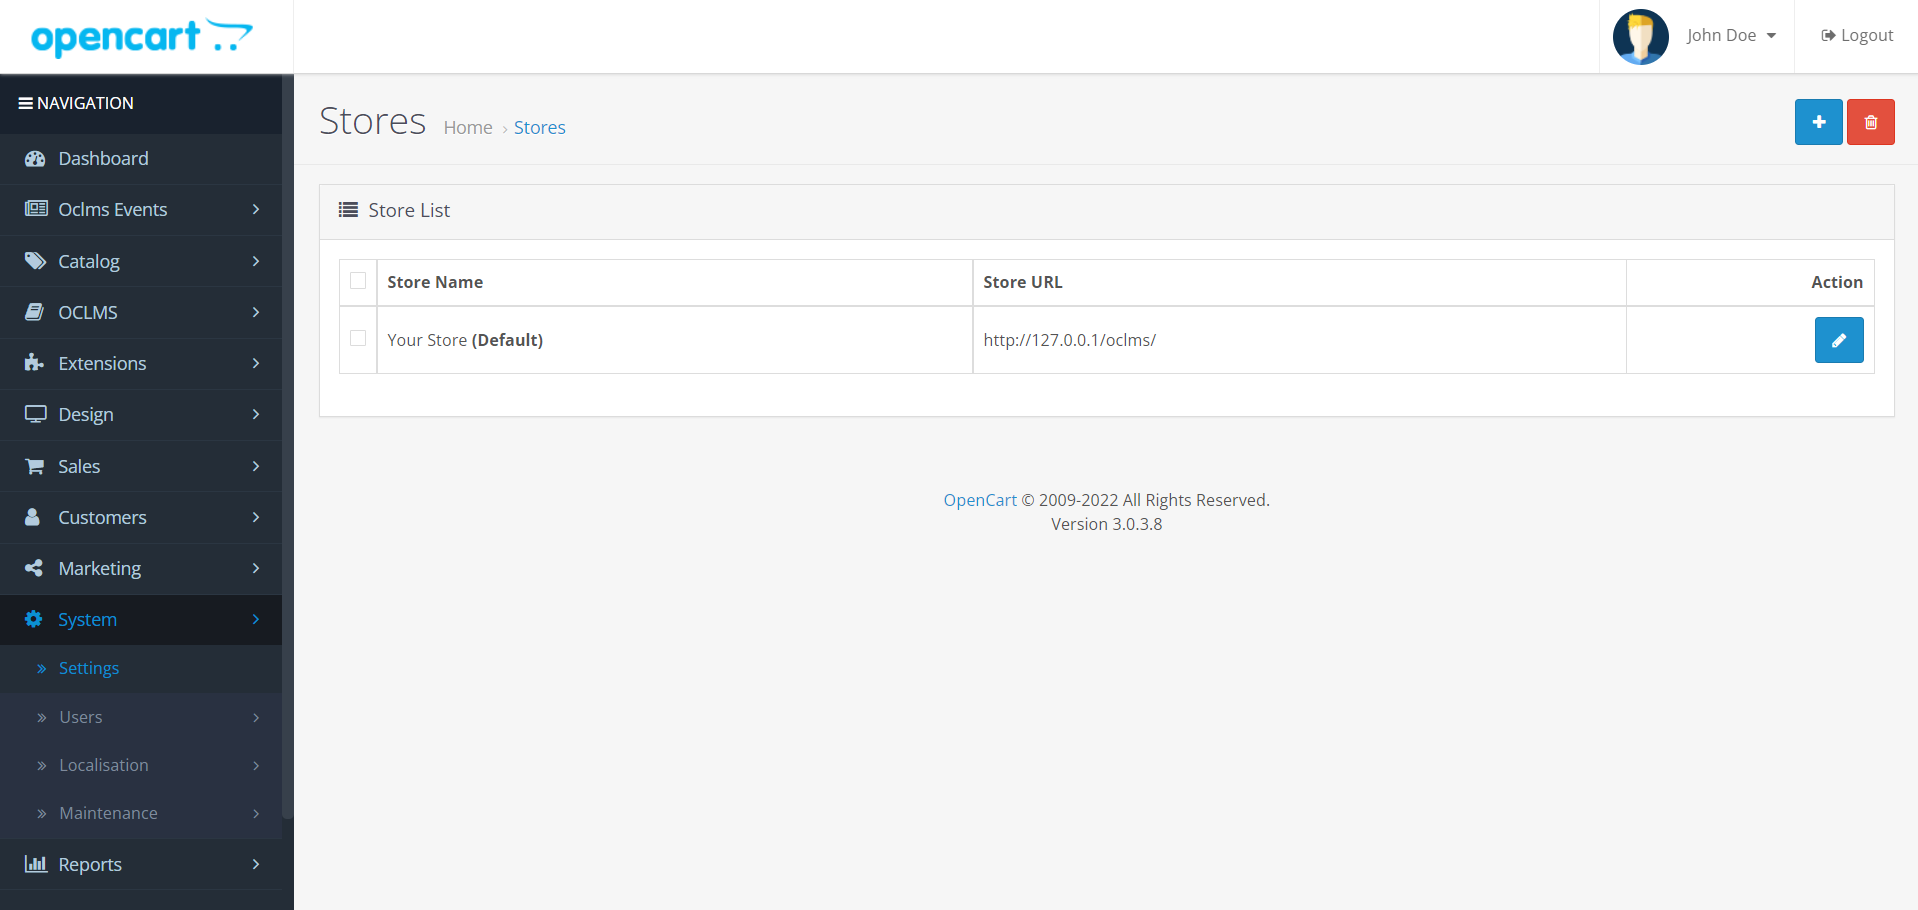
- Click the button for the store where the oclms module is installed to open the following page
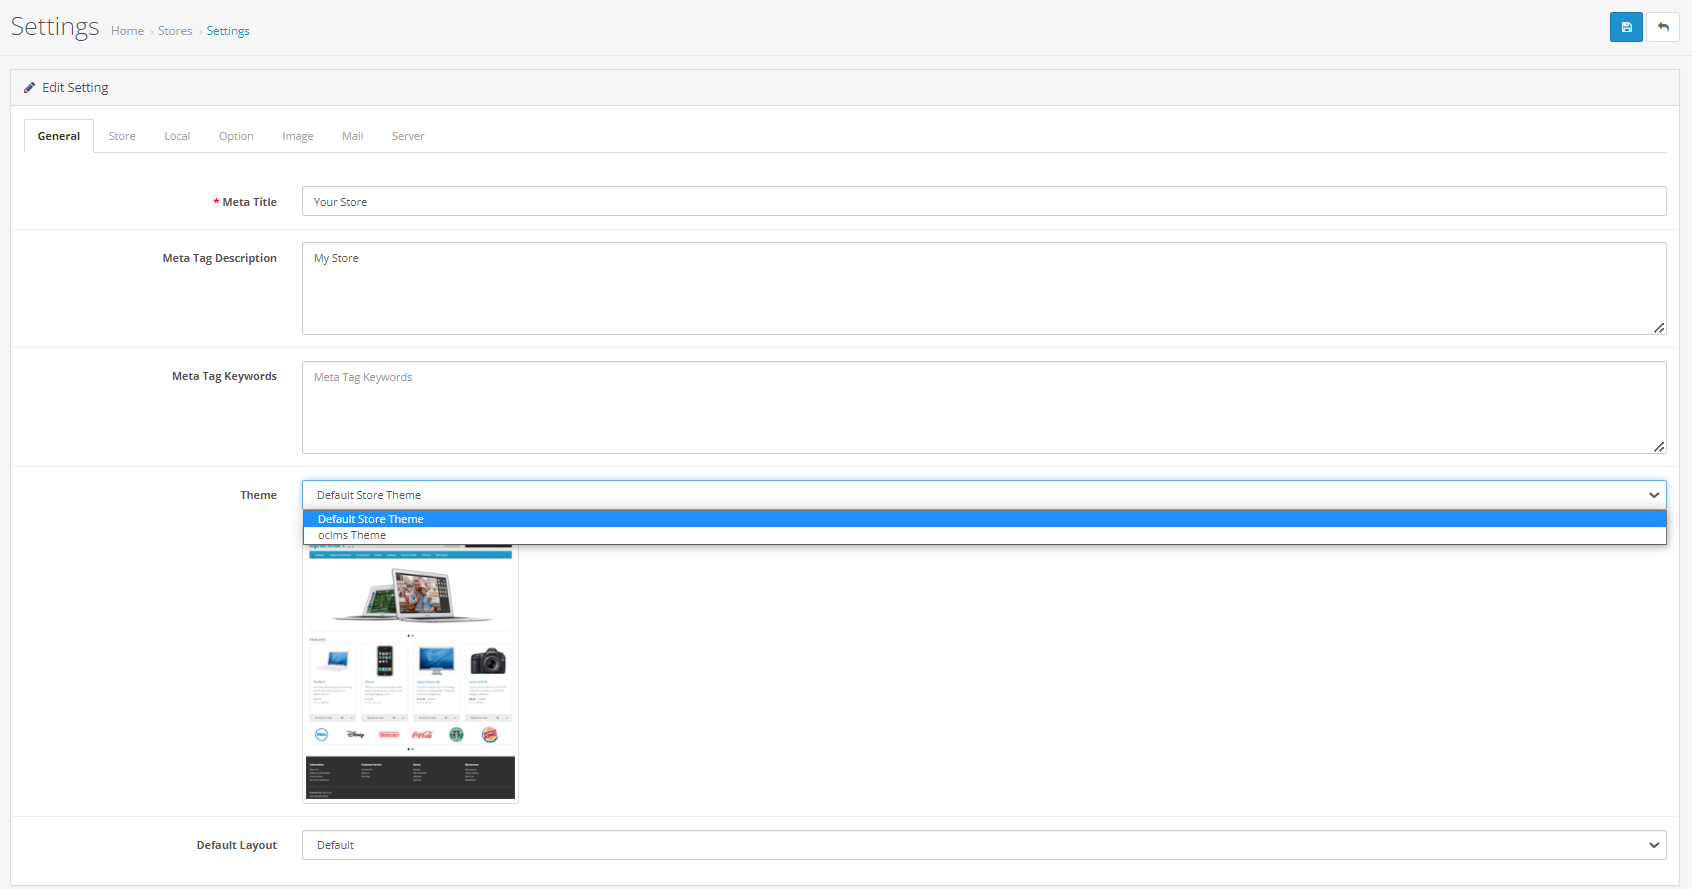
- As you can see in the image above, from the general tab of the theme list, you can select your theme name to complete the theme installation process, then click the save button.
- Go to the Home page of the website to see the changes made by the installed theme.
- If you rather to have complete featuers of OCLMS THEMES (like Html contents , Oclms Modules , Products and ...) Edit your installed Theme and in the top right of page click on the IMPORT DEMO button.
Client side users
1.Students
Course
On the home page, users can view the products of the website. The products in this store are divided into three categories: store products, courses and quizes.
Below you can see a row of website products.
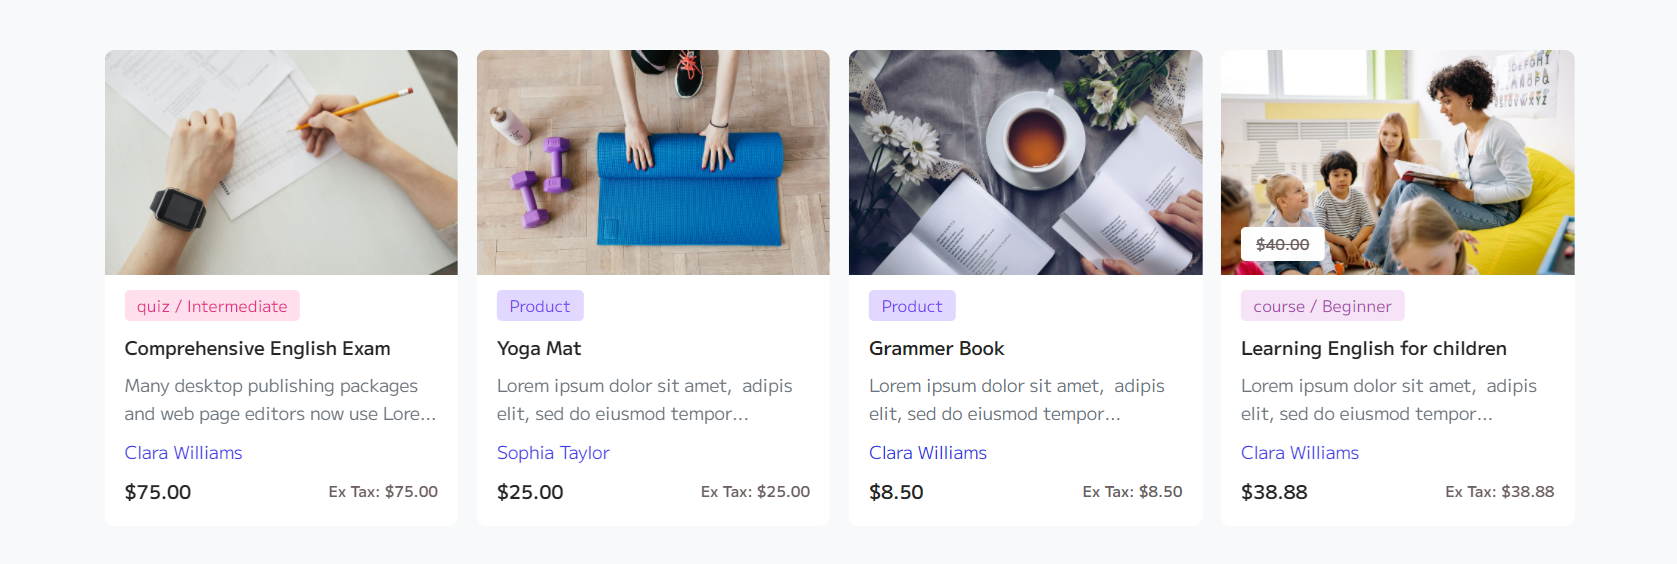
Above, there are all three types of products, and next to them, the level of each product is also specified.
As you can see, the name of the instructor is also written for each product
By clicking on the name of the instructor, you can see the information and other products of that instructor.

If you want to buy or join a course, after clicking on your desired course, you will be taken to the following page
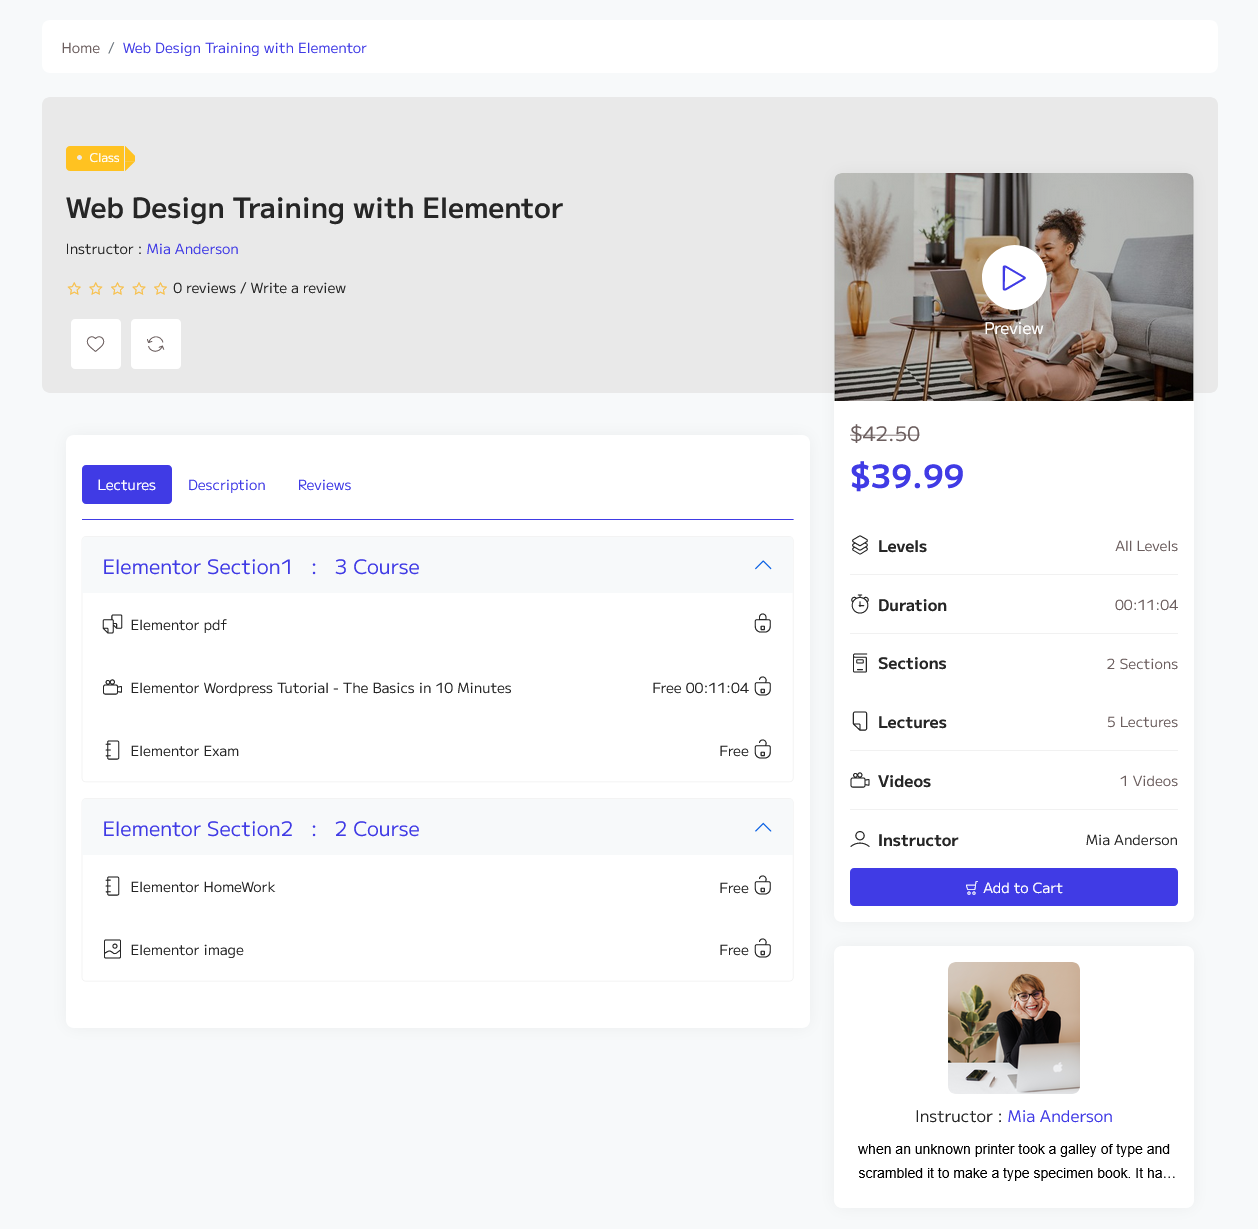
Each course can have a video preview for its lessons.
Each course can have several sections, each section can include several lessons, exams and home works.
Each lesson can be of the following types:
- Video : YouTube, Vimeo, HTML5
- Document
- Image
And Each lesson can be free or paid.
Below the preview video you can see the following information about the course:
- Levels
- Duration : Total duration of course videos
- Sections
- Lectures: Number of all lectures in this course
- - Videos : Number of all videos in this course
- - Instructor
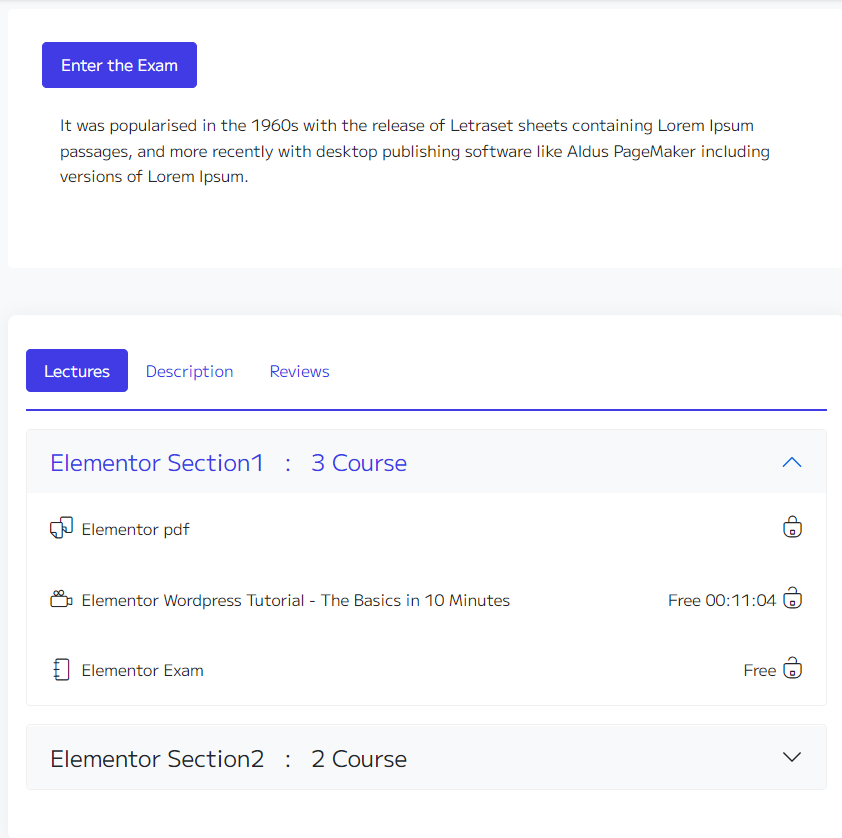
In the following, we will examine how the lessons are displayed
Pdf: If the type of lesson is pdf, After enrolling the student in the course, a PDF file will be displayed in the download account.
Document: Document files are just like PDF files.
Video: If the lesson type is video and the video is free, it will be played as shown below.
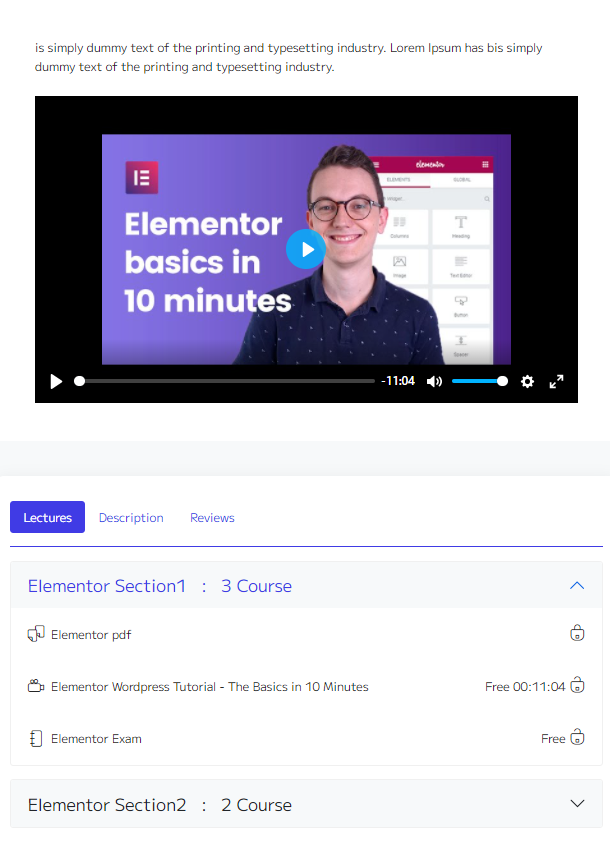
Image: To display the image lesson, just like the video, just click on that lesson to display the image as shown below.
Exam: If the lesson is an exam, after clicking on that lesson, a button to enter the exam will be displayed as below.
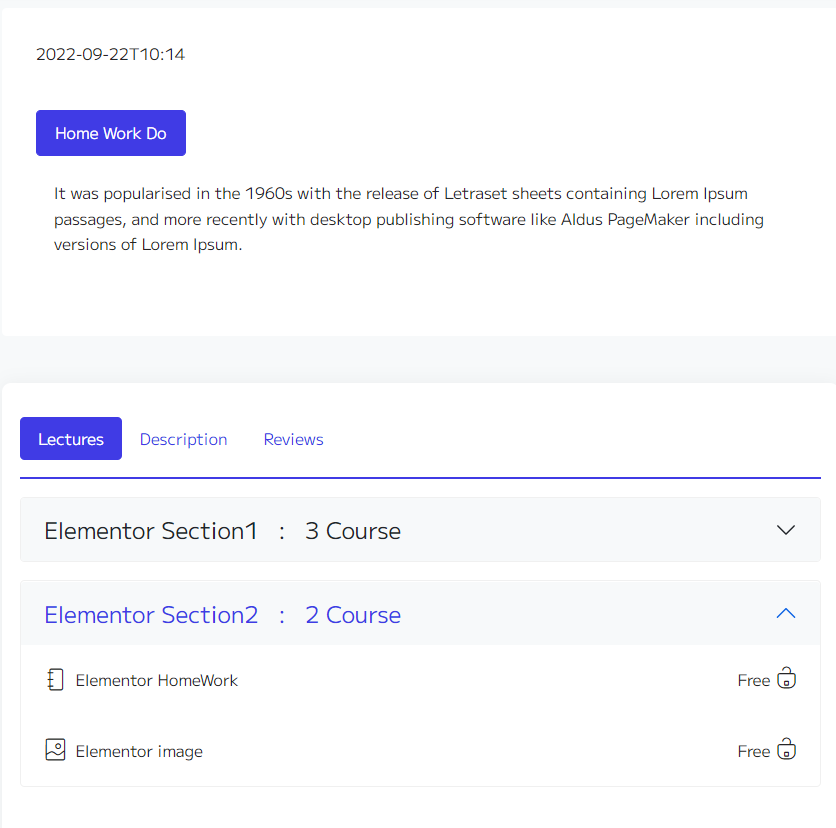
Homework: If the lesson is an homework, after clicking on that lesson, End date of homework and a button to do the homework will be displayed as below.
Students can register in OCLMS and login to their student account like normal Opencart users.
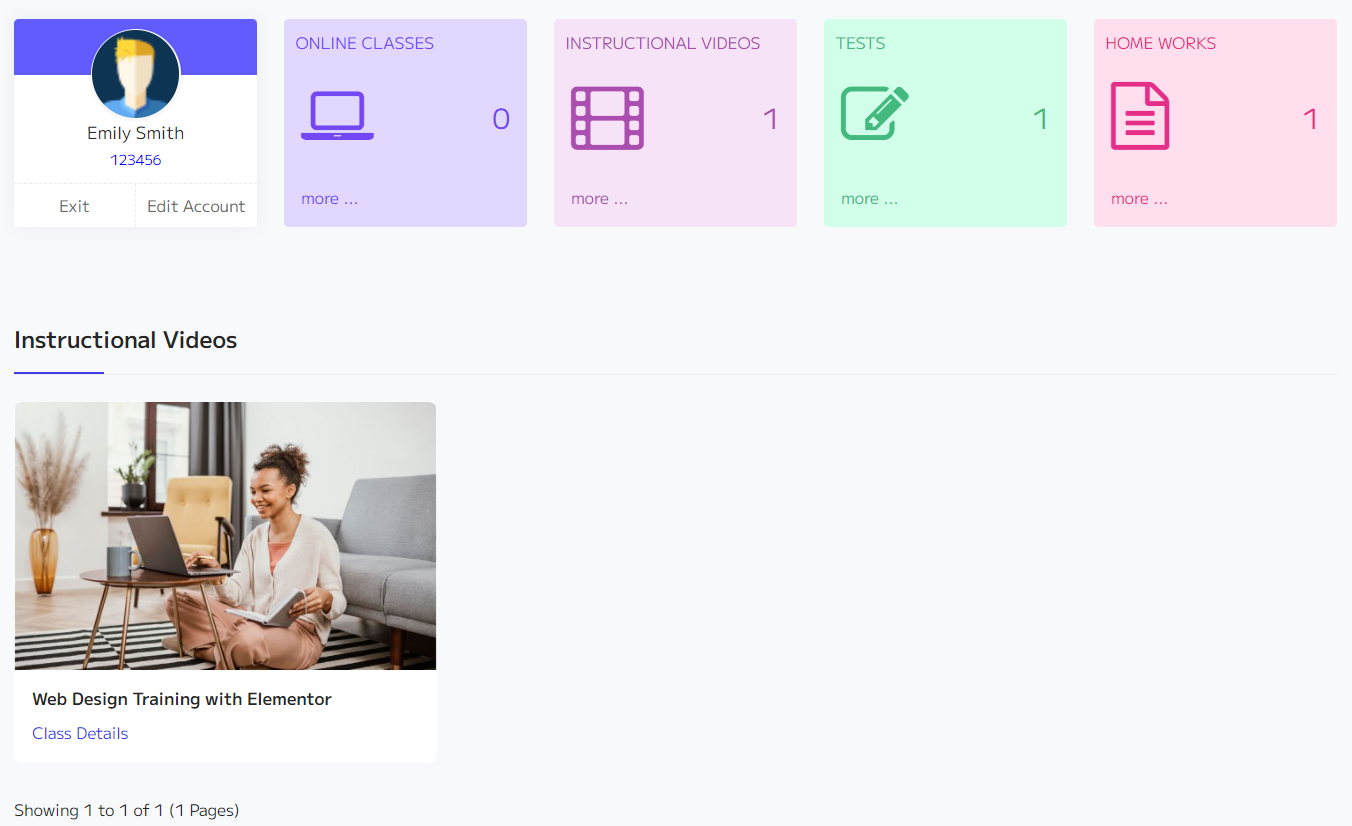
After login, the student enters the following page.

In this page, you can see the student information and next to it, you can the courses and exams of courses and homeworks of courses that student has enrolled in.
Instructional Videos:
If you click on this section, you will see all the courses that the student has enrolled in, and by clicking on each course, you will enter the course page.
Tests :
If you click on this section, you will see all the exams of courses that the student has enrolled in, and by clicking on each exam, you can enter the exam or see the exam report.
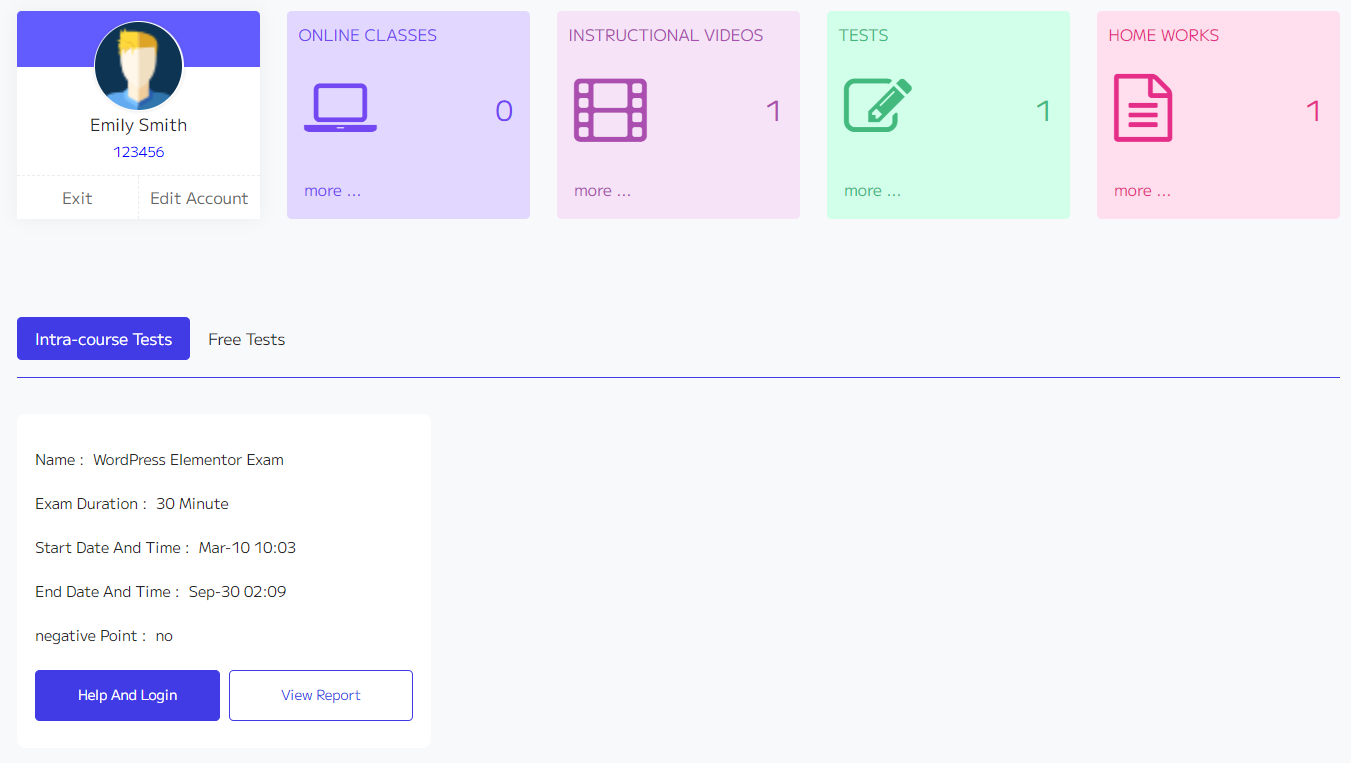
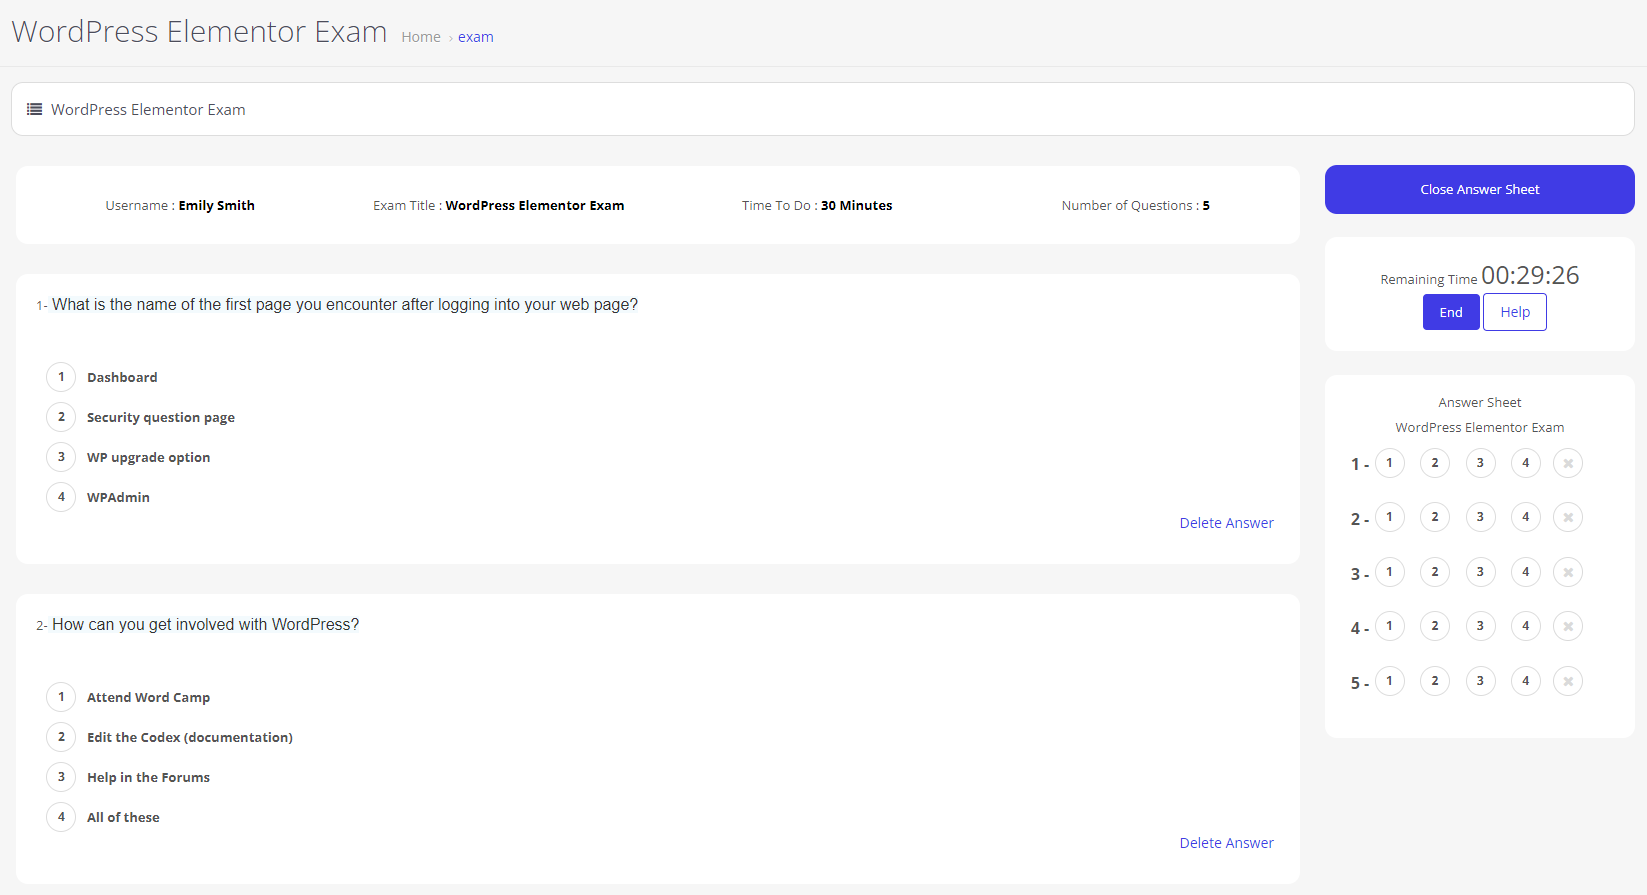
You can click the Help And Login button to take the exam.
After clicking on the Help And Login button, you will enter the following page.

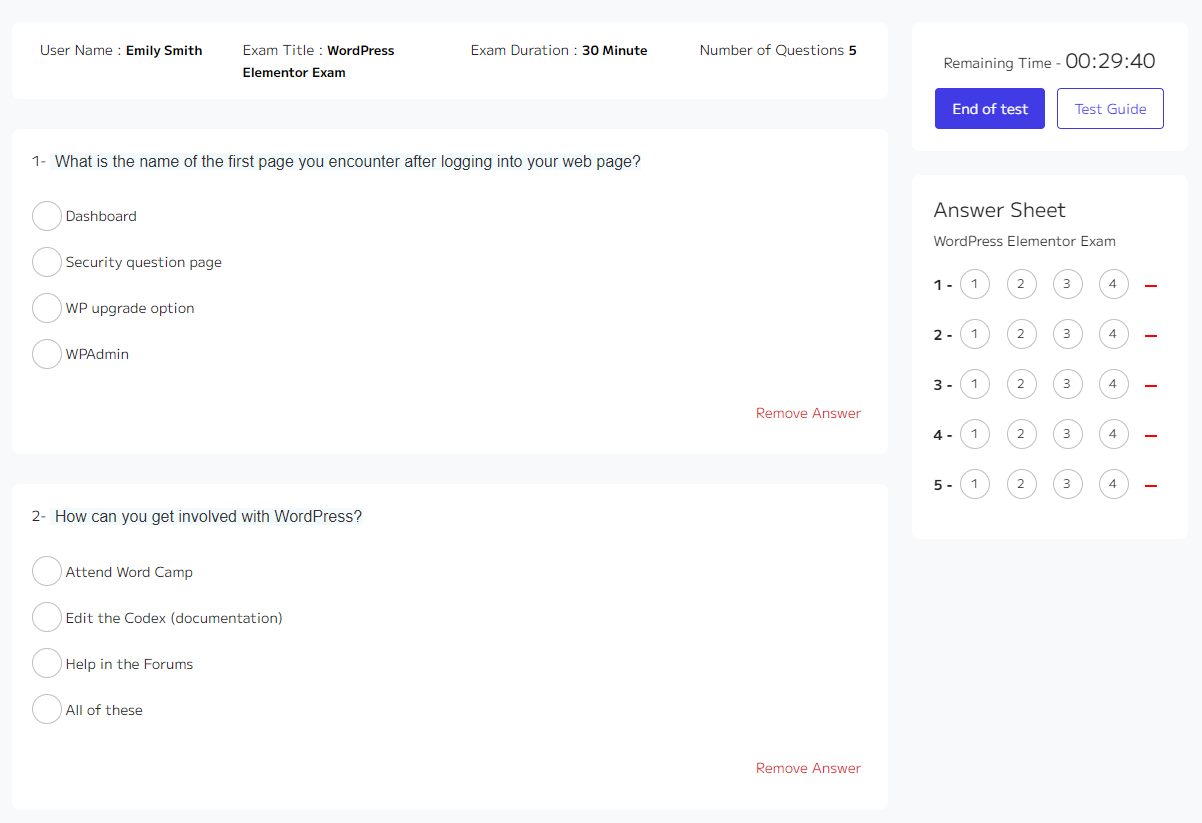
You can start the exam by clicking the Start Exam button.
After clicking on the Start Exam button, you will enter the following page.
After answering the questions and the end of the test, if the repeat of the exam is on, you can take the exam several times until the end of the exam and see the report after the end of the exam, but if the repeat of the exam is off, you can see the report immediately after the exam.
You can see report page bellow.
The exam report page contains five tabs.
Report Tab:

The report tab includes the number of questions, right and wrong answers, and the student's score on the exam.
Key Answer letter Tab :
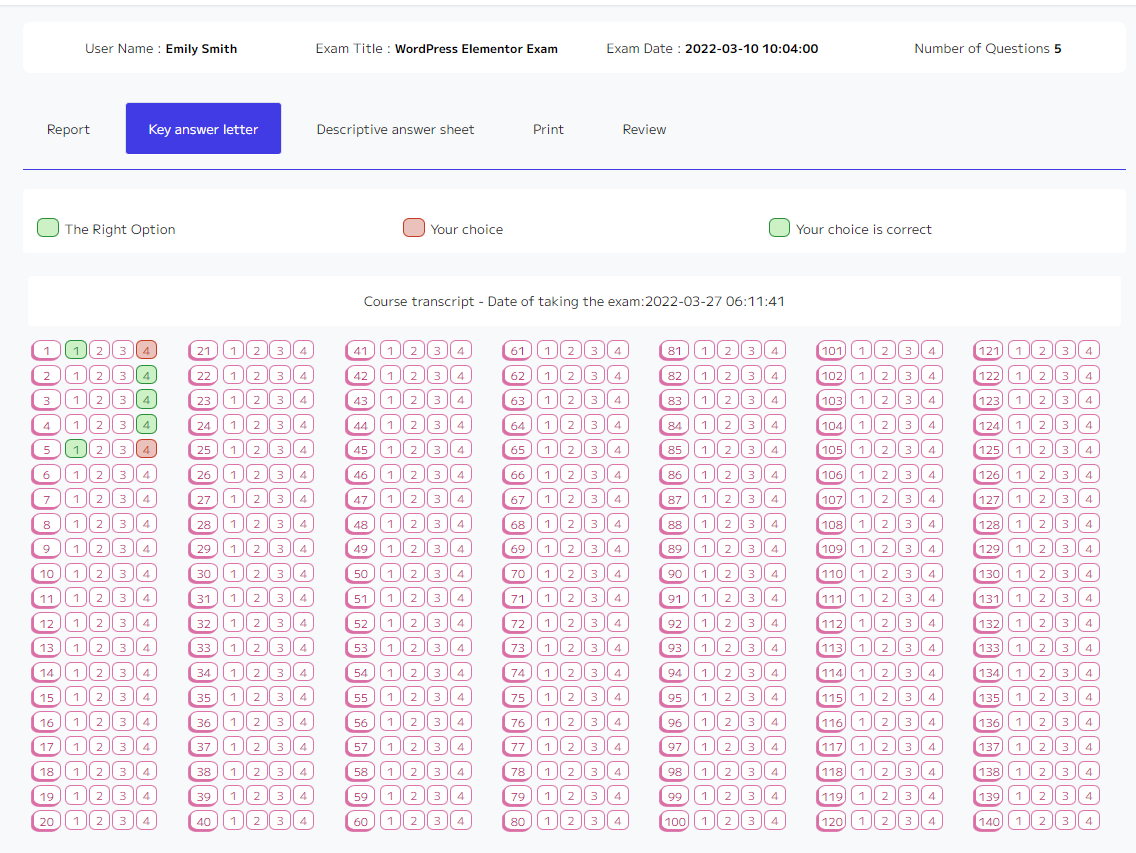
The key answer sheet displays the correct four-choice answers as the key letter.
Descriptive answer sheet Tab :
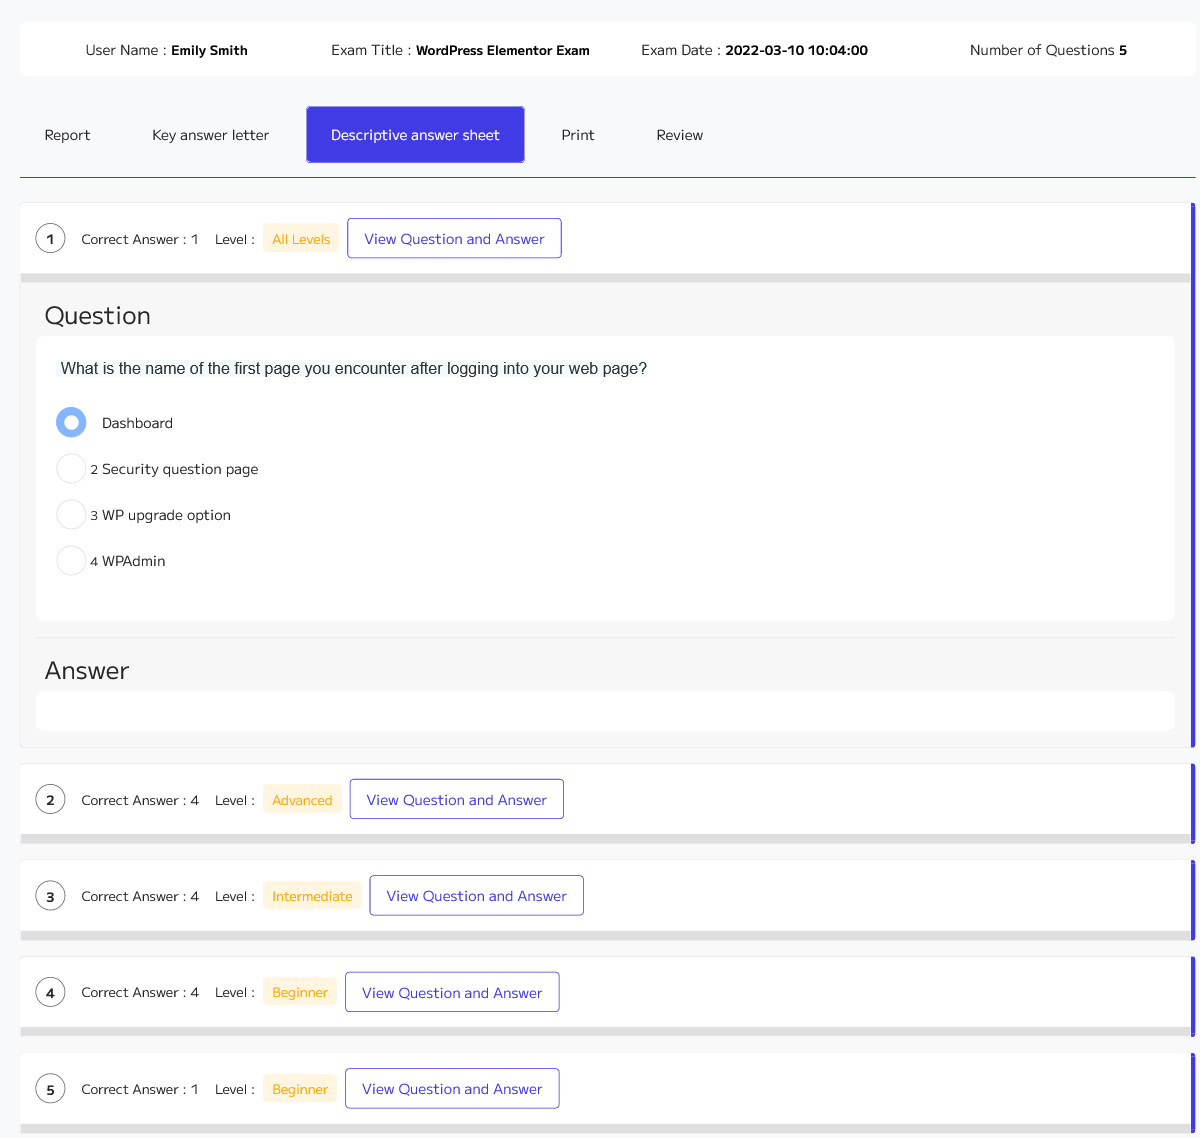
This tab showed questions and answers in four-choice and Description.
Print Tab:
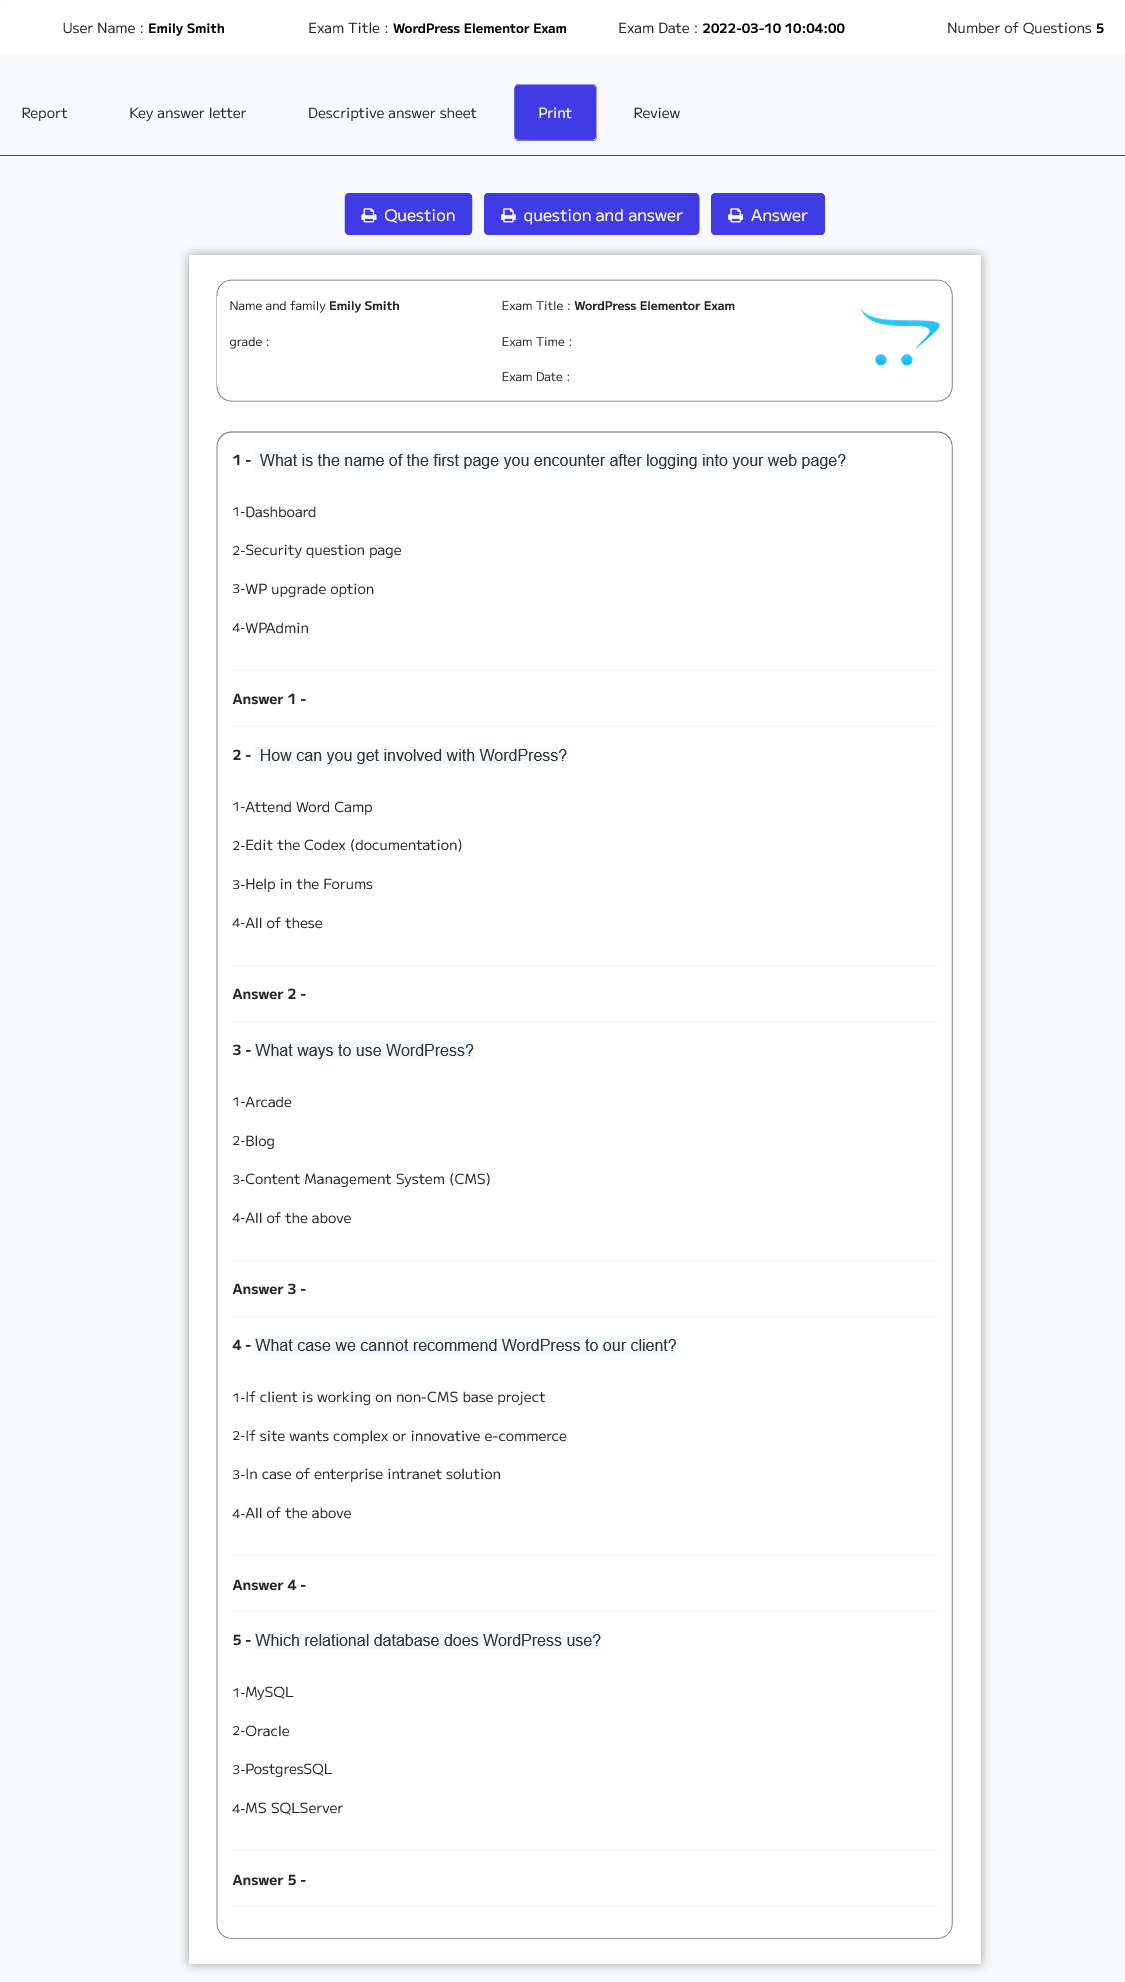
In this tab, you can print the exam sheet.
Review Tab:
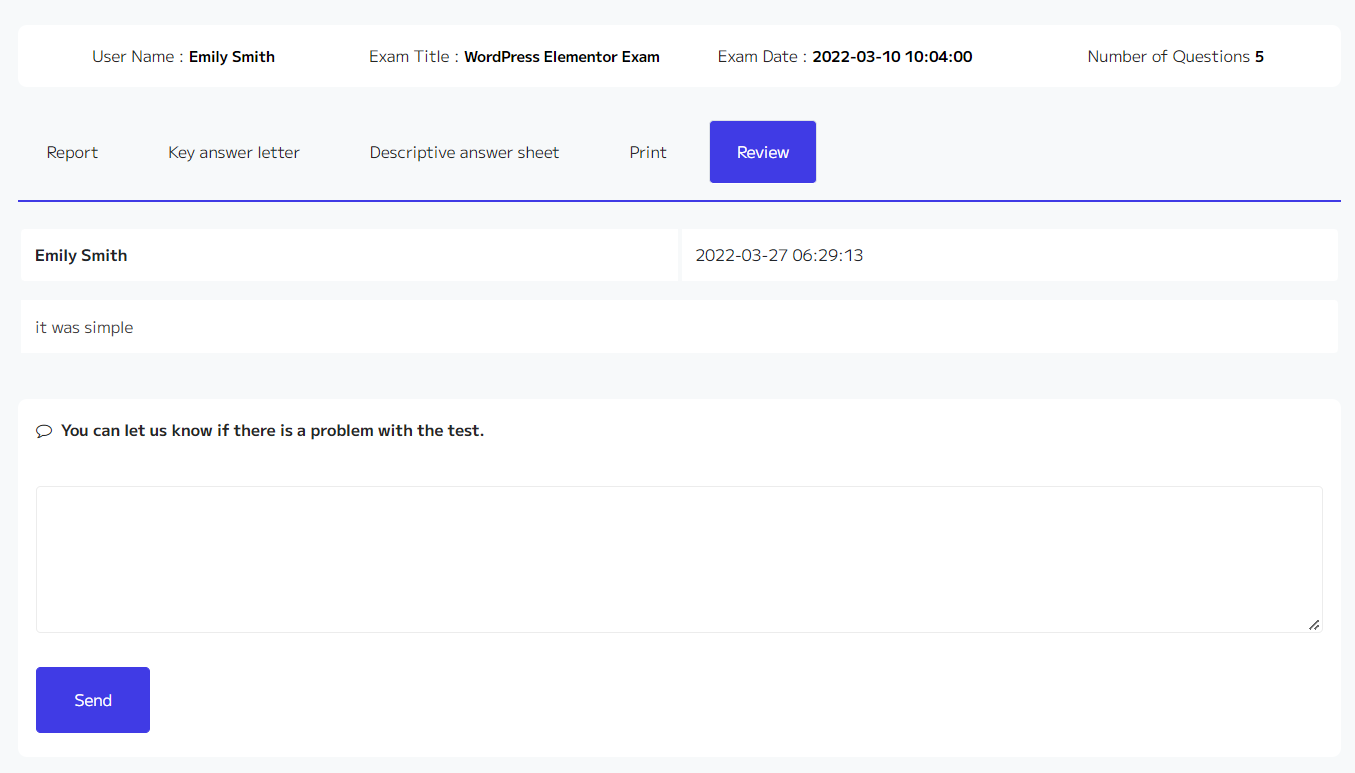
Exam reviews are displayed in this tab and you can add your review in this section.
Home Works:
If you click on this section, you will see all the Homeworks of courses that the student has enrolled in, and by clicking on each theme, you can send your homeworks that you have done.
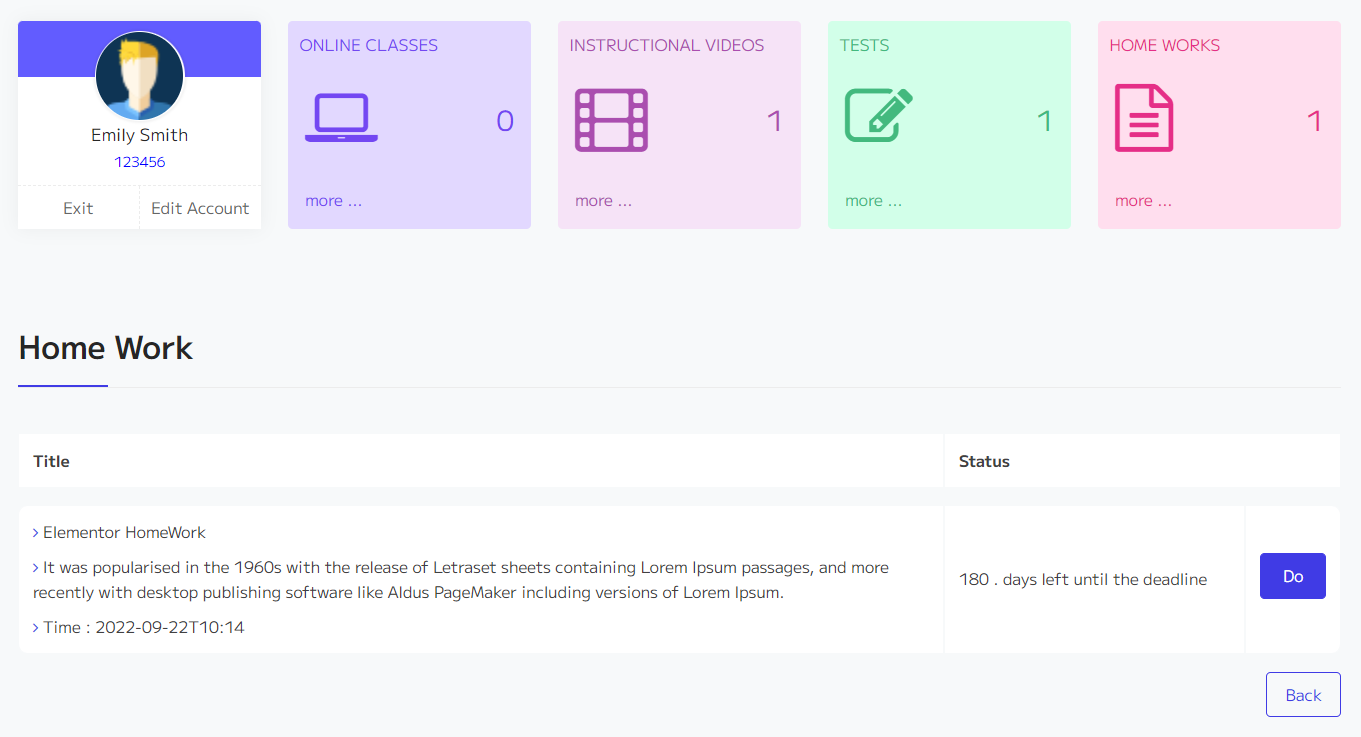
You can submit your homeworks by clicking the Do button.
After clicking the Do button, you will enter the following page.
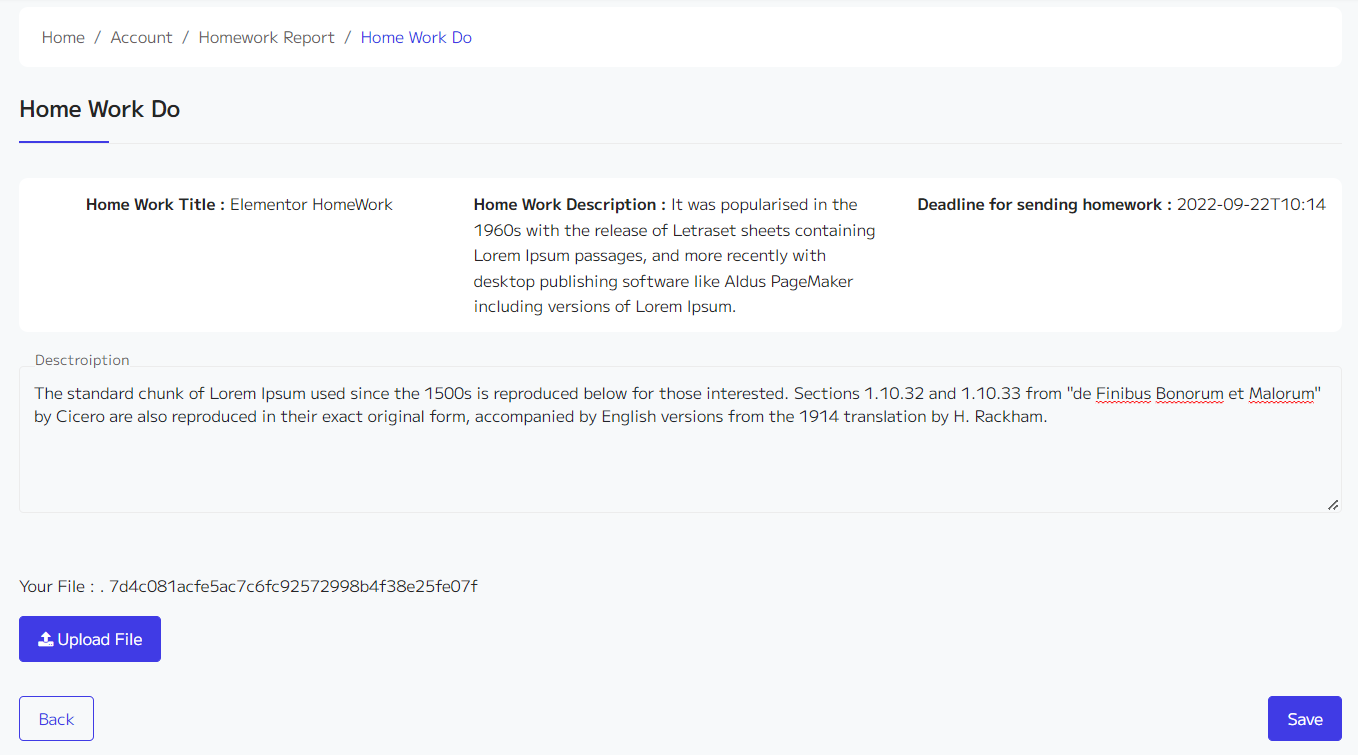
You can submit your homeworks as descriptions or pdf file.
Messages :
Students can contact instructors by sending a message in oclms.
You can enter the message page by clicking on the message in the account menu.
You will see the message page bellow.
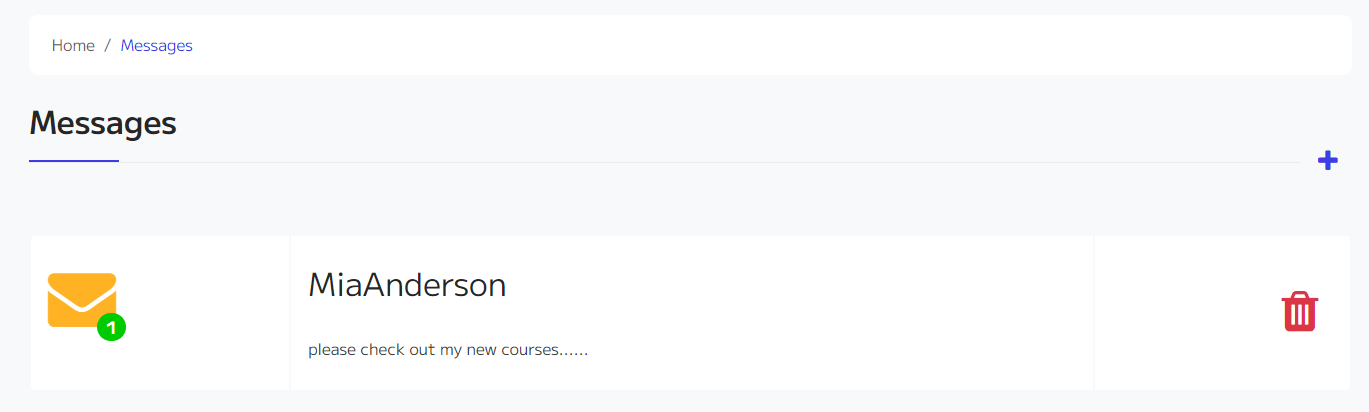
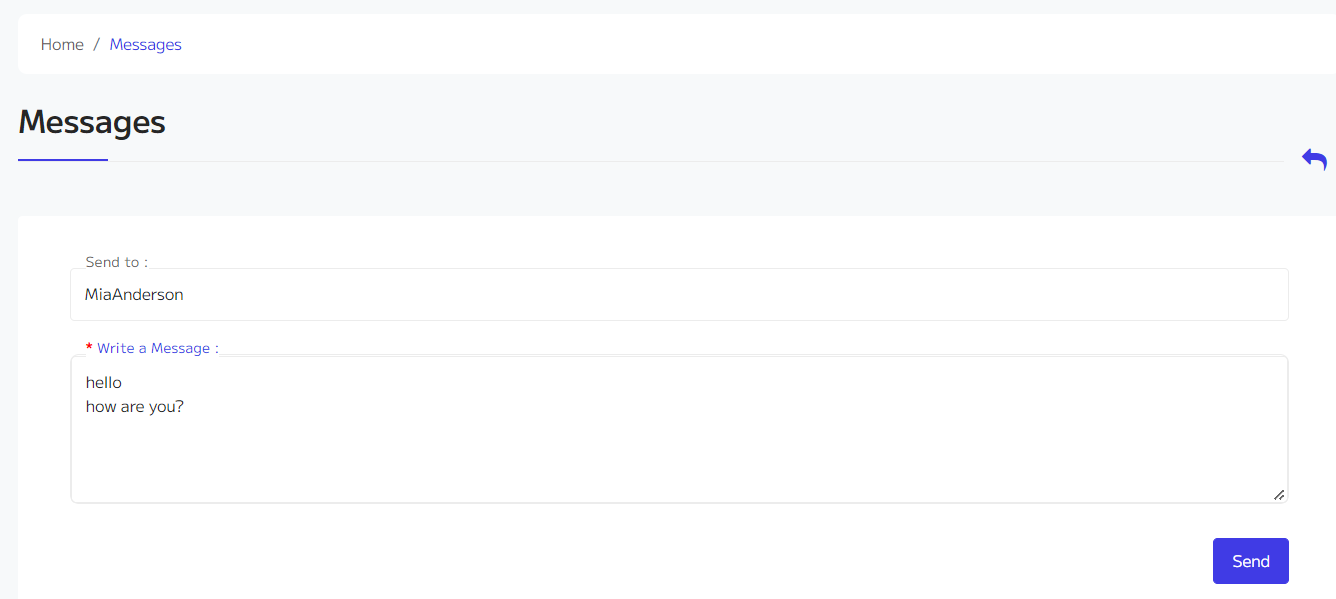
You can send a message to your instructors by clicking the + button.
After clicking the + button, you will be redirected to the following page.
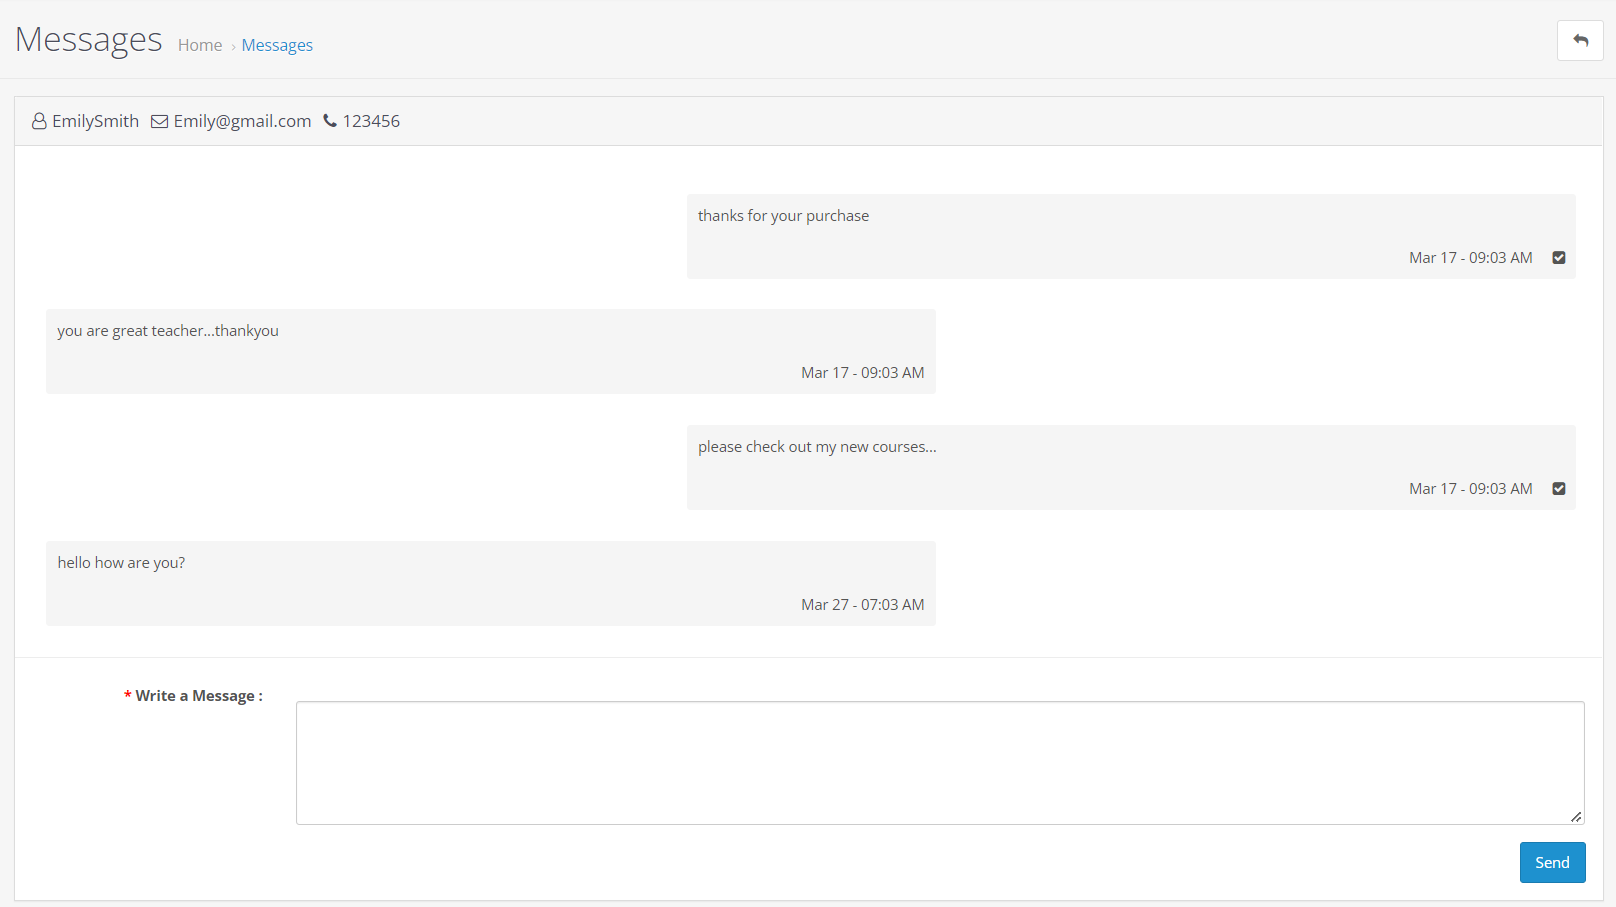
After sending the message to your desired instructor, a list of your sent and received messages will be created as follows.
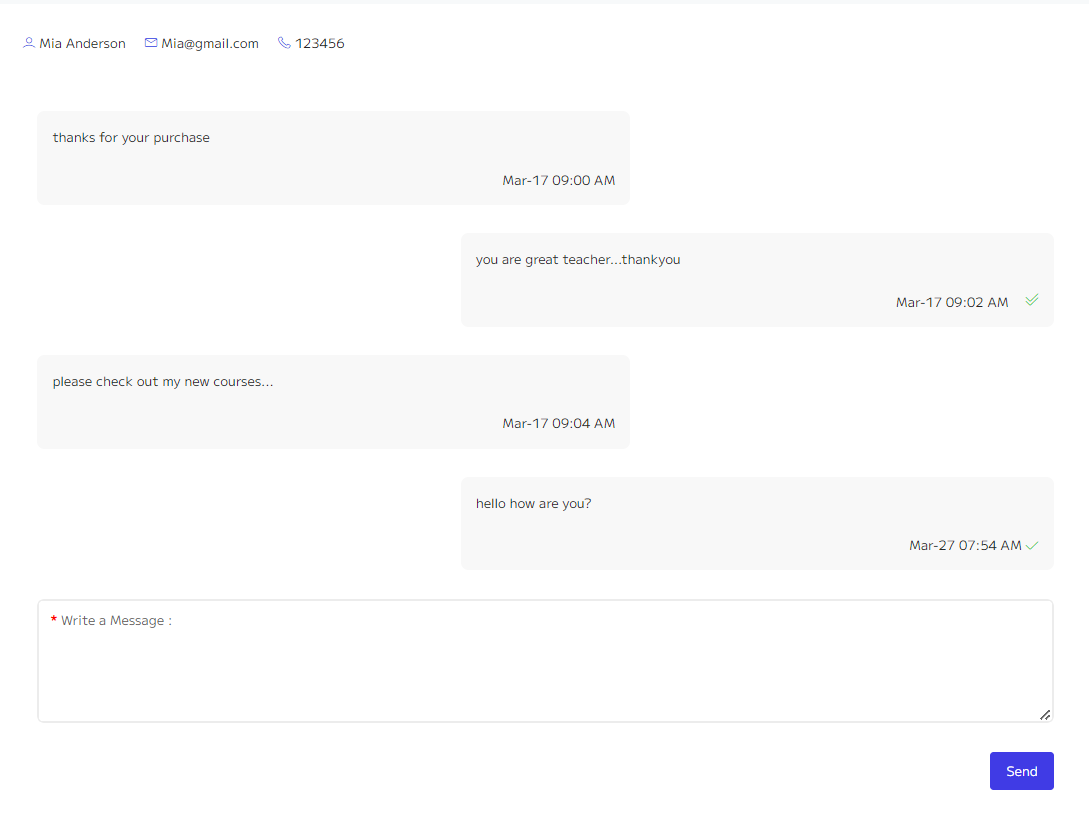
After sending the message, if the instructor has read your message, that message will be displayed with double check, and if the message has not been read, that message will be displayed with single check.
2.Instructors
If users want to register as an instructor, they can click on the Become an Instructor button at the header, such as below, to enter the registration page.

After registering as an instructor, you must wait for approval from admin.
After approval by admin, the Become an Instructor button becomes the dashboard button and by clicking on the dashboard button, you will be directed to the instructor panel.
- Instructor’s Dashboard :
Each instructor's dashboard includes the instructor's products and courses, students, orders, and sales.
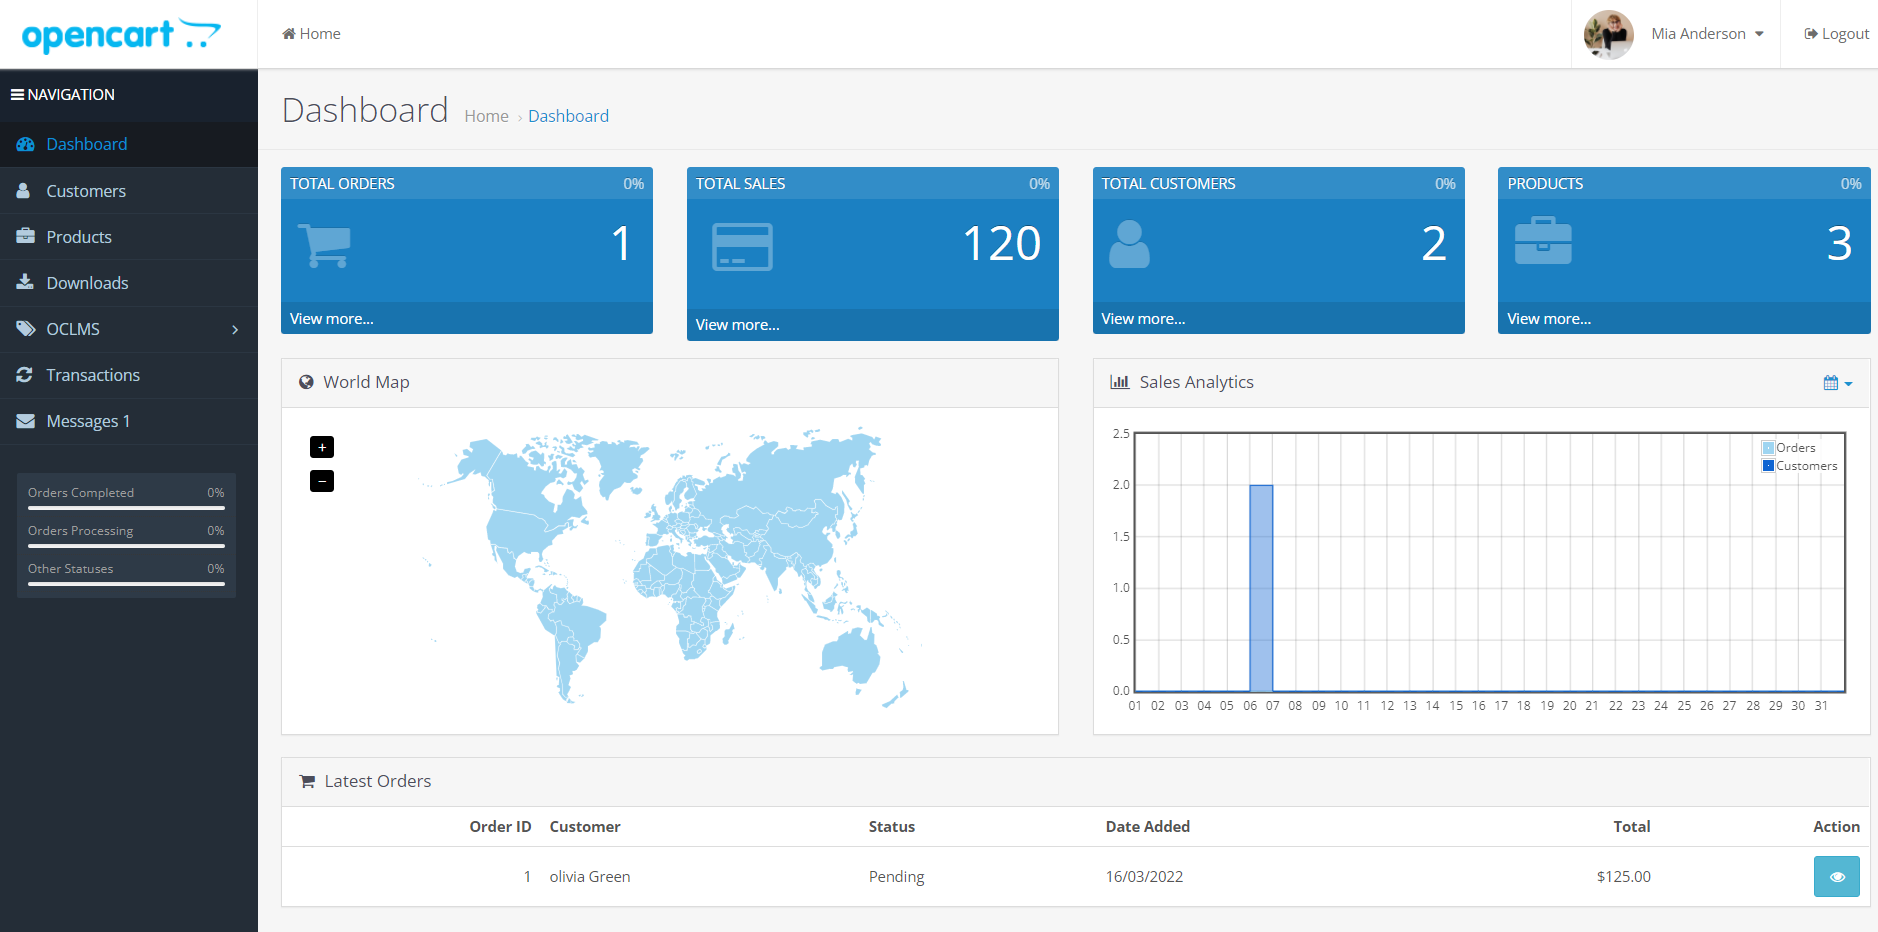
If the admin is intended for commission instructors, by clicking on the totalsales section, you can see the instructor's sales by considering the commission like bellow.
Instructor’s Customers:
On this page, like the image below, you will see a list of all Instructor’s customers.
This list displays the information of Instructor’s customers.This information includes first and last name, email, user group, user registration date and user enabled status.if you click on the info button, information about the customer's courses will be displayed.After entering the customer info page, you will be faced with the following page.
There are 4 tabs on this page, the first of which is related to the customer's online coursesIn the next tab that you see in the image below, offline courses are displayed
Here is a list of courses that the user has purchased and you can edit the course by clicking on the name.
The next tab is the exam tab, which displays the exams related to the user's course lessons. You can see the image of this tab below.
In this section, the list of all user exams is displayed and by clicking on the exam name, you enter the edit exam page and you can edit the exam information.
There are two links, view and report, which you can enter on the exam page by clicking on the view option, and you can view the exam questions.
This section shows the exam page to the admin as it is displayed to the students.
The next column shows the answer sheet link, which is clicked to display the students' exam answers.
On this page, 4 tabs are displayed, the first tab of the exam report and the student's score is displayed.
The second tab is the key answer letter tab, which is displayed as a test answer.
The third tab shows the test questions and test descriptive answers.
The next tab is the review tab, which displays students' opinions about the exam. Admin can also add review for their exams.

Instructor’s Products:
three product models can be added within the site.(Products,Courses,Quizes)
- Product : There are products that can be sold and sent to the customer after registering
- Courses : There are products that are offered as a training course and can be offered online or offline.
- Quizes : There are tests that include one or more exams and are sold on the site.
A number of features for educational(course product) and test products have been added to the product form
For example, when adding a course product, in the image tab, you can add a video preview to your course, which is as shown below.

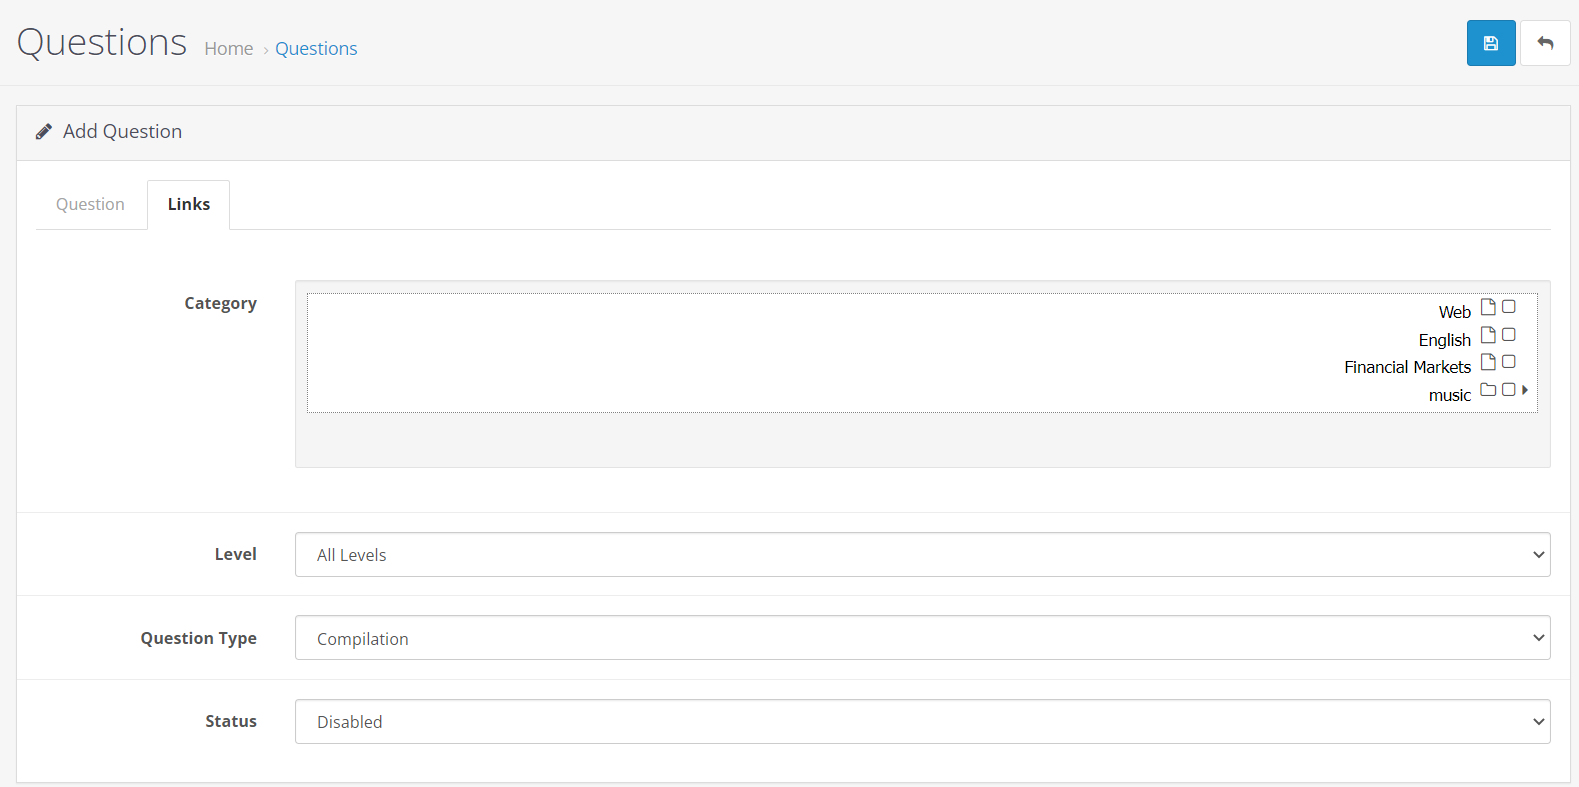
And when adding an exam product, in the links tab, an entry is placed like the image below, and you can select the Favorite exam from the exam list and sell it as a product.

After adding a course, the add lesson button is added to the course row (a green button with a + sign) .
After clicking on the addlesson button, you will enter the following page.

Each course can contain several sections and each section can include several lessons, exams and homework.
To add a section in the add section, write the name that you want and click the + button.
There are three buttons in the box for each section.
1.AddLesson : Lessons can contain several types of files
- Video : Which can be youtube, vimeo, html5
- Pdf,document: Calls the files in the downloads section
- Image : Uploads photos to the project filemanager.
After clicking on the addlesson button, the following box will open:

2.AddHomework : you can define a set of homework for each course for students to do and register in their account as a description or pdf file and you can watch.
After clicking on the addhomework button, the following box will open:
You can enter the title homework in the summary field and specify the end date of homework in the enddate field so that students can't submit their homework after that date.
3.AddQuiz : You can define different quizes so that your students can do them and the result will be displayed to you.

In this section, by clicking on the exam section, the exam list stored on the site will be displayed, and you can select one of the exams to be displayed in the students' account and to be able to participate in that exam.
Instructor’s Downloads:
Instructor downloads are like help downloads, and each instructor has its own download folder
OCLMS submenu:
Question Bank: Question Bank is divided into three parts
- Question Category
- Questions
- Import Question
Question Category :
This section lists the questions to be used in the exams.
To add a new category, click on the blue button with + sign to enter the following page.

If your category is a subset of another category, a list of other categories will appear in the parent section, and you can place your new category under another category.
Questions :
In this section you can define your exam questions.
In the image below, you will see a list of defined questions.
On the right side of this page there is a form where you can filter and search the questions you want using the options of this form.
Click the edit button to edit a question.
To add a question, click the blue button at the top left of the page with + sign to enter a page like the one below.

There are two tabs on this page, in the first tab we write the question and answer
In the Question section, the question is written, a little lower, you will see a + button with a blue color, which you must click on the number of options to add multiple-choice answer, and if you have a descriptive answer, write the answer in the answer description section.

In this tab, you can specify the category, level, type and status of the question.
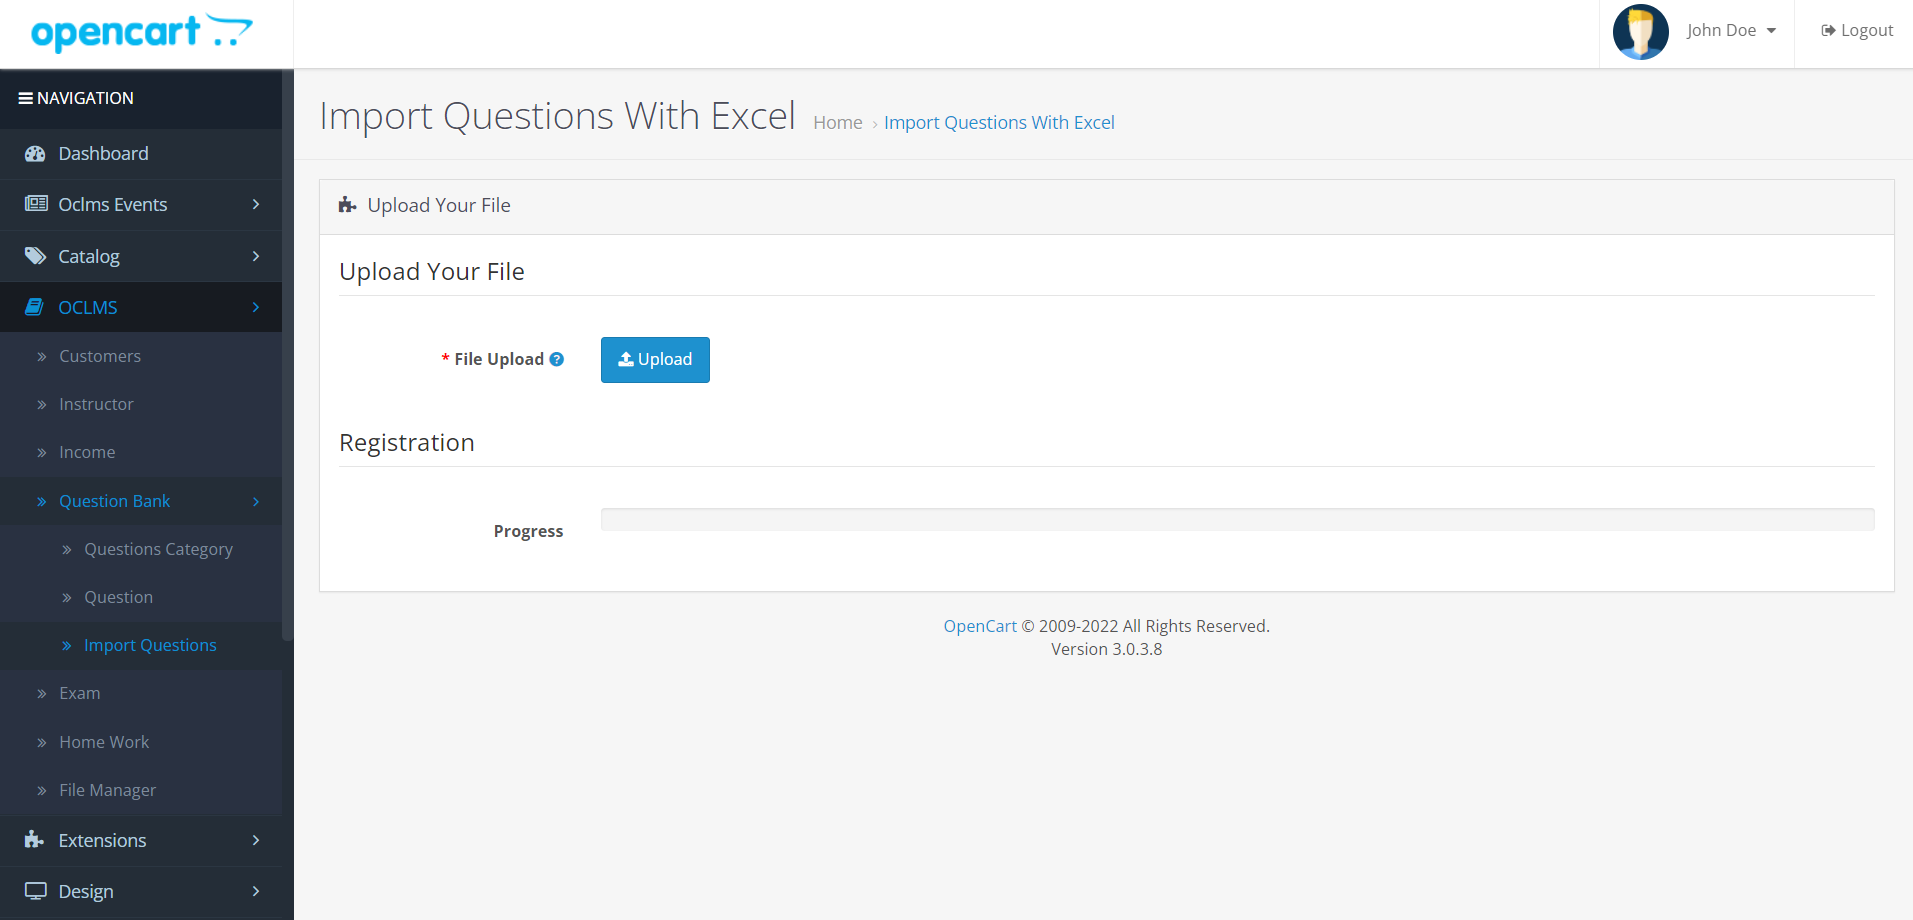
Import Question :
In this section you can enter the questions through the excel file.
On this page, by clicking the upload button, you can upload your Excel file and questions will be added.
Exam:
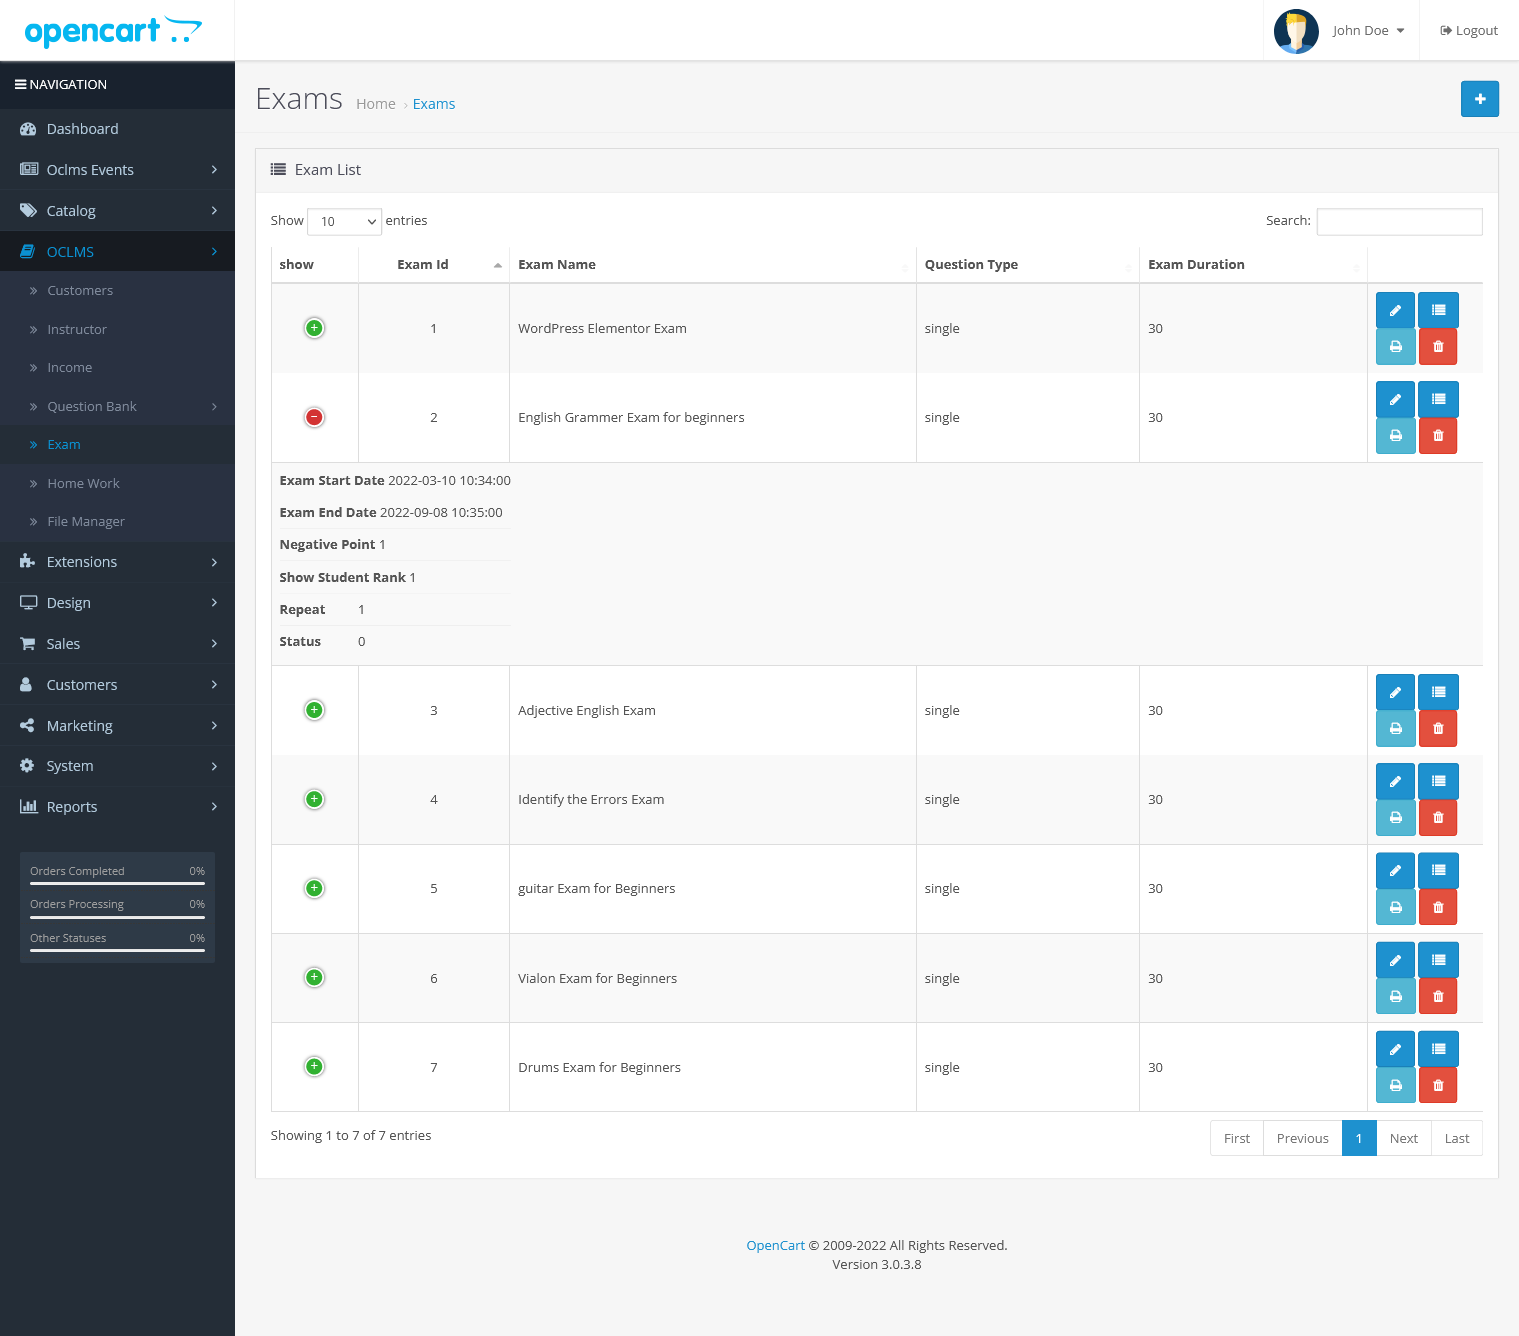
This page show a list of exams defined by the admin.
By clicking on the green button to the left of each row, as in the image above, you can see the details of each exam. On the right side of each row, you will see 4 buttons. By clicking on the Edit button, you can edit the exam.
Next to the edit button is the Report button, which displays the transcripts of the students who took the exam, as shown below.
In this list, by clicking on the view button of each row, you will enter the student report page.
On the exam list page, you can print the exam questions by clicking the print button.
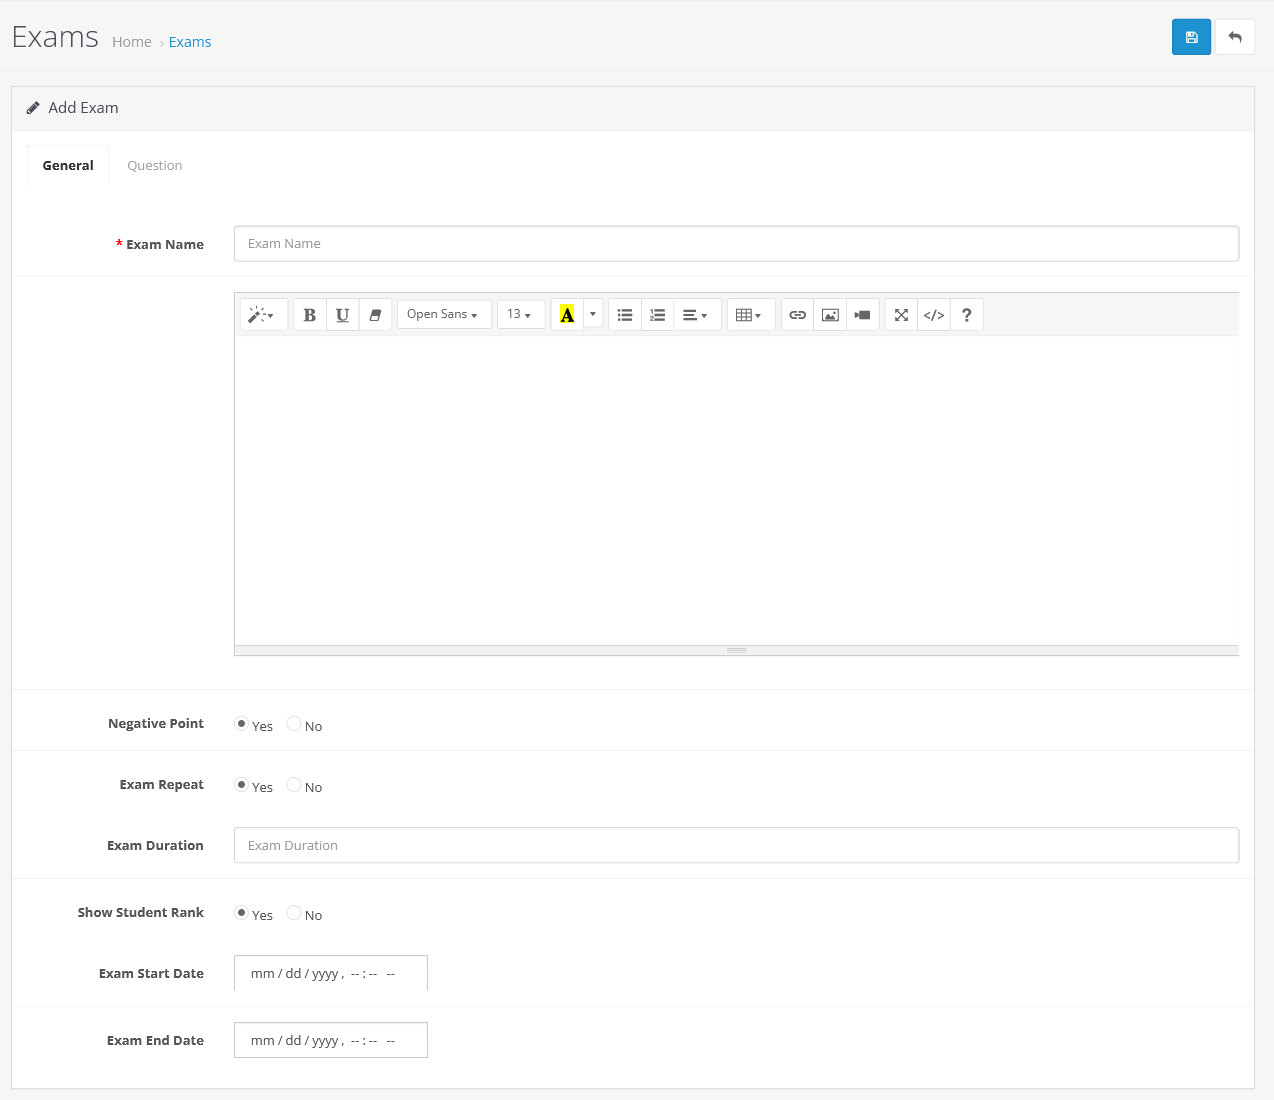
To add a quiz to the Exam list page, click the add option at the top right of the page to enter the following page.

This page contains two tabs that the first tab that you see above specifies the name, description, settings and start date of the end of the exam.
In the second tab that you see below, you can add exam questions.
There are two ways to add a question. The first way you see above is the pdf mode, where we enter the exam questions from the question image section, and for the answers in the add Question section, you enter the number of questions, and on the left button of this input, which Click on the specified file to create a 4-choice row for the number of questions you have, and add the correct answers in these rows.
The second way is to add individual questions, which you can see below.

In this section, there are two modes. The first mode is addquestion, which by clicking on this option, you will enter the Questions page, and you can add your desired questions directly and enter the exam.
The second way is to use the questions that have been added in the questions section. To do this, you must click on the question bank button to open your sub-box.

Any question you need in your exam can be added to your exam by clicking the green button with a check mark in each row.
- Instructor’s homeworks :
This page lists all the defined homeworks.
By clicking on the action of each task, the list of students who have done that task will be displayed along with the download file uploaded by the student as shown in the image below.
By clicking on the file button, you can download the student’s uploaded file.
Instructor’s Transactions :
Admin deposit amounts for the instructor are displayed in the list of transactions on this page.
You can see instructor’s transaction bellow.
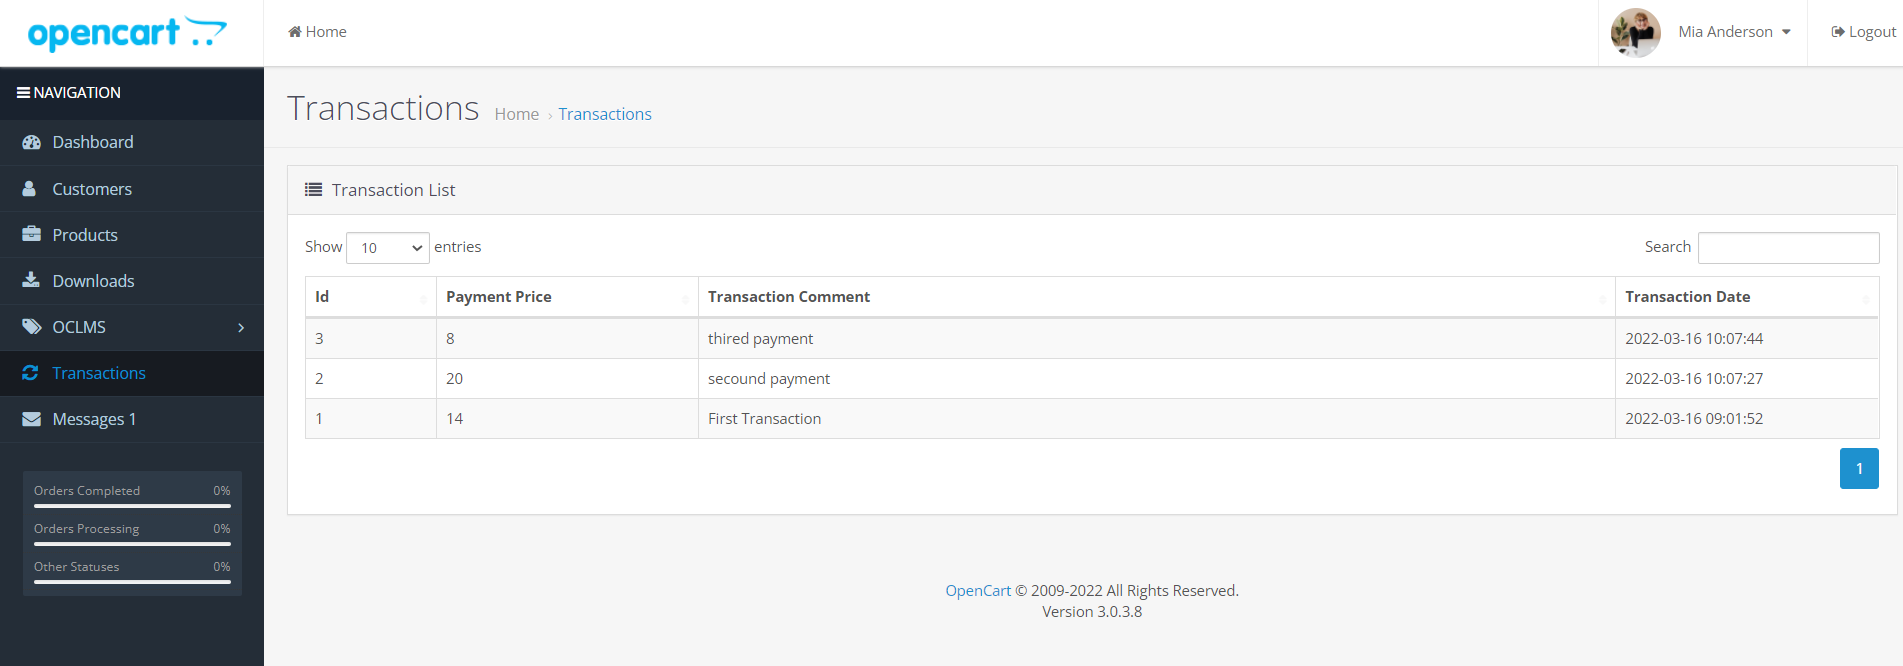
This list includes payment amount, comment and payment date.
Instructor’s messages :
instructors can contact Students by sending a message in oclms. You will see the message page bellow.
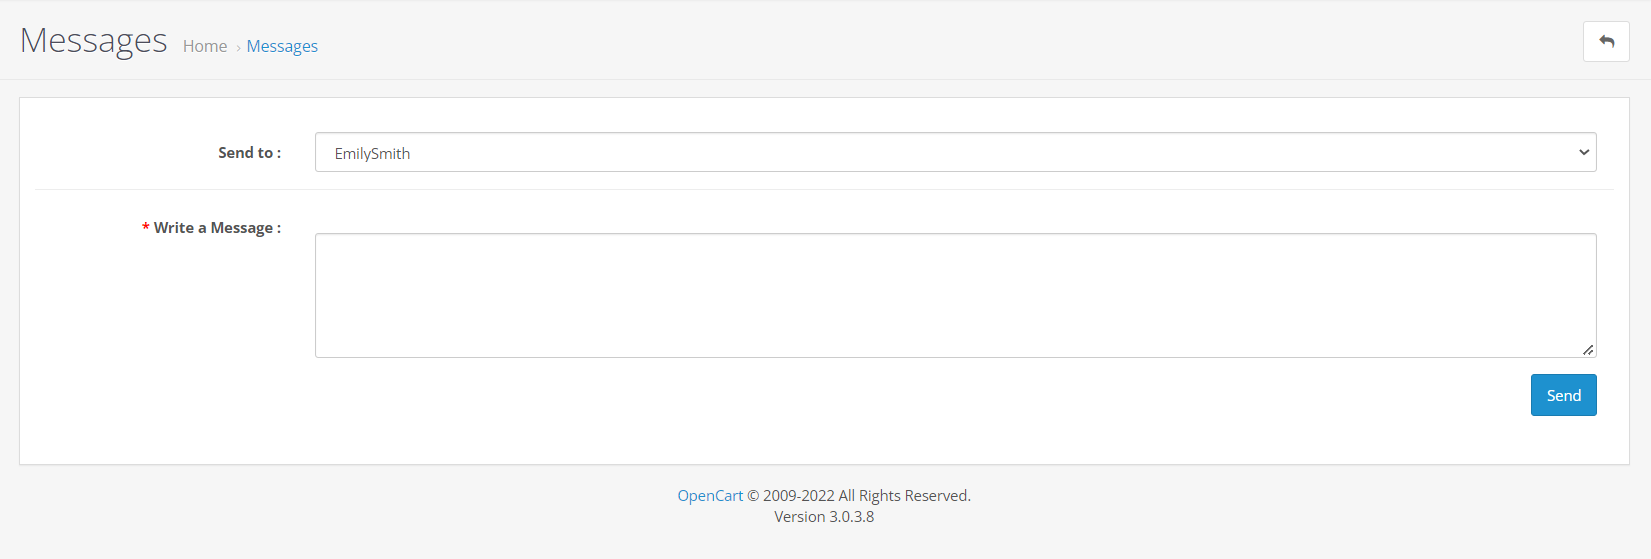
You can send a message to your instructors by clicking the + button. After clicking the + button, you will be redirected to the following page.
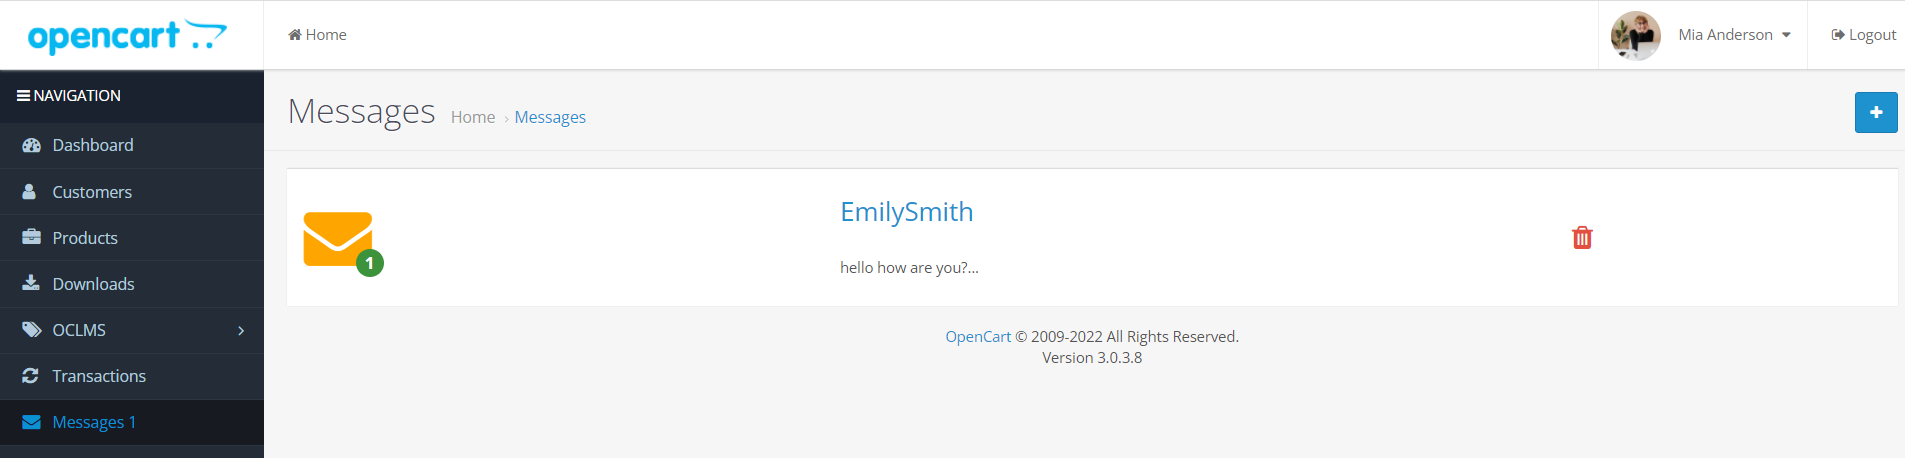
After sending the message to your desired student, a list of your sent and received messages will be created as follows.
After sending the message, if the student has read your message, that message will be displayed with double check, and if the message has not been read, that message will be displayed with single check.
Thanks for choosing us.
Copyright © 2022. Template has been designed by Retrina